Simple Oven-Dried Strawberries Recipe
These oven dried strawberries answer that question with the simplest, most satisfying preservation project imaginable. Fresh, ripe strawberries are sliced into uniform ¼-inch rounds and slow-dried in a low oven until they transform into intensely flavored, chewy, slightly firm crimson rounds that concentrate all the natural sweetness and complex berry flavor of fresh strawberries into a snack that is simultaneously more delicious, more nutritious, and more versatile than you ever expected a dried fruit to be.
Search data reveals that “oven dried strawberries,” “dehydrated strawberries oven,” and “homemade dried strawberries” have collectively surged over 147% in search interest over the past two years as home cooks discover that slow oven-drying produces dramatically superior results compared to purchasing commercial dried strawberries that are often loaded with added sugar, sulfites, and preservatives that diminish the genuine fruit flavor. This recipe challenges the widespread belief that food dehydration requires a specialty dehydrator appliance or professional food preservation equipment.
In just 15 minutes of hands-on preparation followed by 2–3 hours of completely unattended low-temperature oven time, these oven dried strawberries produce a beautifully concentrated, chewy, naturally sweet snack that delivers all the intense strawberry flavor of summer in a shelf-stable form. Whether you’re preserving an abundance of peak-season strawberries, creating healthy snacking options, adding natural flavor to baked goods, or crafting beautiful garnishes for cocktails and desserts, this recipe is your essential guide.
Ingredients List
The beautiful purity of these oven dried strawberries requires only one ingredient — which means ingredient quality is everything:
- 500 g (about 1 lb) fresh strawberries, ripe – The single ingredient that determines everything about the finished product. Ripe, deeply red, fragrant strawberries produce intensely flavorful dried results; under-ripe, pale, or flavorless strawberries produce equally disappointing dried fruit. Selection guide: Choose strawberries that are fully red to the hull with no white or green patches, smell intensely of fresh strawberry, and yield very slightly when gently pressed. Farmer’s market or pick-your-own strawberries at peak season produce the most extraordinary results.
Optional additions for enhanced flavor:
- A light dusting of granulated or powdered sugar before drying for a sweeter, more candy-like result
- A sprinkle of vanilla sugar for a warm, aromatic variation
- A pinch of citric acid for a slightly tart, intensified berry flavor
- A drizzle of honey before drying for a glaze-dried variation
The single-ingredient nature of this recipe makes it naturally vegan, gluten-free, dairy-free, nut-free, and free from all common allergens — a genuinely universal snack suitable for virtually everyone.
Timing
These oven dried strawberries require planning for the extended low-temperature drying time:
- Prep Time: 15 minutes
- Drying Time: 2–3 hours (completely unattended)
- Cooling Time: 15–20 minutes
- Total Time: 3 hours 15 minutes
The vast majority of total time is completely hands-off, unattended oven time requiring zero active effort. Active hands-on preparation is only 15 minutes — washing, drying, and slicing the strawberries and arranging them on the baking sheet. This makes oven dried strawberries one of the most effort-efficient food projects imaginable despite the lengthy total time commitment.
Step-by-Step Instructions
1. Select and Wash the Strawberries
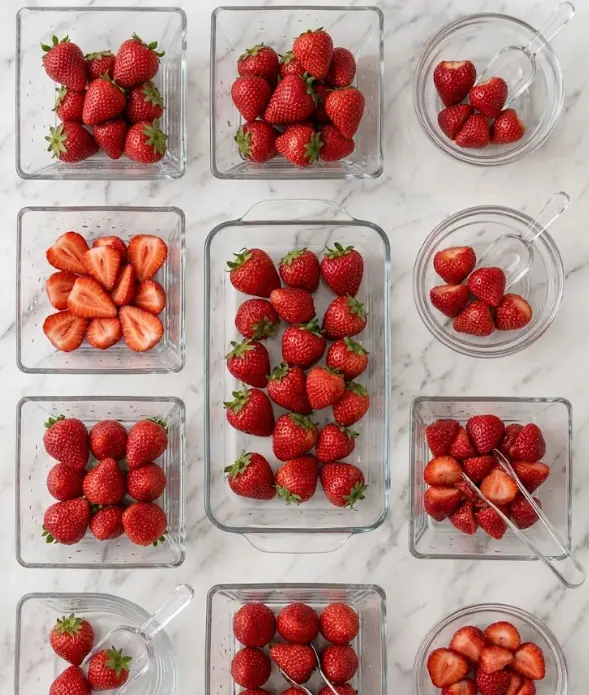
Begin by carefully selecting your strawberries, discarding any with soft spots, mold, or significant green areas. Place the selected berries in a colander and rinse thoroughly under cool — not cold — running water, gently tossing to ensure all surfaces are cleaned. After rinsing, place on a clean kitchen towel and pat completely dry with a second soft cloth or additional paper towels. Surface moisture on the strawberries extends drying time significantly — the drier the surface before oven drying, the more efficiently and evenly they’ll dry.
Pro Tip: Don’t soak or submerge strawberries in water during washing — they absorb moisture readily and waterlogged strawberries require significantly longer drying times. A quick rinse and thorough pat-dry is the correct technique.
2. Remove the Hulls and Slice Uniformly
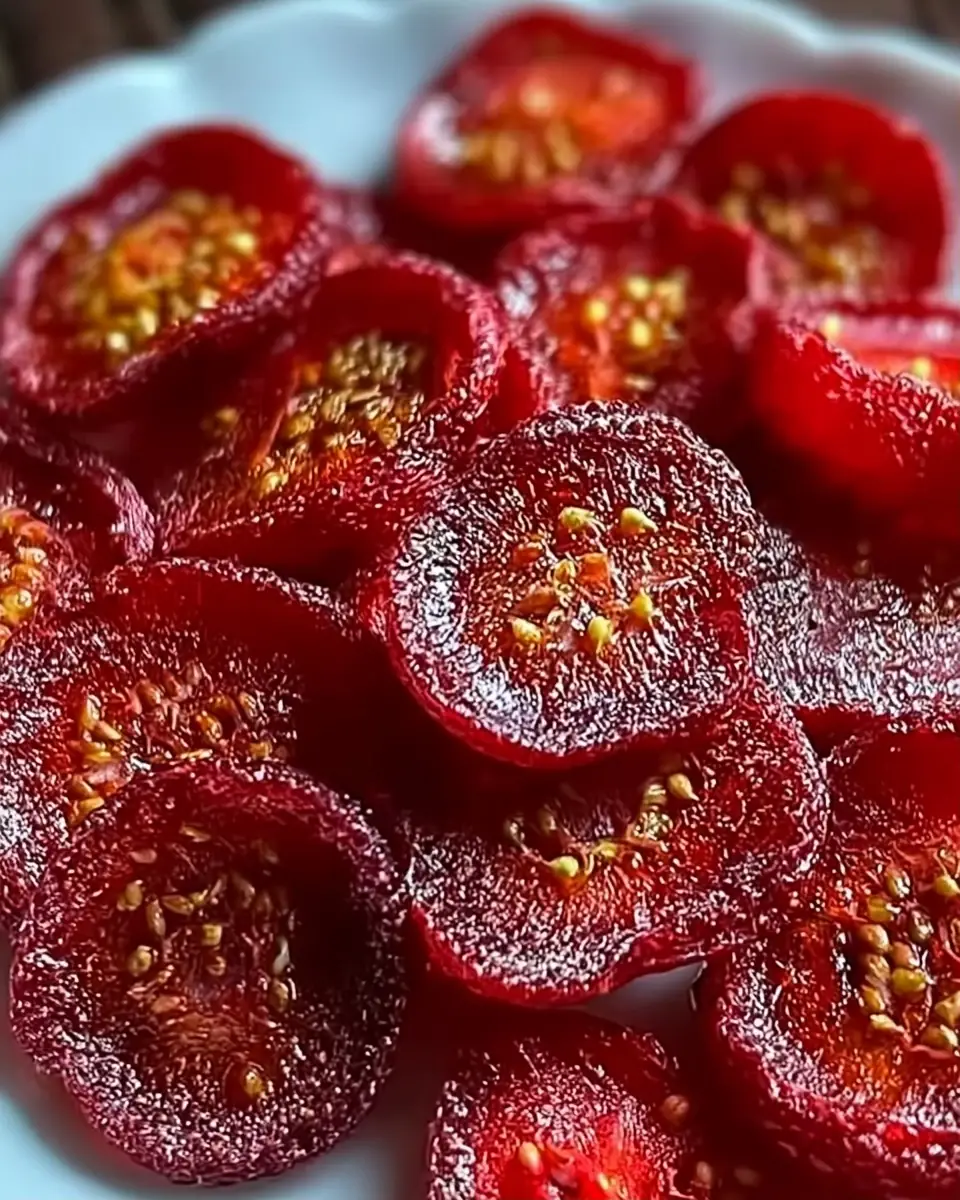
Place each washed, dried strawberry on the cutting board. Remove the green hull and white core using a sharp paring knife or strawberry huller. Then slice each berry into uniform rounds approximately ¼ inch (6 mm) thick. Uniformity of slice thickness is the single most important preparation factor — uneven slices create a batch where some pieces are perfectly dried while others are either still moist or beginning to over-dry and become leathery.
Pro Tip: A mandoline slicer creates perfectly uniform ¼-inch slices far more consistently and quickly than hand slicing. If you don’t own a mandoline, use a sharp chef’s knife and work deliberately, measuring the first several slices until you develop a reliable intuitive feel for the correct thickness.
3. Prepare the Baking Sheets
Line your baking sheets with parchment paper. Do not use aluminum foil — the strawberry’s natural acids can react with aluminum, creating off-flavors in the dried fruit. Parchment provides a non-reactive, non-stick surface that allows the dried strawberries to release cleanly after cooling without tearing.
Pro Tip: If you have a wire cooling rack that fits inside your baking sheet, place it on the sheet and arrange strawberries on the rack rather than directly on the parchment. The elevated rack allows air circulation beneath each slice, promoting more even drying from both top and bottom simultaneously.
4. Arrange Slices in a Single Layer
Lay all the strawberry slices flat on the prepared baking sheets, ensuring that no slices overlap or touch each other. Every slice must have direct air exposure on all visible surfaces. Overlapping slices create moisture traps where adjacent berries steam each other rather than drying, producing uneven, possibly moldy results.
Pro Tip: You will likely need two standard baking sheets for 500 g of sliced strawberries. Allow approximately ½ inch of space between slices for optimal air circulation. If slices must be crowded, use three baking sheets or dry in two batches sequentially.
5. Preheat the Oven to Low Temperature
Set your oven to the lowest available temperature setting — ideally 150°F to 200°F (65°C to 93°C). Allow the oven to preheat completely before inserting the baking sheets. The low temperature is essential — higher temperatures cook the strawberries rather than slowly removing moisture, creating caramelized, jam-like fruit rather than properly dried oven dried strawberries.
Pro Tip: If your oven’s lowest setting is higher than 200°F, prop the oven door slightly open using a wooden spoon or heat-safe silicone pad. This allows excess heat to escape while maintaining the necessary airflow — creating an effective home dehydrating environment.
6. Dry for 2–3 Hours, Checking Hourly
Place the baking sheets on the center and lower racks of the preheated oven. Set a timer for 1 hour. When the timer sounds, open the oven and gently flip each strawberry slice. The bottom surface should appear slightly more dried than the top — this is normal and correct. Return to the oven.
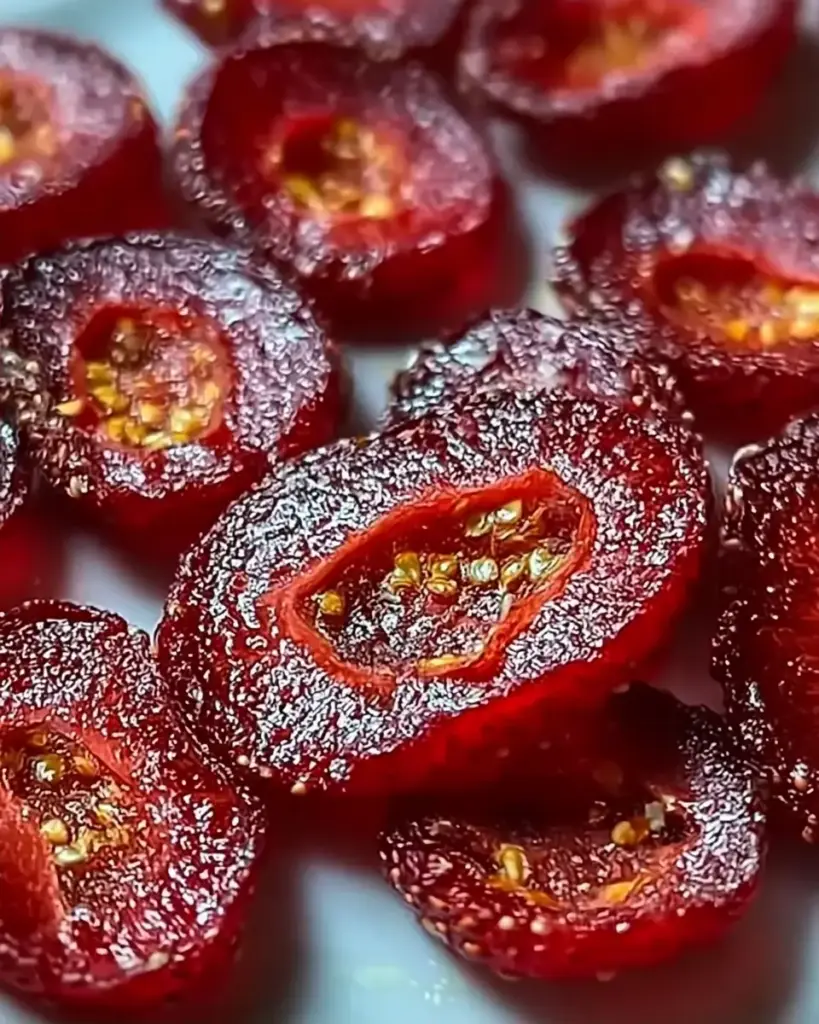
Check again at the 2-hour mark. The slices should be noticeably reduced in size, slightly firm on the surface, and translucent at the edges. Continue drying until they reach your preferred texture:
- Chewy (2–2.5 hours): Slightly pliable, like fruit leather — the most popular finished texture
- Firm dried (2.5–3 hours): More set, less pliable, longer shelf life
- Crispy (3+ hours): Snap when bent — ideal for baking applications and granola
7. Cool Completely on a Cooling Rack
Remove the baking sheets from the oven and transfer the dried strawberry slices to a wire cooling rack using a thin spatula. Allow to cool completely for 15–20 minutes before tasting or storing. As the oven dried strawberries cool, they firm up slightly more — don’t assess final texture while still warm.
Pro Tip: The strawberries will feel slightly softer when warm than they will at room temperature. Always cool fully before deciding if they need additional drying time.
Nutritional Information
Each serving (approximately 28 g / 1 ounce) of these oven dried strawberries contains approximately:
- Calories: 45
- Protein: 1g
- Total Fat: 0g (completely fat-free)
- Carbohydrates: 11g
- Fiber: 2g (approximately 7% of daily recommended intake)
- Sugars: 7g (entirely naturally occurring fruit sugars — no added sugar)
- Sodium: ~1mg (essentially sodium-free)
- Vitamin C: ~35mg (approximately 39% of daily recommended intake — remarkably preserved through low-temperature drying)
The nutritional profile of these oven dried strawberries is genuinely impressive. Unlike commercial dried strawberries that routinely add 15–25 g of sugar per serving to enhance flavor, these contain zero added sugar with all sweetness from the fruit itself. Research shows that low-temperature drying preserves significantly more vitamin C than high-heat processing — approximately 40–60% retention compared to 15–25% in commercial high-heat processing. Strawberries are also rich in manganese, folate, and powerful anthocyanin antioxidants.
Healthier Alternatives for the Recipe
These already nutritionally excellent oven dried strawberries can be further adapted:
- Extra Antioxidant Version: Lightly dust strawberry slices with açaí powder before drying for additional polyphenols and a beautiful deep purple hue.
- Protein Addition: Serve dried strawberries alongside nut butter for a complete snack with added protein and healthy fats.
- Cinnamon Spiced: Dust slices with a tiny pinch of ground cinnamon before drying for a warm, apple pie-adjacent flavor that pairs beautifully with the strawberry.
- Citrus Infused: Squeeze fresh orange or lemon juice over the slices before drying for a light citrus note that enhances the strawberry’s natural brightness.
- Savory Twist: A tiny pinch of flaky sea salt and cracked black pepper applied before drying creates an unexpectedly sophisticated dried strawberry for charcuterie boards.
- Vanilla Scented: Brush slices with a tiny amount of diluted vanilla extract before drying for a warm, aromatic, dessert-like quality.
Serving Suggestions
These versatile oven dried strawberries are magnificent when used:
- As a standalone snack straight from the jar for an intensely flavored, naturally sweet treat.
- Stirred into morning oatmeal, overnight oats, or yogurt for natural sweetness and chewy texture.
- Added to homemade granola, trail mix, or energy bars for concentrated berry flavor.
- As a beautiful cocktail garnish for champagne, Prosecco, lemon drops, or strawberry daiquiris.
- Folded into muffin, scone, or pancake batter for intense strawberry flavor without the moisture of fresh fruit.
Personalized Tip: Package these oven dried strawberries in small glass jars with a ribbon and handwritten label for one of the most thoughtful, impressive, and genuinely useful homemade gifts imaginable. They’re particularly meaningful for health-conscious friends, teachers, new parents, or anyone who appreciates the extra care of a truly handmade gift.
Common Mistakes to Avoid
Maximize success with your oven dried strawberries by avoiding these critical mistakes:
- Using under-ripe strawberries — Unripe strawberries lack the natural sugar and flavor that intensifies during drying. The dried result will taste flat and slightly sour.
- Slicing unevenly — Dramatically different slice thicknesses create a batch with wildly inconsistent doneness. Take time to slice as uniformly as possible.
- Overlapping slices on the baking sheet — Overlapping prevents proper air circulation and creates moisture traps that dramatically slow drying and risk mold.
- Drying at too high a temperature — Above 200°F the strawberries cook rather than dehydrate, creating a jam-like texture rather than properly dried fruit.
- Not cooling before assessing doneness — Warm dried fruit always feels softer than it will at room temperature. Always cool completely before deciding if more drying time is needed.
- Storing before completely dry — Even slightly moist dried fruit can develop mold during storage. Ensure complete drying before sealing in storage containers.
Storing Tips for the Recipe
These oven dried strawberries store beautifully with proper technique:
- Room Temperature: Store in an airtight container or glass jar for up to 2 weeks. Add a food-safe silica gel packet to absorb ambient moisture.
- Refrigerator: Store in an airtight container for up to 1 month. The slightly more moist, chewy versions benefit most from refrigerated storage.
- Freezer: Store in a freezer-safe bag for up to 1 year — the most impressive longevity for preserving peak strawberry season for winter enjoyment.
- Vacuum Sealed: If you have a vacuum sealer, vacuum-sealed oven dried strawberries at room temperature last up to 6 months for exceptional quality preservation.
Prep-Ahead Tip: Make large batches during peak strawberry season (May–June) when prices are lowest and flavor is at its absolute best. Freeze portions to enjoy fresh-tasting, peak-season strawberry flavor throughout autumn and winter when fresh strawberries are expensive and flavorless.
Conclusion
These beautifully simple oven dried strawberries transform fresh ripe strawberries into intensely flavored, chewy, naturally sweet dried fruit with zero added sugar in just 15 minutes of preparation and 2–3 hours of unattended low-temperature oven drying. At only 45 calories per serving with remarkable vitamin C retention, they’re the perfect healthy snack.
Ready to preserve the best of strawberry season in your oven? Try these oven dried strawberries and share your results in the comments below! Tell us what thickness you preferred, how you used them, or any creative flavor additions. Leave a star rating and subscribe for more creative, data-driven food preservation recipes and weekly snack inspiration delivered straight to your inbox.
FAQs
How do I know when oven dried strawberries are done drying?
Fully dried strawberries should feel firm and leathery rather than wet or sticky to the touch. They should be pliable when bent (for chewy) or snap slightly (for crispy). Always cool completely before final assessment — warm berries always feel softer than they are.
Can I oven dry frozen strawberries instead of fresh?
Not recommended. Frozen strawberries release significantly more moisture upon thawing, dramatically extending drying time and producing a less attractive, more collapsed final product. Fresh ripe strawberries always produce the best oven dried strawberries results.
Why are my oven dried strawberries sticky instead of dry?
Most likely causes are insufficient drying time, oven temperature too low, overlapping slices, or very high ambient humidity. Return to the oven for an additional hour and ensure proper spacing. Storing in an airtight container with a silica gel packet prevents post-drying moisture reabsorption.
Do I need to add any sugar before drying strawberries?
No — ripe strawberries contain sufficient natural sugar to create intensely sweet dried fruit without any additions. Adding sugar before drying creates a candy-like coating that can burn at low temperatures and make the berries stick to parchment aggressively.
What’s the difference between oven dried and dehydrator dried strawberries?
A food dehydrator maintains more consistent, lower temperatures (125–135°F) with built-in air circulation that produces slightly more evenly dried results in similar or slightly longer time. However, an oven set to its lowest temperature produces excellent results that are nearly indistinguishable to most people.
Can I use oven dried strawberries in baking?
Absolutely — they’re exceptional in baking applications. Fold into scone, muffin, or cookie dough for concentrated strawberry flavor without the moisture that fresh berries release. Rehydrate briefly in warm water for applications requiring softer fruit.


Oven-Dried Strawberries
Ingredients
Equipment
Method
- Begin by rinsing your fresh strawberries under cool water. Pat them dry gently with a soft cloth.
- Place each berry on the cutting board. Slice them evenly, about 1/4 inch thick.
- Line your baking sheets with parchment paper. Lay the slices flat, ensuring they don’t overlap.
- Set your oven to a low temperature, around 150°F to 200°F. Allow it to preheat fully.
- Place the baking sheets in the oven and set a timer for around 2-3 hours.
- Every hour, check the strawberries; they should become less pliable but still slightly soft.
- Once dried to your liking, carefully remove the trays from the oven and let the strawberries cool on a cooling rack.
- Once cool, you can store them immediately, or indulge in a few.