Bonfire Bars
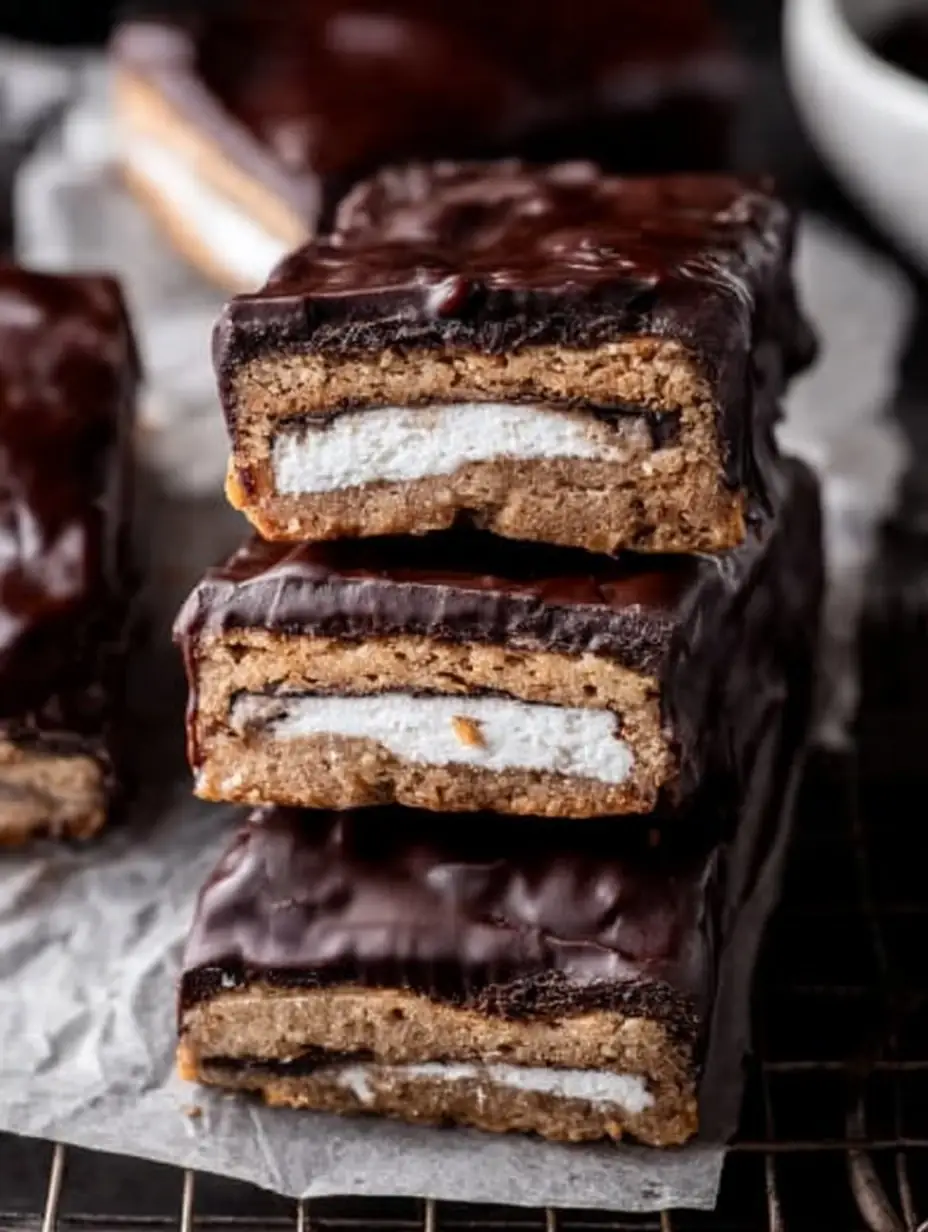
Homemade layered candy bars have surged in popularity as home bakers seek to recreate premium, small-batch confections at home rather than paying $6–8 per bar at artisan chocolate shops. This comprehensive guide walks you through every stage of making these Bonfire Bars: a complete ingredients breakdown with substitutions, precise timing (including why the overnight set is non-negotiable), detailed step-by-step instructions with candy-making pro tips, full nutritional information, healthier adaptations, creative serving ideas, common mistakes to avoid, storage best practices, and answers to frequently asked questions. If you’re ready for a rewarding weekend candy-making project, let’s build these bars layer by layer.
Ingredients List
These Bonfire Bars involve four distinct components. Here’s everything you’ll need for a 12×17-inch sheet pan yielding 12 generous bars:
Chocolate Caramel Layer:
- 680 g evaporated milk — Creates the rich, creamy caramel base.
- 120 g heavy cream — Adds extra richness and smoothness.
- 380 g sugar — Provides sweetness and helps achieve proper caramelization.
- 285 g corn syrup — Prevents crystallization for a smooth caramel texture.
- 113 g butter — Enriches flavor and mouthfeel.
- 2 g salt — Balances sweetness.
- 227 g unsweetened baker’s chocolate — Delivers deep, intense chocolate flavor.
Graham Cracker Crust:
- 300 g chocolate or candy melts — Creates a moisture barrier between crust and caramel.
- 340 g graham cracker crumbs — Forms the classic s’mores-inspired base.
- 300 g flour — Provides structure to the crust.
- 150 g brown sugar — Adds caramel notes.
- 3 g salt — Balances sweetness.
- 170 g cold butter, cubed — Creates a sandy, press-in texture.
Homemade Marshmallow Layer:
- 30 g unflavored gelatin + 120 ml cold water — The foundation of fluffy, stable marshmallow.
- 380 g sugar, 285 g corn syrup, 180 g honey, 150 ml water — Cooked together to 252°F for the perfect marshmallow syrup.
- 10 g vanilla — Rounds out the flavor.
Chocolate Coating:
- 1361 g dark chocolate, tempered — Provides the signature glossy, snap-worthy shell.
Smart substitutions:
- Chocolate swaps: Use bittersweet or semi-sweet chocolate instead of dark for a milder coating, or milk chocolate for extra sweetness.
- Lower sugar: Reduce corn syrup slightly in the caramel (no more than 15%) to maintain proper texture—candy recipes are sensitive to ratio changes.
- Gluten-free: Substitute gluten-free graham crackers and a 1:1 gluten-free flour blend in the crust.
- Honey-free: Replace honey in the marshmallow with additional corn syrup for a more neutral flavor.
These chocolate caramel marshmallow bars require precision, so substitutions should be made cautiously to preserve proper candy structure.
Timing
Prep Time: 30 minutes
Cook Time: 1 hour (across all cooking stages)
Setting Time: 12 hours (critical overnight rest)
Total Time: 12 hours
Unlike quick no-bake bars, these Bonfire Bars require patience—the marshmallow layer needs a full 12-hour rest to set properly before cutting and dipping. While the active hands-on time is only about 1.5 hours combined, the extended setting period ensures clean cuts and professional-quality texture. This is standard practice among confectioners; rushing the set time is the single biggest reason homemade candy bars turn out messy or soft. Plan to start this recipe the evening before you want to serve or gift your bars.
Step-by-Step Instructions
Building the Chocolate Caramel Layer
Line your 12×17-inch sheet pan with lightly oiled parchment paper, leaving a 3-inch overhang on the short sides for easy removal later. In a thick-bottomed, heavy-duty pot, combine the evaporated milk, heavy cream, sugar, corn syrup, salt, and butter. Cook over medium heat until everything dissolves, then increase to medium-high and cook until the caramel reaches exactly 228°F on a candy thermometer.
Pro tip: Precision matters here—a few degrees off can mean the difference between a chewy caramel and one that’s too soft or too hard. Stir frequently to prevent scorching on the bottom.
Once at temperature, remove from heat and add the baker’s chocolate, stirring until fully melted and incorporated. Pour into your prepared pan, top with oiled parchment, and cool completely before moving to the next layer.
Creating the Graham Cracker Crust
Preheat your oven to 350°F. In the bowl of a 5-quart planetary mixer, combine graham cracker crumbs, flour, brown sugar, and salt. Add the cold, cubed butter and mix until the texture resembles damp sand—it should hold together when pressed in your hand.
Actionable trick: Keep butter genuinely cold; this creates the ideal crumbly-yet-cohesive texture that presses firmly without becoming greasy.
Press the mixture tightly and evenly into a separate prepared sheet pan (or the same pan if working in stages). Bake for 20 minutes, then cool completely—rushing this step will cause the crust to crumble when layered.
Layering the Chocolate, Crust, and Caramel
Melt 300 g of chocolate or candy wafers and spread evenly over the cooled graham cracker crust. While the chocolate is still wet, immediately place your cooled caramel layer on top. This creates a secure bond between layers and prevents sliding once cut.
Whipping the Homemade Marshmallow
Combine 120 g cold water with 30 g unflavored gelatin in your mixer bowl and set aside to bloom. In a heavy-duty pot, combine the sugar, honey, corn syrup, and water for the marshmallow syrup. Cook until it reaches 252°F, then remove from heat and cool undisturbed to 212°F. While cooling, gently melt the bloomed gelatin over a hot water bath.
Personalized tip: Use a reliable digital thermometer for both temperature checks—marshmallow-making is one of the most temperature-sensitive candy techniques, and even small deviations affect the final fluffy texture.
Once the syrup reaches 212°F, place the bowl with the melted gelatin into your mixer fitted with the whisk attachment. Turn to high speed and slowly stream in the hot syrup. Whip for 8 full minutes until thick, glossy, and voluminous, then add vanilla and mix for 30 more seconds.
Setting and Cutting the Bars
Spread the freshly whipped marshmallow directly over the chocolate-caramel-crust layers. Cover with oiled parchment paper and let sit undisturbed for a minimum of 12 hours—this is essential for the marshmallow to fully set and firm up.
Using an oiled knife (re-oil between cuts to prevent sticking), cut the bars into 1.75-inch squares for clean, professional-looking pieces.
Tempering and Dipping in Chocolate
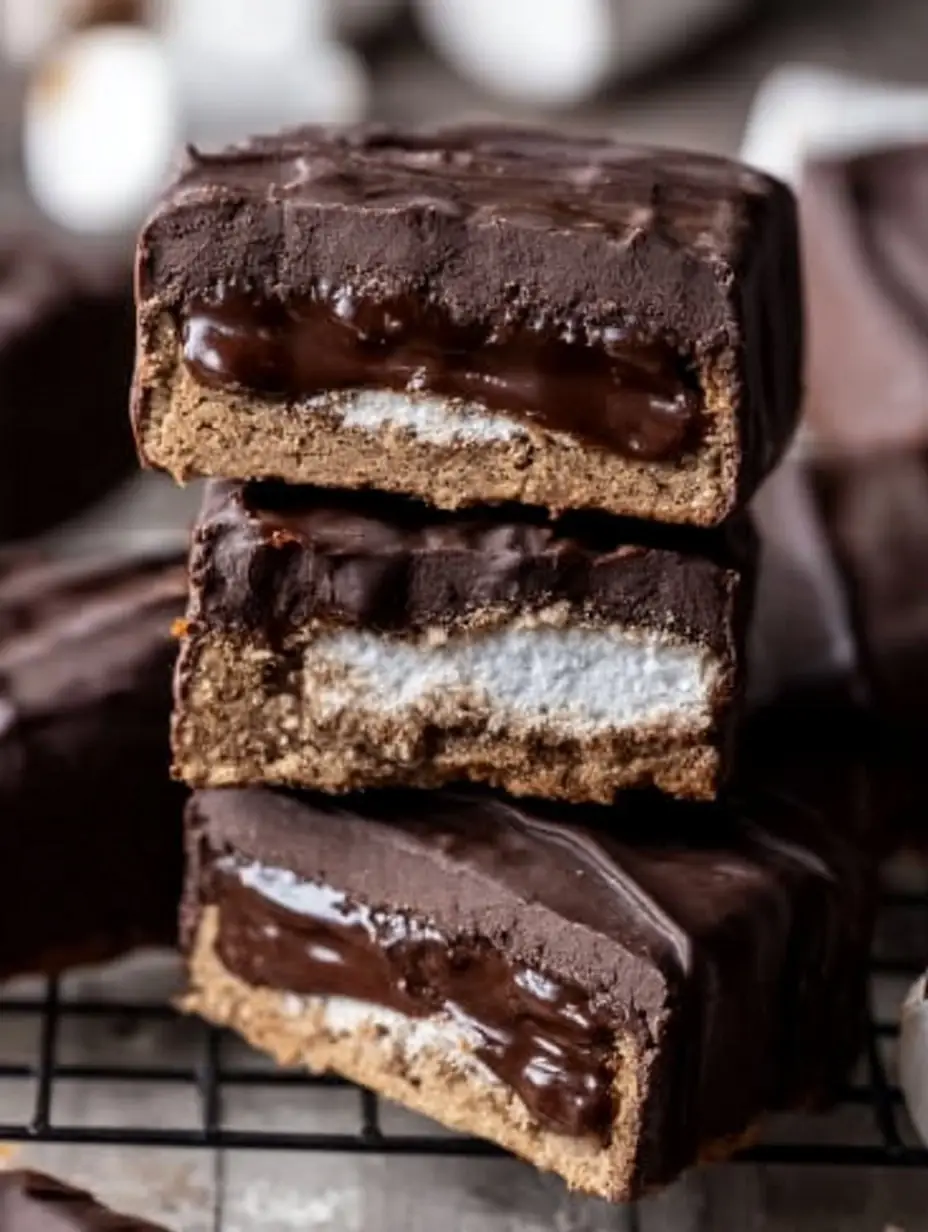
Melt and properly temper your dark chocolate. Dip the bottom of each square first by holding it between your thumb and forefinger, then scrape along a spatula edge to remove excess chocolate and allow the bottom to set. Once set, fully dip each bar, again scraping excess for that signature thin, glossy shell.
Pro tip: Proper tempering gives your Bonfire Bars that satisfying snap and shine—untempered chocolate will look dull and may develop white streaks (bloom) over time.
Step 1: Prepare the Chocolate Caramel
Prepare Your Pan: Line a 12 x 17-inch sheet pan with lightly oiled parchment paper, leaving a 3-inch overhang on the short sides for easy removal.
Mix Ingredients: In a heavy-duty pot, combine 680 grams of evaporated milk, 120 grams of heavy cream, 380 grams of sugar, 285 grams of corn syrup, 2 grams of salt, and 113 grams of butter.
Cook the Mixture: Heat over medium heat, stirring occasionally until everything dissolves.
Increase Heat: Turn the heat to medium-high and cook until the mixture reaches 228°F.
Add Chocolate: Remove from heat and stir in the 8 ounces of bakers chocolate until melted and fully incorporated.
Pour and Cool: Pour the caramel into the prepared pan and top with a sheet of lightly oiled parchment paper. Cool completely.
Step 2: Prepare the Graham Cracker Crust
Preheat Oven: Set your oven to 350°F and prepare the same sheet pan as before.
Mix Dry Ingredients: In a mixing bowl, combine 340 grams of graham cracker crumbs, 300 grams of flour, 150 grams of brown sugar, and 3 grams of salt.
Add Butter: Incorporate 170 grams of cold, cubed butter into the mixture until it resembles damp sand.
Press into Pan: Firmly press the mixture into the base of the prepared sheet pan.
Bake: Bake for 20 minutes. Allow to cool completely.
Step 3: Assemble the Crust and Caramel
Melt Chocolate: Melt 300 grams of chocolate or candy melts until smooth.
Spread Chocolate: Evenly spread the melted chocolate over the cooled graham cracker crust.
Layer Caramel: While the chocolate is still wet, pour the cooled caramel layer on top.
Step 4: Prepare the Marshmallow
Hydrate Gelatin: In a mixing bowl, combine 120 grams of cold water with 30 grams of unflavored gelatin. Set aside.
Cook Syrup: In a heavy pot, combine 380 grams of sugar, 180 grams of honey, 285 grams of corn syrup, and 150 grams of water. Heat until it reaches 252°F.
Melt Gelatin: While the syrup cools to 212°F, melt the gelatin over a hot water bath.
Combine: Once cooled, place the melted gelatin in the mixer bowl and whisk on high while slowly streaming in the hot syrup. Continue mixing for about 8 minutes.
Add Vanilla: Mix in the 10 grams of vanilla for additional flavor.
Spread Marshmallow: Layer the marshmallow mixture on top of the caramel. Cover with parchment and let it sit for a minimum of 12 hours.
Step 5: Cutting and Dipping
Cut Bars: Using an oiled knife, cut the marshmallow layer into 1.75-inch squares.
Dip in Chocolate: Melt and temper the 3 lbs of dark chocolate. Dip the bars first on one side, scrape off excess, and then dip completely once the bottom has set.
Nutritional Information
Here’s a table with the nutritional information per Bonfire Bar (based on average serving size of one bar):
Nutritional Information
| Nutrient | Amount |
|---|---|
| Calories | 250 kcal |
| Total Fat | 12 g |
| Saturated Fat | 7 g |
| Cholesterol | 20 mg |
| Sodium | 50 mg |
| Total Carbohydrates | 35 g |
| Dietary Fiber | 1 g |
| Sugars | 25 g |
| Protein | 3 g |
Data insights: Compared to store-bought layered candy bars, which often exceed 250–300 calories in a much smaller portion, these homemade chocolate caramel marshmallow bars offer comparable indulgence with the benefit of controlling ingredient quality—no preservatives, artificial flavors, or mystery additives. The dark chocolate coating also contributes modest antioxidants (flavonoids), particularly if using 60%+ cacao chocolate.
Healthier Alternatives for the Recipe
While these are inherently a special-occasion candy, you can make thoughtful adjustments:
- Reduced sugar caramel: Slightly decrease corn syrup and sugar (no more than 10–15%) while maintaining enough for proper caramelization and texture stability.
- Dark chocolate boost: Use 70%+ dark chocolate for the coating to increase antioxidant content and reduce overall sweetness.
- Portion control: Cut bars into smaller 1-inch squares for bite-sized treats that satisfy cravings with fewer calories per piece.
- Gluten-free crust: Substitute gluten-free graham crackers and flour blend without compromising texture.
- Natural sweeteners: Experiment with honey-forward marshmallow (already included) rather than all corn syrup for a more natural sweetness profile.
These tweaks let you enjoy Bonfire Bars while making mindful adjustments for dietary preferences.
Serving Suggestions
These Bonfire Bars make a stunning addition to holiday cookie trays, gift boxes, or dessert tables. Their bakery-quality appearance makes them perfect for gifting during the holidays or as an impressive contribution to potlucks and parties.
Creative ideas: Package individually in cellophane bags tied with twine for homemade gifts. Serve alongside coffee or espresso to balance the sweetness, or pair with fresh berries for a contrasting tart note. For a campfire-themed dessert table, display these alongside actual s’mores ingredients for a fun visual pairing.
Common Mistakes to Avoid
- Skipping the candy thermometer — Temperature precision (228°F for caramel, 252°F for marshmallow syrup) is non-negotiable for proper texture.
- Rushing the 12-hour set — Cutting too early results in messy, unstable bars. Patience is essential.
- Improper chocolate tempering — Untempered chocolate leads to dull appearance and poor snap; take time to temper correctly.
- Not oiling the knife — This causes sticking and messy, uneven cuts.
- Adding syrup too quickly to gelatin — Stream slowly while whisking on high to prevent scrambling the mixture.
Storing Tips for the Recipe
Store finished Bonfire Bars in an airtight container at room temperature (65–70°F) for up to 1 week, separating layers with parchment paper. Refrigeration can cause the chocolate to bloom (develop a dull, whitish appearance) and affect texture, so room temperature storage in a cool, dry spot is best. These bars also freeze well for up to 2 months—wrap individually and thaw at room temperature before serving.
Conclusion
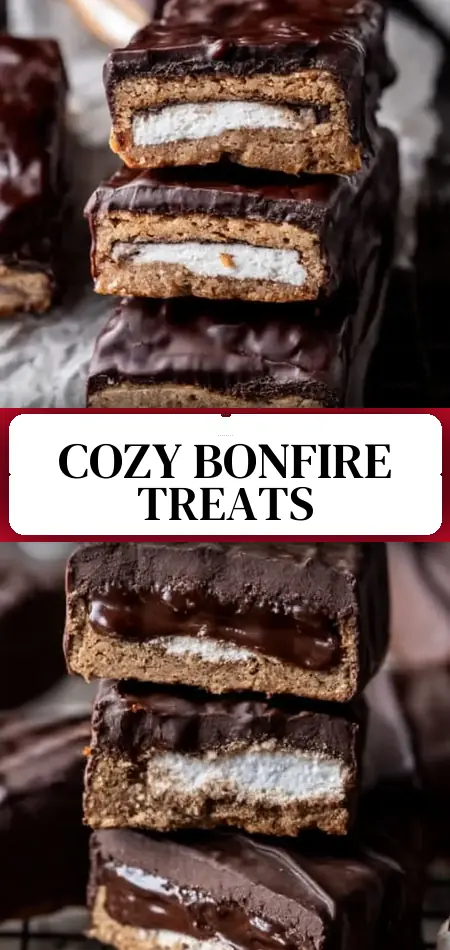
These Bonfire Bars transform classic s’mores flavors into an elevated candy-shop confection with layers of caramel, chocolate, graham crust, and marshmallow. Though they require patience and precision, the professional-quality results make them perfect for gifting or impressing guests. (46 words)
Ready for a rewarding candy-making project? Try these Bonfire Bars and share your results in the comments below! Leave a review, tell us your tips, or subscribe for more advanced dessert recipes and candy-making tutorials delivered to your inbox.
FAQs
Why do Bonfire Bars need 12 hours to set?
The homemade marshmallow requires this time to fully stabilize through the gelatin structure, ensuring clean cuts and proper texture rather than a sticky, unset layer.
Can I skip tempering the chocolate?
Tempering gives the classic glossy shine and snap. Skipping it results in dull, soft chocolate that may develop white bloom spots over time.
What if I don’t have a candy thermometer?
For candy-making, a thermometer is essential for accurate results. Investing in an inexpensive digital candy thermometer will dramatically improve your success rate.
Can I make Bonfire Bars ahead for a party?
Yes! These bars store well for up to a week at room temperature, making them ideal for preparing several days before an event.
Why did my caramel turn out grainy?
This typically happens from stirring too vigorously during cooking or not fully dissolving the sugar initially, causing crystallization.
Can I use a different type of chocolate for coating?
Yes, milk or semi-sweet chocolate work well, though dark chocolate provides the best contrast to the sweet caramel and marshmallow layers.ickness of the layers may need adjusting to ensure even cooking.
Bonfire Bars
Ingredients
Equipment
Method
- Prepare a 12 X 17″ sheet pan by lining it with lightly oiled parchment paper. Leave a 3″ overhang on the short sides.
- Combine evaporated milk, heavy cream, sugar, corn syrup, salt, and butter into a thick bottomed, heavy duty pot.
- Cook over medium heat until all ingredients have dissolved.
- Turn heat to medium high and cook until caramel has reached 228F.
- Add chocolate. Stir until chocolate has melted and caramel has completely incorporated chocolate.
- Pour caramel into prepared pan. Top with a sheet of lightly oiled parchment paper. Cool completely.
- Preheat oven to 350F.
- Combine graham cracker crumbs, flour, brown sugar, and salt in the bowl of a 5 quart planetary mixer.
- Add in butter. Mix until mixture becomes similar to a damp sand consistency – it holds together when you press it in your hand.
- Press mix into prepared sheet pan. Make sure it is pressed as tightly as you can get it.
- Bake for 20 minutes at 350F. Cool Completely.
- Melt 300 grams of chocolate or candy wafers. Spread in an even layer over top of graham cracker crust. Place caramel layer on top while chocolate is still wet.
- Combine 120 grams of cold water with 30 grams of unflavored gelatin in the bowl of a 5 quart planetary mixer. Set aside.
- Set up a hot water bath but do not start heating the gelatin yet.
- Combine sugar, honey, corn syrup, and water in a heavy duty, thick bottomed pot. Cook until 252F.
- Turn off heat and cool undisturbed to 212F. While the slurry is cooling, melt your gelatin over the hot water bath.
- When the mix is 212F, place your mixing bowl with fluid gelatin in the base of your mixer. Turn the mixer on high with the whisk attachment.
- Slowly stream hot syrup into the gelatin. Mix for 8 minutes. Add vanilla and mix for 30 more seconds.
- Spread marshmallow directly on top of chocolate caramel. Cover the marshmallow with a piece of oiled parchment paper and allow to sit for a minimum of 12 hours before cutting.
- Using an oiled knife, cut 1.75″ squares.
- Melt and temper chocolate. Bottom squares before dipping completely by holding a piece between your thumb and forefinger and dipping into chocolate. Scrape along a spatula to remove excess.
- Dip completely after bottom as set up.