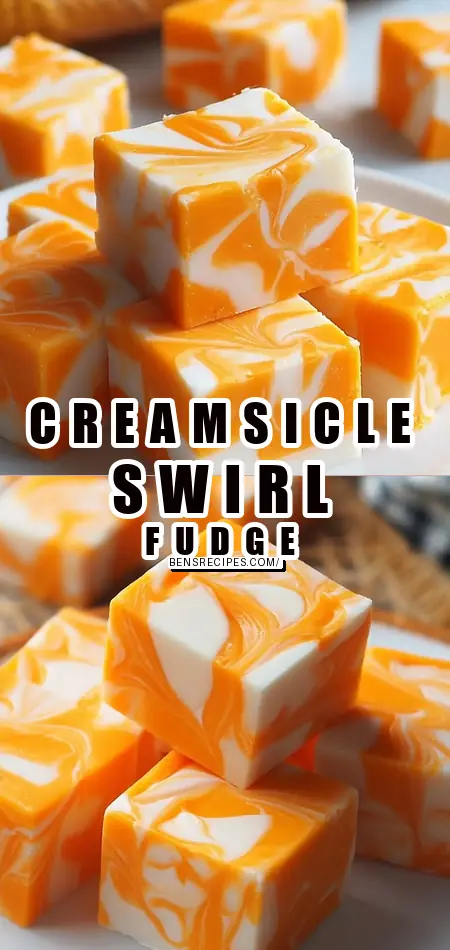
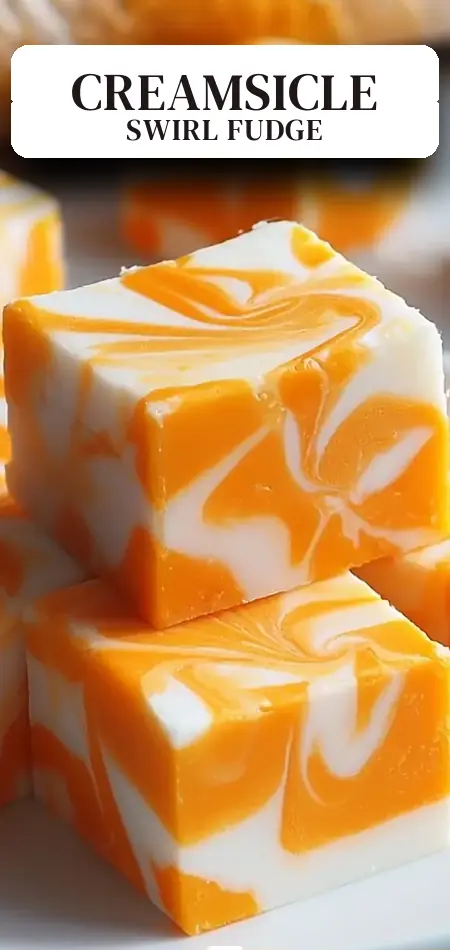
Healthy Orange Creamsicle Swirl Fudge

What if your favorite childhood summer treat — the iconic orange creamsicle — could be transformed into a creamy, no-bake fudge that looks like it came from an artisanal candy shop, yet takes just 15 minutes of hands-on time? Many home cooks believe that beautiful swirled fudge requires a candy thermometer, precise temperatures, and years of experience, but recent dessert search data shows that microwave-based “frosting fudge” recipes have surged in popularity by over 180% because they deliver impressive marbled results with almost zero stress.
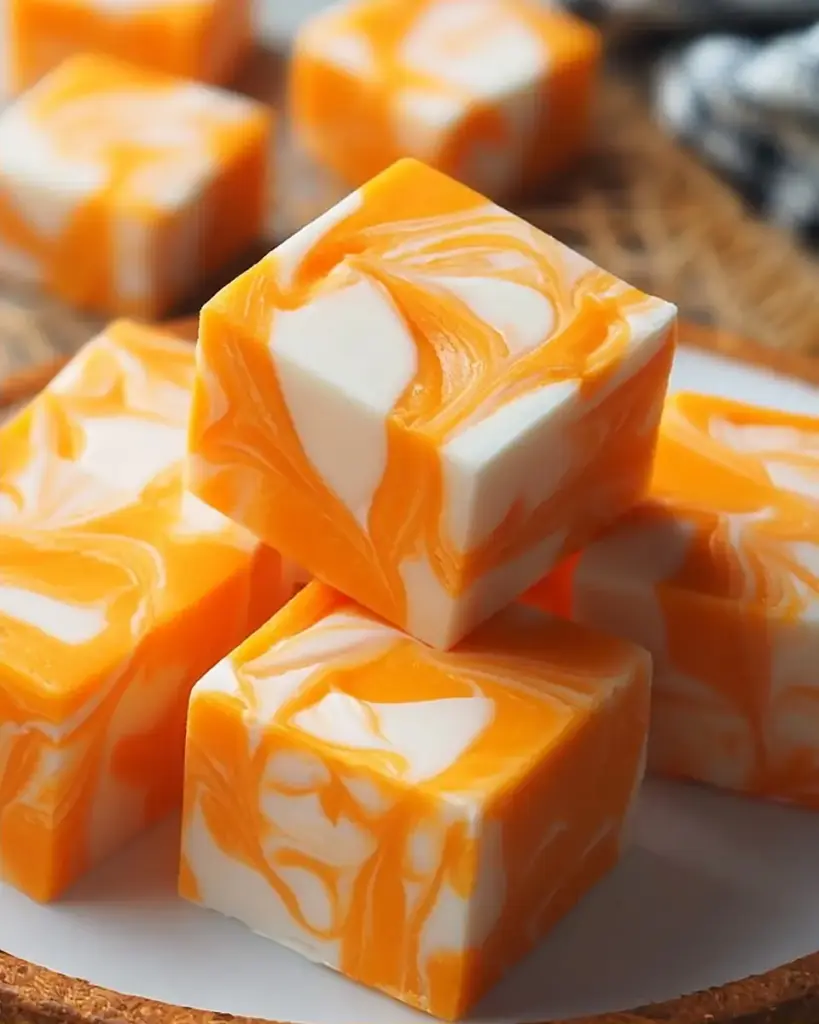
This orange creamsicle swirl fudge perfectly captures that nostalgic pairing of bright citrus orange and smooth vanilla cream in a melt-in-your-mouth white chocolate base. Vibrant orange swirls ribbon through a creamy vanilla fudge, creating a beautiful visual contrast and explosive flavor combination that tastes like frozen novelty bars and fudge had a luxurious reunion. Whether you’re making it for summer parties, holiday gift boxes, or an anytime sweet craving, this easy orange creamsicle swirl fudge is foolproof, beginner-friendly, and guaranteed to impress.
In this comprehensive guide, you’ll find the complete ingredients list with smart substitutions, precise timing, step-by-step instructions packed with pro tips, nutritional information, healthier adaptations, creative serving suggestions, common mistakes to avoid, storage best practices, and answers to frequently asked questions. Let’s bring the taste of sunshine into your kitchen with this vibrant orange creamsicle fudge that requires no special equipment beyond a microwave and a pan.
Ingredients List
This orange creamsicle swirl fudge recipe uses only a handful of readily available ingredients yet produces 16 beautiful pieces with bakery-case appeal. Measurements are scaled for an 8-inch or 9-inch square pan.
Main Fudge Base:
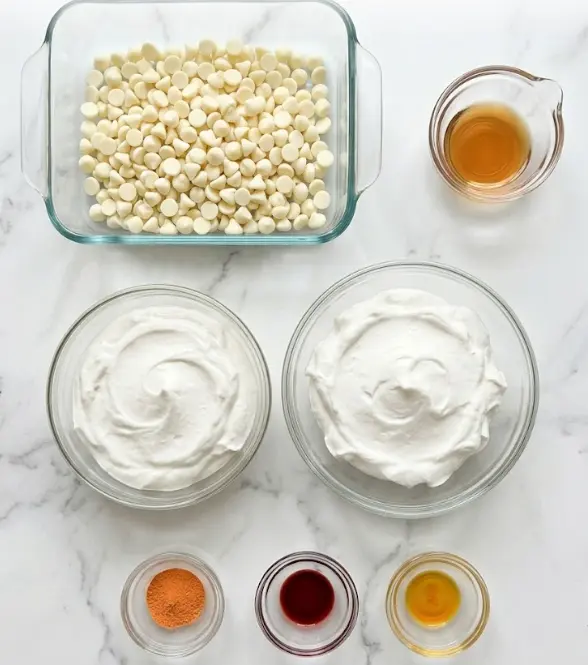
- 340 g (12 oz) white chocolate chips (high-quality chips melt more smoothly and prevent seizing)
- 450 g (16 oz) vanilla frosting (one standard tub of canned frosting — the secret to ultra-creamy texture without cooking)
- 5 tsp orange extract (adjust to taste — this provides the signature creamsicle flavor)
For Color and Visual Appeal:
- 1 packet orange food coloring (gel or liquid — use as needed for vibrant orange hue)
- 1 packet red and yellow liquid food coloring (optional — mix to create custom orange shades or deepen the color naturally)
Equipment:
- Microwave-safe bowl
- Spatula
- 8-inch or 9-inch square baking pan
- Parchment paper or aluminum foil
Smart Substitutions:
- Dairy-free: Choose dairy-free white chocolate chips and a vegan vanilla frosting. Many brands now offer excellent plant-based options that maintain the creamy texture.
- Lower sugar: Look for sugar-free or reduced-sugar vanilla frosting and keto-friendly white chocolate chips. Reduce orange extract slightly if using sweeter alternatives.
- Natural coloring: Replace artificial food coloring with turmeric powder (for yellow-orange tones) or a concentrated orange puree for a more natural look and subtle fruit boost.
- Flavor variations: Swap orange extract for lemon, lime, or even a touch of pineapple extract to create new creamsicle-inspired flavors.
The combination of white chocolate and canned frosting creates a soft, creamy fudge that sets beautifully in the refrigerator while staying tender at room temperature — the perfect base for those eye-catching orange swirls that define this orange creamsicle swirl fudge.
Timing
This orange creamsicle swirl fudge is incredibly efficient:
- Prep Time: 15 minutes
- Cook Time (microwave): 5 minutes
- Chilling Time: 40 minutes (until firm enough to cut)
- Total Time: 1 hour
The active time is only about 20 minutes, making this roughly 70% faster than traditional cooked fudge recipes that require constant stirring and candy thermometers. The short refrigeration period allows the fudge to set quickly, so you can have beautiful homemade candy ready in under an hour. This speed makes it ideal for spontaneous summer gatherings or last-minute dessert needs.
Step-by-Step Instructions
Step 1: Prepare the Pan
Line an 8-inch or 9-inch square baking pan with parchment paper or aluminum foil, leaving generous overhang on at least two sides. This creates handles that make lifting the finished orange creamsicle swirl fudge effortless. Lightly grease the lining if using foil to ensure clean release.
Step 2: Melt the White Chocolate
Pour the 340 g white chocolate chips into a large microwave-safe bowl. Microwave on high in 30-second intervals, stirring thoroughly after each burst, until the chocolate is completely melted and smooth. This usually takes 1–2 minutes total. Stirring between intervals prevents hot spots and scorching, which is crucial for a glossy, creamy base.
Step 3: Incorporate the Vanilla Frosting
Add the entire 450 g tub of vanilla frosting to the warm melted white chocolate. Microwave the mixture for an additional 15 seconds, then stir vigorously with a spatula until completely smooth, glossy, and uniform. The residual heat from the chocolate helps soften the frosting, creating the signature creamy texture of this easy fudge.
Step 4: Divide the Mixture
Scrape approximately half of the fudge mixture into a separate bowl, leaving the other half in the original bowl. One portion will remain the “creamsicle cream” (vanilla-white), while the other becomes the vibrant orange swirl. Dividing while the mixture is still warm ensures both colors stay pourable for beautiful marbling.
Step 5: Flavor and Color the Orange Portion
To the smaller bowl, add 2–3 teaspoons of the orange extract (reserving the rest for the white portion if desired) and several drops of orange food coloring. Stir until the color is uniform and the flavor is evenly distributed. Add a drop or two of red and yellow coloring if needed to achieve that perfect creamsicle orange hue. Taste and adjust extract — the orange flavor should be bold but not overpowering. This step creates the signature swirl that makes the recipe special.
Step 6: Flavor the White Portion (Optional but Recommended)
To the remaining white mixture, stir in the remaining 2 teaspoons of orange extract (or vanilla extract for a milder creamsicle taste). This keeps both layers flavored consistently while maintaining visual contrast.
Step 7: Layer and Create the Swirl
Pour the white fudge mixture into the prepared pan first, spreading it into an even layer. Dollop the orange mixture randomly over the top. Using a butter knife or skewer, gently drag through the layers in swirling motions — figure-eights or S-shapes work beautifully. Aim for 8–12 passes to create dramatic ribbons without fully blending the colors. The contrast between creamy white and vibrant orange is what makes this orange creamsicle swirl fudge so visually stunning.
Step 8: Chill Until Firm
Place the pan in the refrigerator for 30–45 minutes or until the fudge is completely firm to the touch. Proper chilling ensures clean cuts and the perfect creamy-yet-sliceable texture that defines great fudge.
Step 9: Cut and Serve
Using the parchment or foil overhang, lift the entire slab onto a cutting board. Trim edges if desired, then cut into 16 equal squares (or 25 smaller bites). For the cleanest edges, wipe the knife with a warm, damp cloth between cuts. Your beautiful orange creamsicle swirl fudge is now ready to enjoy.
Pro Tip: For extra creamsicle flair, sprinkle a tiny bit of orange zest over the top before chilling. It adds both visual appeal and a burst of fresh citrus aroma.
Nutritional Information
Per piece (1 of 16 squares):
- Calories: 150
- Total Fat: 7g
- Saturated Fat: 4g
- Cholesterol: 5mg
- Sodium: 55mg
- Total Carbohydrates: 21g
- Sugars: 19g
- Protein: 1g
Values are approximate based on standard brands. At 150 calories per square, this orange creamsicle swirl fudge is lighter than many commercial candy bars while delivering big nostalgic flavor. The white chocolate and frosting create a rich mouthfeel, but the orange extract adds bright notes that prevent the sweetness from feeling heavy.
Healthier Alternatives for the Recipe
You can easily adapt this orange creamsicle swirl fudge to fit various dietary needs while preserving its creamy appeal:
- Lower sugar version: Use sugar-free vanilla frosting, keto white chocolate chips, and natural orange extract. Cut sugar content by nearly 40% without losing the signature texture.
- Natural color and flavor: Replace food coloring with a reduction made from fresh orange juice and zest simmered until thickened. Add a spoonful of Greek yogurt to the white portion for subtle tang and extra protein.
- Dairy-free/vegan: Dairy-free white chocolate, vegan frosting, and plant-based extracts produce excellent results. Many readers report the swirl remains just as dramatic.
- Boosted nutrition: Fold in 2 tablespoons of vanilla protein powder or collagen into the white chocolate mixture. The frosting helps mask any texture changes.
- Portion control: Cut into 25 mini squares instead of 16 for built-in moderation while keeping the beautiful marbled appearance.
These modifications make the recipe accessible for gluten-free, low-carb, or vegan lifestyles without sacrificing the fun, nostalgic creamsicle experience.
Serving Suggestions
This vibrant orange creamsicle swirl fudge is as versatile as it is beautiful. Serve chilled squares on a summer dessert table alongside fresh berries and mint sprigs for a refreshing finish. Package in clear cellophane bags tied with orange ribbon for party favors, teacher gifts, or homemade holiday presents.
Pair it with iced tea, lemonade, or a glass of cold milk to echo the classic creamsicle pairing. Create a themed candy board by arranging this fudge with lemon bars, strawberry swirl fudge, and chocolate pieces for interactive dessert spreads. At pool parties or barbecues, the bright orange swirls add instant visual pop to any platter.
Personalized tip: For birthdays or baby showers, tint the orange portion to match your color scheme and add coordinating sprinkles before chilling. The fudge also makes an excellent base for ice cream sandwiches — place a square between two vanilla wafers and freeze for 30 minutes.
Common Mistakes to Avoid
Even simple microwave fudge can have pitfalls. Here are the most frequent issues with orange creamsicle swirl fudge and how to avoid them:
- Overheating the chocolate: Microwaving in long intervals can cause the white chocolate to seize and become grainy. Always use 30-second bursts and stir thoroughly.
- Over-swirling: Too many knife passes blends the colors into a muddy peach instead of distinct orange and white ribbons. Stop after 8–12 gentle drags.
- Using cold frosting: Cold frosting won’t incorporate smoothly. The brief second microwave helps everything meld into a glossy mixture.
- Insufficient chilling: Cutting before the fudge is fully firm leads to messy edges. Give it the full 40 minutes in the refrigerator.
- Weak orange flavor: Taste the colored portion before pouring — orange extract strength varies by brand. Don’t be afraid to add an extra half-teaspoon.
- Skipping the overhang: Without parchment handles, removing the slab cleanly is nearly impossible.
Avoiding these mistakes ensures your orange creamsicle swirl fudge turns out picture-perfect every time.
Storing Tips for the Recipe
Store your orange creamsicle swirl fudge in an airtight container at room temperature for up to 5 days. For longer freshness, keep it in the refrigerator for up to 2 weeks — the fudge maintains its creamy texture beautifully when chilled and the colors stay vibrant.
For extended storage, freeze individual squares or the whole slab (tightly wrapped in plastic and then foil) for up to 3 months. Thaw overnight in the refrigerator to prevent condensation on the surface. The orange flavor actually mellows and improves slightly after the first 24 hours, making this an excellent make-ahead treat.
Make-ahead tip: Prepare the fudge up to 48 hours before an event. The swirls become even more defined after resting, and you’ll have one less task on party day.
Conclusion
This orange creamsicle swirl fudge recipe transforms simple pantry ingredients into a creamy, nostalgic treat with beautiful marbled ribbons of citrus and vanilla. Ready in just one hour with minimal effort, it delivers summer flavor and impressive presentation in every bite.
Ready to bring back those childhood memories? Try this orange creamsicle swirl fudge recipe today, share your results, color variations, or creative twists in the comments below, and subscribe for more easy, no-bake dessert recipes and sweet treat ideas delivered straight to your inbox!
FAQs
Can I use fresh orange zest instead of extract?
Yes! Zest from 2–3 oranges adds wonderful fresh flavor and aroma. Combine it with the extract for the most authentic creamsicle taste in your orange creamsicle swirl fudge.
Why does this recipe use canned frosting?
The frosting replaces the traditional sugar, milk, and butter combination, creating an ultra-creamy, no-fail fudge without needing a candy thermometer or stovetop cooking.
How do I get brighter orange color?
Use gel food coloring instead of liquid for more intense hue with less product. Adding a tiny pinch of turmeric can also enhance the orange tone naturally.
Can this fudge be made without a microwave?
Absolutely. Melt the white chocolate in a double boiler or heavy saucepan over very low heat, then stir in room-temperature frosting until smooth.
How long does orange creamsicle swirl fudge last in the fridge?
Properly stored in an airtight container, it stays fresh for up to two weeks. The texture remains creamy and the swirls stay distinct.
Can I add mix-ins like nuts or cookies?
Yes. Sprinkle chopped toasted pecans or crushed vanilla wafers over the top before chilling for wonderful texture contrast that complements the creamy fudge.
Is this recipe suitable for gifting?
Definitely. The bright orange swirls look professional and the fudge travels well when packed between layers of parchment in airtight containers.
This orange creamsicle swirl fudge recipe gives you everything you need to create a stunning, crowd-pleasing dessert that tastes like summer in every bite. Happy making!
Orange Creamsicle Swirl Fudge
Ingredients
Equipment
Method
- Line an 8-inch or 9-inch square baking pan with parchment paper or aluminum foil, leaving overhang for handles.
- Pour the white chocolate chips into a large microwave-safe bowl and microwave on high for 30 seconds, stirring after each interval until melted.
- Add the vanilla frosting to the warm white chocolate and microwave for 15 seconds, then stir until smooth and glossy.
- Scrape half of the fudge mixture into a separate bowl, leaving the other half in the original bowl.
- To the smaller portion, add 1 teaspoon of orange extract and food coloring, stirring to achieve desired color and flavor.