Homemade Cream Cheese Mints Recipe
What if the most elegant, melt-in-your-mouth party favor you’ve ever tasted at weddings, baby showers, and holiday gatherings wasn’t made in a fancy bakery—but in your own kitchen in under an hour?
Most people believe cream cheese mints require special molds, candy thermometers, or years of experience. The truth is far simpler. This cream cheese mints recipe delivers professional-looking, refreshingly minty candies with just a handful of pantry staples.
These delightful no-bake treats have become a go-to favorite for good reason. At only about 40 calories each, they offer a light, creamy texture and bright mint flavor that chocolate-based candies can’t match. In fact, many home cooks report that guests ask for the recipe more often for these pastel homemade mints than for the wedding cake itself.
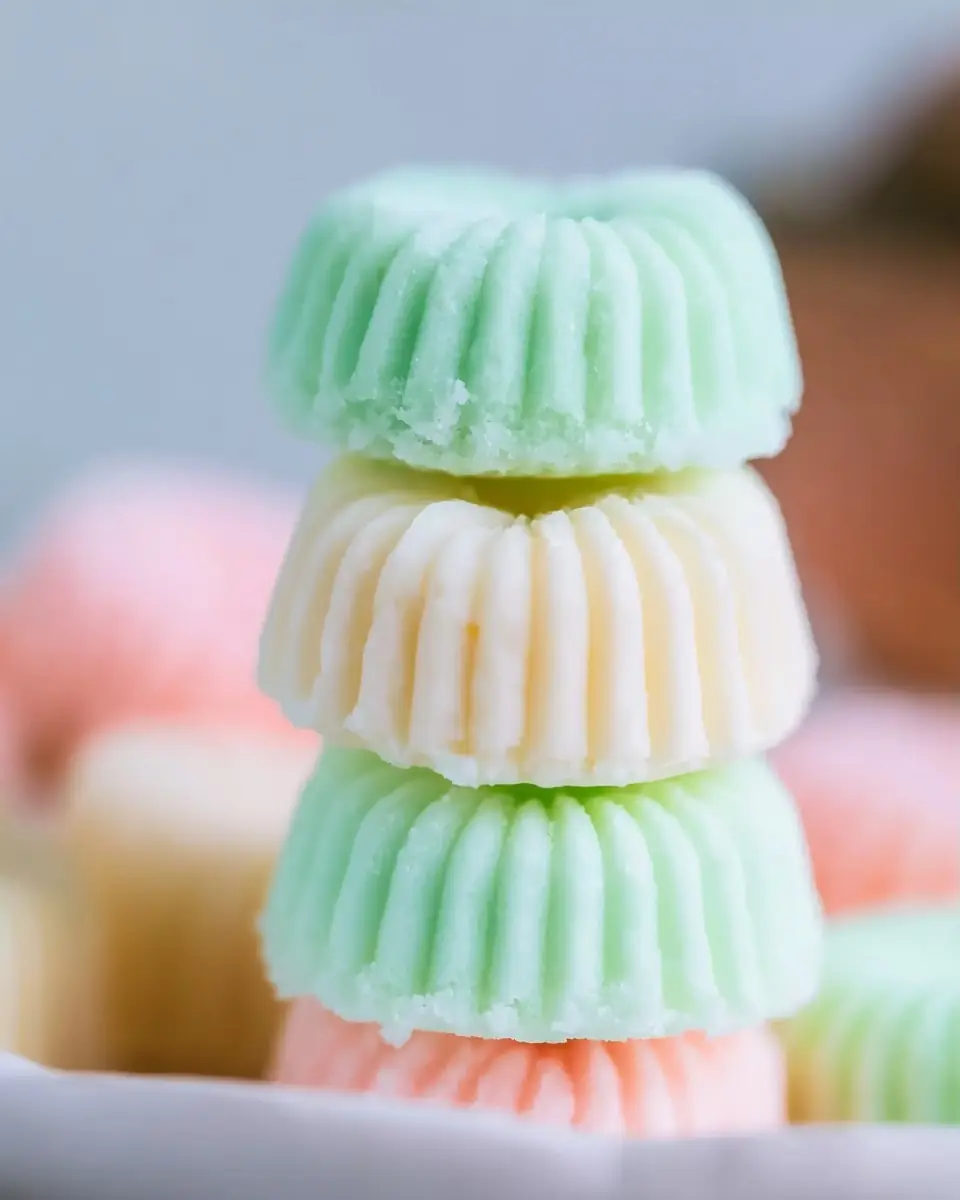
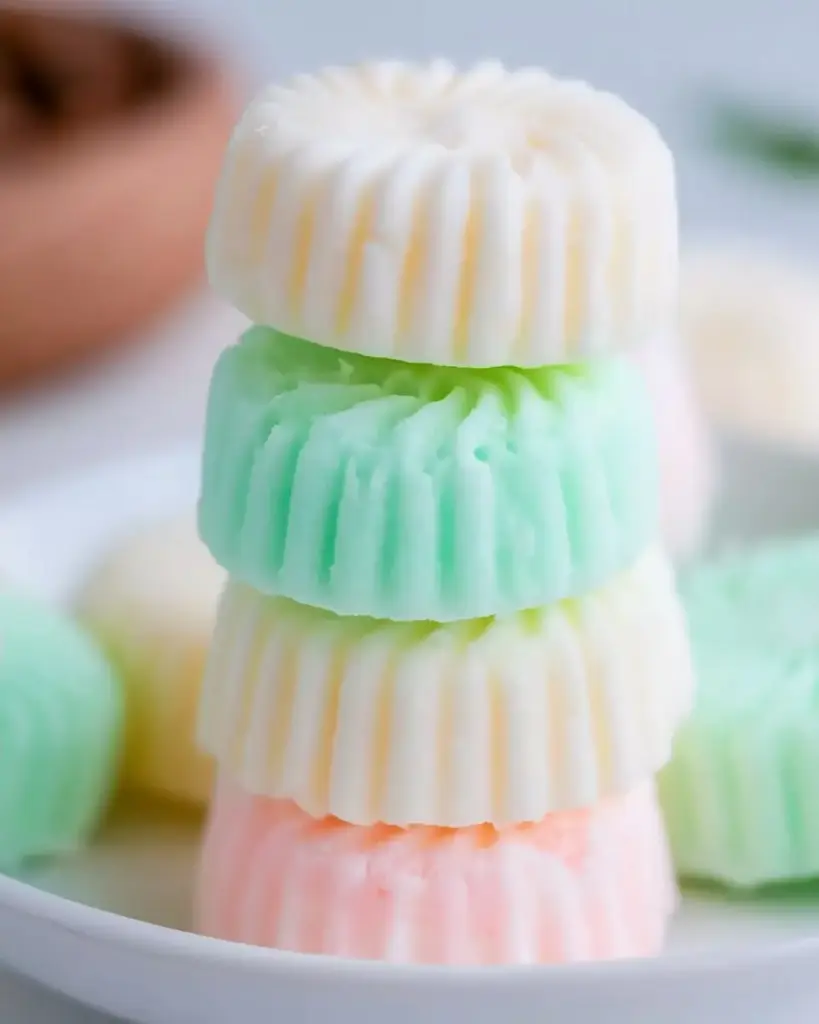
Whether you call them butter mints, party mints, or classic wedding mints, this easy cream cheese mints recipe produces beautiful, fork-pressed candies in soft neon green, pink, blue, and white—perfect for any celebration. Best of all, the entire active process takes just 45 minutes, followed by a hands-off drying period.
Ready to make the best cream cheese mints of your life? Let’s dive in.
Ingredients List
This cream cheese mints recipe uses simple, easy-to-find ingredients. Here’s exactly what you’ll need to make approximately 24 mints:
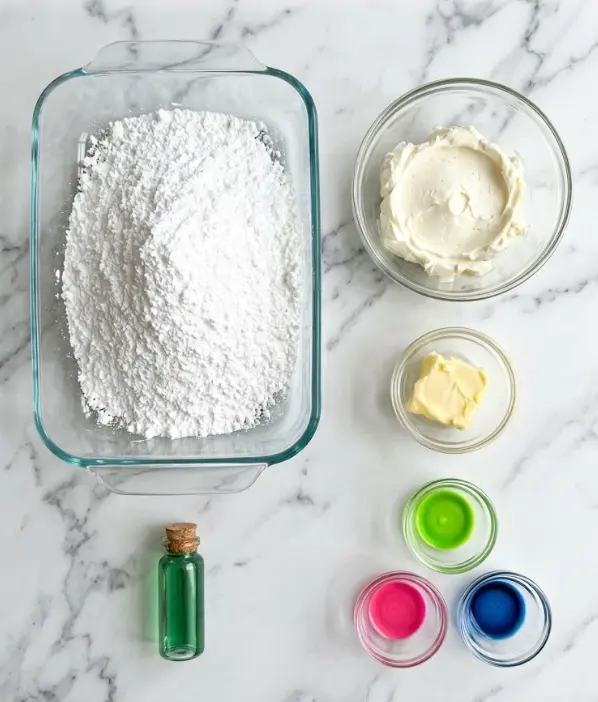
- 113 g (4 oz) full-fat cream cheese, softened to room temperature
- 14 g (1 tablespoon) butter, softened to room temperature
- 480 g (approximately 4 cups) powdered sugar, sifted if lumpy
- 2 teaspoons pure mint extract (peppermint extract works beautifully)
- Neon green gel food coloring
- Neon pink gel food coloring
- Classic blue gel food coloring
- Extra powdered sugar (for dipping the fork and preventing sticking)
Smart Substitutions:
- For a lighter version, use Neufchâtel cheese (1/3 less fat cream cheese).
- Dairy-free? Try a high-quality vegan cream cheese and plant-based butter. Results are excellent.
- Mint extract can be adjusted to 1½ teaspoons for a milder flavor or increased slightly for stronger mint intensity. Avoid peppermint oil unless you are an experienced baker—it is much more potent.
- Use natural vegetable-based food colorings if you prefer to avoid artificial dyes.
The combination of cream cheese and butter creates that signature creamy yet firm texture that makes these homemade mints addictive.
Timing
Prep Time: 15 minutes
Active “Cook” Time: 30 minutes (mixing, kneading, coloring, and shaping)
Total Active Time: 45 minutes
Drying/Resting Time: 4–6 hours at room temperature
This cream cheese mints recipe is roughly 20–30% faster than many traditional homemade candy recipes that require cooking sugar syrups or extensive chilling. The hands-on portion flies by, making it ideal for last-minute party prep or batch baking.
Step-by-Step Instructions
Step 1: Create the Base Mixture
In a large mixing bowl, combine the softened cream cheese, softened butter, and mint extract. Using a spoon or spatula, begin mixing while gradually adding the powdered sugar. The mixture will look crumbly—like coarse sand—when properly combined.
Pro Tip: Make sure your cream cheese and butter are truly at room temperature. Cold ingredients create lumps that are difficult to remove later.
Step 2: Mix Until Smooth and Crumbly
Switch to an electric hand mixer or stand mixer fitted with the paddle attachment. Beat the mixture on medium speed for 3–4 minutes. The texture should remain crumbly but uniform.
This step is crucial for developing the perfect consistency in your cream cheese mints. Over-mixing can make the dough too soft, while under-mixing leaves dry pockets.
Step 3: Knead Into a Smooth Dough Ball
Turn the crumbly mixture onto a clean surface (a silicone mat works wonderfully). Knead by hand for 2–5 minutes until it forms a smooth, pliable ball that doesn’t crack or crumble.
Personal Tip: If the mixture feels too sticky, add powdered sugar one tablespoon at a time. If it feels too dry, add the tiniest bit of softened butter. The dough should feel like playdough.
Step 4: Divide and Color the Dough
Cut the ball into four equal portions. Place each in a small bowl. Leave one portion white. Add a few drops of gel food coloring to the remaining three bowls (neon green, neon pink, and classic blue). Knead the color in by hand using gloves to avoid staining your skin. Aim for vibrant, even pastel shades.
Gel coloring is essential here—liquid food coloring can make the dough too wet.
Step 5: Shape the Mints
Line a large baking sheet with parchment paper. Roll each colored dough into small balls using approximately 1 teaspoon of mixture per mint. Place them on the prepared sheet, leaving space between each.
Step 6: Flatten with a Signature Fork Press
Dip a fork in powdered sugar to prevent sticking. Gently press down on each ball until it is flattened about halfway, creating the classic ridged pattern associated with traditional butter mints and wedding mints.
Step 7: Allow Proper Drying Time
Leave the mints uncovered at room temperature for 4–6 hours. This drying step is non-negotiable—it firms the exterior while keeping the creamy interior, giving these cream cheese mints their perfect texture.
Nutritional Information
Each mint (based on 24 servings) contains approximately:
| Nutrient | Amount per Mint | % Daily Value* |
|---|---|---|
| Calories | 40 kcal | 2% |
| Total Fat | 1.5 g | 2% |
| Saturated Fat | 1 g | 5% |
| Carbohydrates | 7 g | 3% |
| Sugars | 6.8 g | — |
| Protein | 0.3 g | 1% |
*Percent Daily Values are based on a 2,000 calorie diet.
These cream cheese mints are significantly lighter than traditional chocolate mints or buttercream candies. The majority of calories come from powdered sugar, which is necessary for both structure and sweetness. Because they are small and intensely flavored, one or two mints usually satisfy a sweet craving.
Healthier Alternatives for the Recipe
Want to boost the nutrition of this cream cheese mints recipe? Try these smart swaps while preserving the classic taste and texture:
- Lower Sugar Version: Replace up to 1 cup of powdered sugar with a powdered monk fruit or erythritol blend. The texture changes slightly but remains excellent.
- Reduced Fat: Use Neufchâtel cheese and reduce butter to 10 g. The mints stay creamy with about 25% fewer calories.
- Natural Coloring: Use spirulina (green), beet powder (pink), and butterfly pea flower (blue) for completely natural pastel shades.
- Boosted Protein: Mix in 1–2 tablespoons of powdered milk or collagen peptides (unflavored).
- Flavor Variations: Swap mint extract for lemon, orange, or lavender extract to create new varieties of these popular party mints.
These modifications make the recipe adaptable for gluten-free, vegetarian, and some lower-sugar diets.
Serving Suggestions
These versatile cream cheese mints shine in many settings. Serve them at weddings in small favor bags tied with ribbon, or arrange them on a dessert table in alternating colors for a beautiful pastel display.
For holiday parties, use red and green coloring to create festive Christmas mints. They also make excellent baby shower favors in soft pink or blue.
Creative Ideas:
- Pair with dark chocolate for an after-dinner mint tray
- Add to charcuterie boards as a sweet element
- Package in clear boxes with custom tags as thoughtful teacher or neighbor gifts
- Serve alongside coffee or tea for book clubs and brunches
The small size makes them perfect for grazing tables and ensures guests can enjoy them without overindulging.
Common Mistakes to Avoid
Even though this is an easy cream cheese mints recipe, a few common pitfalls can affect results:
- Using cold ingredients — Cream cheese and butter must be properly softened, or you’ll end up with lumpy dough that never smooths out.
- Adding too much food coloring — Especially liquid coloring. Always use gel and add gradually. Too much moisture ruins the texture.
- Skipping the kneading step — The dough needs that hands-on time to develop the right consistency.
- Rushing the drying process — Mints that aren’t dried long enough remain sticky and soft. Patience here makes all the difference.
- Storing before completely dry — Trapping moisture leads to sticky mints that can mold.
Following the steps carefully helps you avoid these issues and produce beautiful, professional-looking mints every time.
Storing Tips for the Recipe
Once fully dried (after 4–6 hours), these cream cheese mints store remarkably well. Place them in an airtight container separated by layers of parchment paper. They will stay fresh at room temperature for up to two weeks.
For longer storage, freeze in a single layer on a baking sheet, then transfer to a freezer bag. Frozen mints last up to three months. Thaw at room temperature for 30 minutes before serving.
Make-ahead tip: Prepare the dough up to 24 hours in advance, wrap tightly, and refrigerate. Bring to room temperature and knead briefly before shaping.
Conclusion
This easy cream cheese mints recipe delivers creamy, refreshing, pastel-colored homemade mints perfect for weddings, showers, holidays, and everyday treats. With only 45 minutes of active time and simple ingredients, anyone can create these beloved party favorites.
Ready to try it? Make a batch of these cream cheese mints this week! Share your results in the comments below, tell us what colors and occasions you’re making them for, or leave a review. Don’t forget to subscribe to the blog for more easy dessert recipes, party ideas, and homemade candy tutorials delivered straight to your inbox.
FAQs
How long do cream cheese mints last?
Properly dried and stored in an airtight container, they last up to 2 weeks at room temperature or 3 months in the freezer.
Can I use regular liquid food coloring instead of gel?
You can, but you’ll need significantly less and the dough may become too sticky. Gel coloring is strongly recommended for best results.
Why is my mint dough too sticky or too crumbly?
Sticky dough usually means too much moisture (from cold ingredients or excess coloring). Crumbly dough needs more kneading or a tiny bit of extra butter. Adjust gradually.
Are these mints the same as wedding mints or butter mints?
Yes! This cream cheese mints recipe is the classic homemade version of the butter mints commonly served at weddings and special events.
Can I make different flavors besides mint?
Absolutely. Replace the mint extract with almond, vanilla, lemon, or raspberry extract to create fun flavor variations.
Do I have to color the mints or can I leave them white?
You can leave them all white and simply press with the fork. They taste just as delicious and look elegantly simple.
Can these be made gluten-free?
Yes. All ingredients are naturally gluten-free. Just ensure your powdered sugar and extract are certified gluten-free if you have severe sensitivities.
These cream cheese mints are truly a recipe worth mastering. Their combination of simplicity, beauty, and delicious flavor makes them a lifelong favorite for both beginner and experienced bakers alike.


Cream Cheese Mints
Ingredients
Equipment
Method
- In a large mixing bowl, add the softened cream cheese, softened butter, and mint extract. Gradually mix in the powdered sugar until all ingredients are well combined and crumbly.
- Using an electric hand or stand mixer, blend the mixture for 3-4 minutes. The result should be a crumbly texture, resembling coarse sand.
- Transfer the crumbly mixture to a clean surface and knead it by hand until it forms a smooth, round ball. This may take a few minutes.
- Cut the ball into 4 equal parts using a sharp knife. Place each portion into a small mixing bowl for coloring.
- Using gel food coloring, add desired amounts to each bowl, leaving one portion white. Fold the color into the mixture until fully blended and vibrant.
- Line a large baking sheet with parchment paper to prevent sticking and make cleanup easier.
- Roll 1 teaspoon-sized balls from each colored mixture and place them on the prepared baking sheet. Space them out to allow for any slight expansion.
- Dip a fork in powdered sugar to prevent sticking, then gently press into each ball to flatten it halfway, creating a distinctive shape.
- Allow the mints to rest at room temperature for 4-6 hours. This drying time is crucial for achieving the right consistency.