Simple Roasted Red Pepper Soup (Canning Recipe)
What if you could open a jar from your pantry on a busy weeknight and enjoy a velvety, smoky roasted red pepper soup bursting with natural sweetness and antioxidants—without the excessive sodium, preservatives, or bland flavor of most store-bought canned soups?
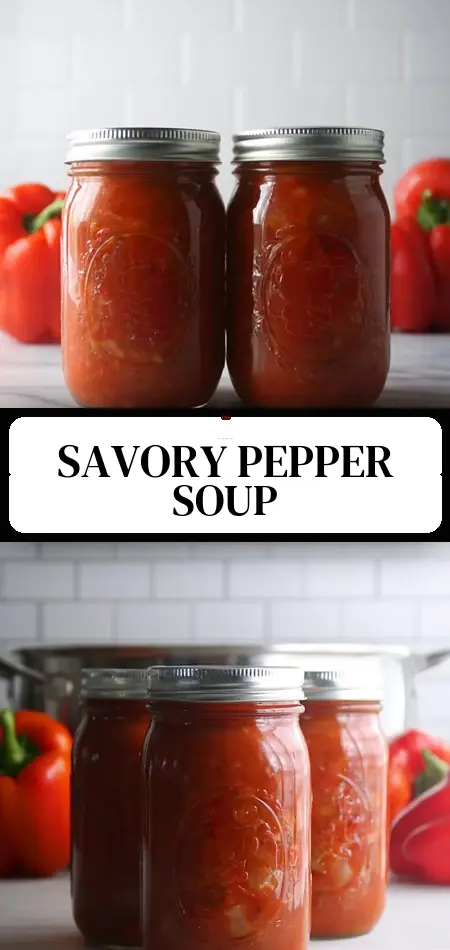
Canning roasted red pepper soup makes this possible. This tested pressure-canning recipe transforms peak-season red bell peppers, carrots, onions, and tomatoes into six pints of ready-to-heat homemade soup you can enjoy any time of year. Each serving delivers approximately 117 calories while providing exceptional levels of vitamins A and C from the roasted peppers.
Unlike water-bath recipes for high-acid fruits, canning roasted red pepper soup requires a pressure canner because vegetables and broth create a low-acid environment. The process yields a versatile, gourmet-quality soup base that beats commercial options in both taste and nutrition. With about 20 minutes of active prep and a streamlined simmer, you’ll have jars cooling on your counter after a total workflow of roughly two hours (including roasting and processing). Ready to stock your shelves with real comfort food? Let’s dive in.
Ingredients List
This recipe produces 6 pints of finished soup. All measurements are scaled for safe, consistent canning results.
Ingredients:
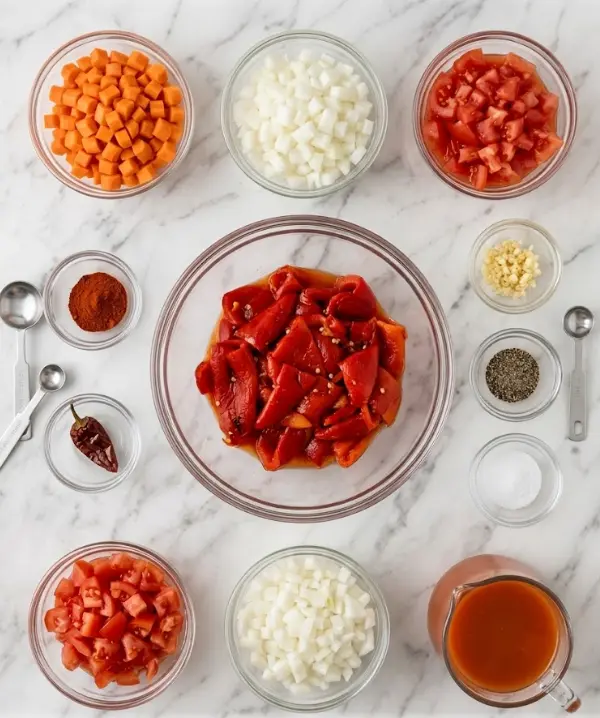
- 6 cups roasted red peppers (from about 6 large fresh peppers, roasted, peeled, seeded, and chopped)
- 2 cups carrots, diced (about 4–5 medium carrots)
- 2 cups onions, diced (about 1 large onion)
- 2 cups tomatoes, chopped fresh or 1 (14-oz) can crushed tomatoes
- 1 tablespoon smoked paprika
- 1 tablespoon garlic, minced (about 3–4 cloves)
- 1 teaspoon freshly ground black pepper
- 2 cups vegetable broth, tomato juice, or a combination
- 1½ teaspoons salt (or to taste; use canning salt for clarity)
Substitutions & Tips:
- Liquid: Vegetable broth adds depth, while tomato juice enhances color and brightness. Avoid homemade broth with low-acid ingredients that haven’t been pressure-canned first.
- Peppers: Fire-roasted jarred peppers can work in a pinch, but fresh-roasted deliver superior smoky flavor. You can substitute up to 2 cups with roasted yellow or orange bell peppers for a milder, sweeter variation.
- Spices: Smoked paprika is signature here—don’t skip it. You may add ½ teaspoon cumin or a pinch of cayenne for warmth, but avoid fresh herbs, as they can affect safety and color during long processing.
- Lower-Sodium Version: Reduce salt to 1 teaspoon total. The roasted peppers and smoked paprika provide so much flavor that you won’t miss the extra sodium compared to commercial soups that often exceed 700 mg per serving.
Using high-quality, ripe produce ensures the brightest color and richest taste in your finished canning roasted red pepper soup.
Timing
- Prep Time: 20 minutes (chopping vegetables after roasting)
- Roasting & Cooking Time: 40–50 minutes (roasting peppers 20–30 minutes + 5-minute simmer)
- Processing Time: 75 minutes for pints at 10–11 psi (90 minutes for quarts)
- Total Time: 2 hours (including roasting, simmering, processing, and initial cool-down)
The 75-minute processing time is significantly longer than water-bath recipes, but it is the scientifically validated time needed for safe canning roasted red pepper soup. This investment yields months of convenience—far faster than making soup from scratch on a weeknight. The hot-pack method used here also improves nutrient retention compared to raw-pack techniques.
Step-by-Step Instructions
Prepare Your Pressure Canner and Jars
Set up your pressure canner and heat water to about 180°F (simmering but not boiling). Wash 6 pint jars, lids, and rings in hot soapy water. Keep jars hot until filling to prevent thermal shock. Have a jar lifter, bubble remover, and clean towels ready. Venting and accurate pressure are critical for safety in pressure canning.
Roast and Prepare the Red Peppers
Roast the 6 large red peppers under a broiler, on a grill, or over an open flame until all sides are charred. Place them in a covered bowl or paper bag to steam for 10–15 minutes. Once cool enough to handle, peel off the skins, remove stems, seeds, and membranes, then chop into pieces. This roasting step creates the signature smoky depth that makes this soup exceptional.
Personalized Tip: For even more flavor, roast the garlic cloves alongside the peppers. The mellowed garlic integrates beautifully and reduces any harshness in the final canned product.
Prepare the Vegetables and Build the Soup Base
Dice the carrots and onions into uniform ¼-inch pieces for even cooking and attractive texture in the jar. Chop fresh tomatoes or open a can of crushed tomatoes. In a large stockpot, combine the chopped roasted red peppers, carrots, onions, tomatoes, minced garlic, smoked paprika, black pepper, salt, and your chosen 2 cups of liquid (broth, tomato juice, or mix).
Simmer the Soup
Bring the mixture to a boil over medium-high heat, stirring frequently. Once boiling, reduce to a simmer and cook for 5 minutes. This brief simmer softens the vegetables slightly while allowing flavors to marry without turning the soup into a puree. Taste and adjust salt if needed before filling jars. The soup should be hot (above 180°F) for proper hot-pack canning.
Fill the Jars
Ladle the hot soup into the prepared hot jars, leaving 1-inch headspace. This generous headspace is essential for safe expansion during pressure canning. Remove air bubbles with a non-metallic tool, adjust headspace if necessary, wipe rims with a clean damp cloth, and apply lids and rings until fingertip tight.
Process in a Pressure Canner
Place jars in the prepared pressure canner. Lock the lid, bring to a boil, and vent steam for 10 minutes (or per your canner’s instructions). Add the weighted or dial gauge and bring to 10 pounds pressure (weighted gauge) or 11 pounds (dial gauge). Process pints for 75 minutes or quarts for 90 minutes, adjusting pressure for your altitude according to current USDA or National Center for Home Food Preservation guidelines.
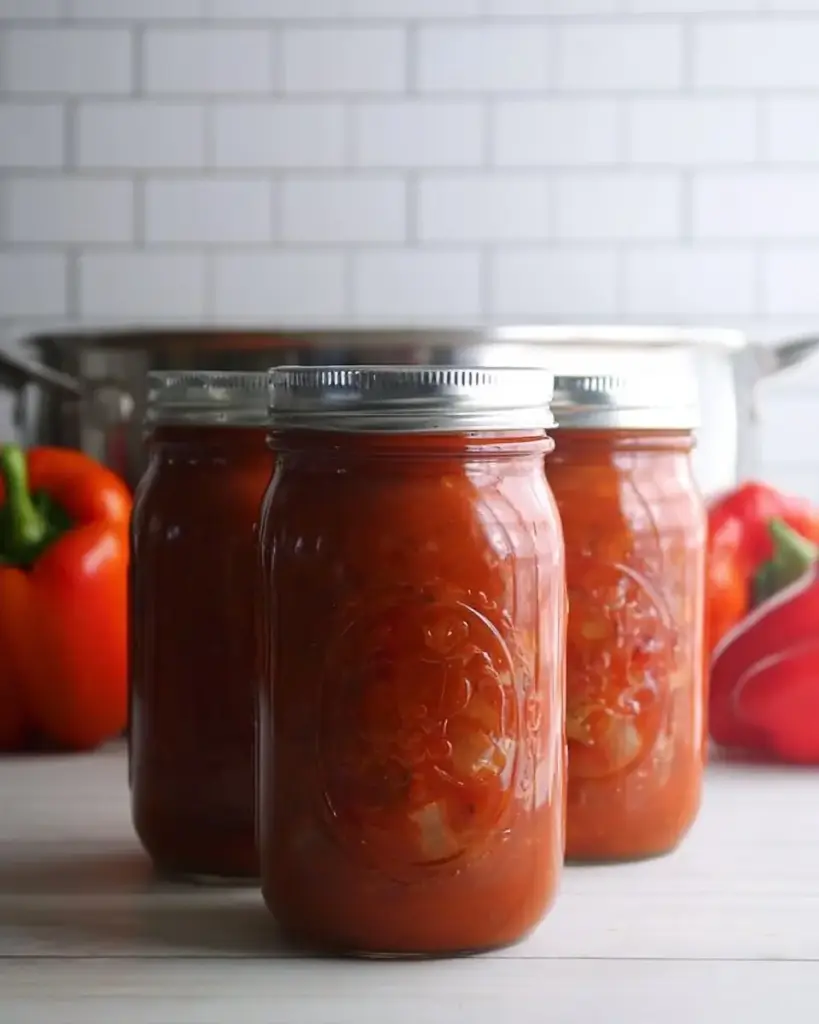
After processing, turn off heat and allow the canner to depressurize naturally. Never force-cool with water. Once pressure reaches zero, remove the lid and let jars rest 5–10 minutes before removing.
Cool and Check Seals
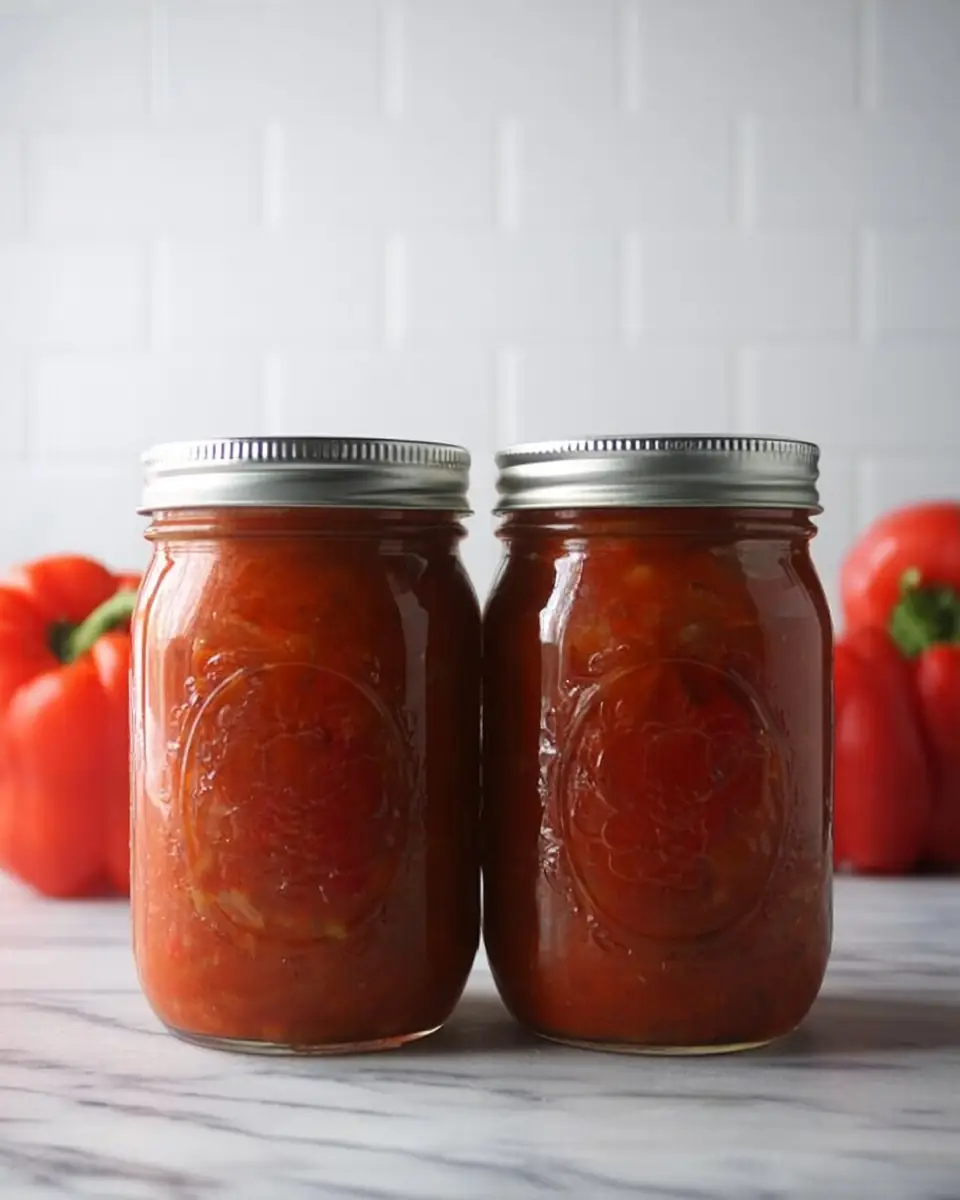
Place jars on a towel or cooling rack away from drafts. Let them cool undisturbed for 12–24 hours. Check seals by pressing the center of each lid—it should not flex. Remove rings, wash jars, label with the date and “Roasted Red Pepper Soup,” and store in a cool, dark place.
Pro Tip: The vibrant red-orange color in the jar is evidence of well-preserved carotenoids. Gentle swirling before heating redistributes any settled particles.
Nutritional Information
Per 1-cup serving (based on the provided 117-calorie benchmark):
- Calories: 117
- Total Carbohydrates: 22–25 g
- Dietary Fiber: 5–7 g
- Sugars: 12–14 g (mostly natural from vegetables)
- Protein: 3–4 g
- Vitamin A: 120–180% Daily Value (from beta-carotene in peppers and carrots)
- Vitamin C: 150–200% DV (red peppers are one of the richest natural sources)
- Antioxidants: High in lycopene, quercetin, and capsanthin
Research consistently links diets rich in these carotenoids to reduced inflammation, better eye health, and lower risk of cardiovascular disease. Compared to many commercial canned soups (often 400+ mg sodium per cup and minimal vegetables), this homemade version gives you full control over salt while delivering significantly more micronutrients. The pressure-canning process preserves most heat-stable antioxidants.
Healthier Alternatives for the Recipe
- Lower Sodium: Reduce salt to ¾ teaspoon and boost flavor with additional smoked paprika or a teaspoon of dried thyme (added before canning).
- Creamy Version: Keep the base dairy-free for canning safety, then stir in Greek yogurt, coconut milk, or heavy cream after opening and heating.
- Higher Protein: Add 1 cup cooked lentils or white beans before simmering (ensure total headspace remains correct). This creates a more filling meal.
- Keto-Friendly Adaptation: Omit carrots and use additional peppers or zucchini. Reduce tomatoes slightly to lower natural carbs.
- Anti-Inflammatory Boost: Increase garlic to 2 tablespoons and add ½ teaspoon turmeric with a pinch of black pepper before canning.
These modifications let canning roasted red pepper soup fit low-sodium, keto, vegan, or anti-inflammatory lifestyles while remaining safe for long-term storage.
Serving Suggestions
This versatile soup shines in many ways:
- Heat and serve as-is with a swirl of cream, fresh basil, and crusty bread.
- Pair with grilled cheese sandwiches for the ultimate comfort meal.
- Use as a sauce base for pasta, risotto, or grain bowls—simply reduce slightly after opening.
- Blend smooth and serve as an elegant starter garnished with goat cheese and roasted chickpeas.
- Create a quick stew by adding canned beans, greens, and sausage after heating.
- Transform into a flavorful braising liquid for chicken or white fish.
Personalized Tip: For busy families, keep a jar in the fridge after opening and use it as a quick weeknight sauce over zucchini noodles or as a base for shakshuka-style eggs. The smoky sweetness pairs beautifully with eggs and feta.
Common Mistakes to Avoid
- Using a Water Bath Instead of Pressure Canner — This is low-acid soup. Water-bath processing will not reach temperatures high enough to destroy botulism spores. Always use a pressure canner.
- Incorrect Headspace — Less than 1 inch can cause overflow or failed seals during the long 75-minute process.
- Skipping the Venting Step — Proper 10-minute steam vent is required before pressurizing. Failure to vent can result in under-processing.
- Inaccurate Pressure or Time — Use 10–11 psi and full 75 minutes for pints. Always adjust for altitude using current tested guidelines.
- Adding Dairy or Thickeners Before Canning — Cream, flour, or cornstarch must be added only after opening and reheating for safety and quality.
Following USDA-aligned methods eliminates these risks and ensures every jar is safe.
Storing Tips for the Recipe
Properly sealed jars of canning roasted red pepper soup maintain best quality for 12–18 months when stored in a cool, dark pantry between 50–70°F. Avoid temperature swings and direct light, which can degrade color and nutrients over time.
Once opened, refrigerate and consume within 5–7 days. You can also freeze the contents of an opened jar in freezer-safe containers for up to 3 months.
Prep-Ahead Strategy: Roast and chop peppers in bulk during peak season, freeze them in 6-cup portions, then thaw and proceed with canning when convenient. This spreads the work and lets you enjoy garden-fresh flavor even in mid-winter.
Conclusion
This reliable canning roasted red pepper soup recipe turns fresh roasted peppers, carrots, onions, and tomatoes into six pints of smoky, nutrient-dense comfort food using safe pressure-canning methods. With only 117 calories per serving and exceptional vitamin content, it’s a pantry staple that beats store-bought versions in every way.
Ready to fill your shelves with homemade goodness? Try this recipe on your next preserving day, then return to share your results, photos of your jars, or how you served it in the comments. Leave a review, and subscribe for more pressure-canning recipes, seasonal preserving guides, and creative ways to use your homemade pantry staples.
FAQs
Why does canning roasted red pepper soup require a pressure canner instead of a water bath?
Vegetables, onions, and broth create a low-acid environment where botulism spores can survive boiling-water temperatures. Pressure canning reaches the necessary 240°F+ to ensure safety.
Can I add cream or milk before canning roasted red pepper soup?
No. Dairy products cannot be safely pressure-canned in soups. Add them only after opening and heating the soup.
How long does home-canned roasted red pepper soup last?
Properly sealed jars maintain best quality for 12–18 months in a cool, dark pantry. Always check seals and look for signs of spoilage before use.
Can I use this soup as a pasta sauce base?
Yes! After opening, simmer to reduce slightly and toss with pasta. Many readers also use it as a base for chili or stews.
What if I live at a higher altitude?
Increase pressure (not time) according to current USDA guidelines. Most people above 1,000 feet need slight adjustments—consult your local extension office or the National Center for Home Food Preservation.
Can I use jarred roasted red peppers instead of roasting my own?
Yes, though the smoky flavor will be milder. Drain them well and measure 6 cups chopped. Results are still excellent and save significant prep time.
Roasted Red Pepper Soup (Canning Recipe)
Ingredients
Equipment
Method
- Prepare a pressure canner and jars for hot pack canning. Heat the canner water to about 180°F.
- Roast the red bell peppers under a broiler, on a grill, or over an open flame until charred on all sides. Place them in a covered bowl to steam for 10–15 minutes. Once cooled, peel off the skins, remove the seeds, and chop the peppers.
- Dice the carrots and onions, and chop the tomatoes if using fresh. Combine the chopped roasted peppers, carrots, onions, tomatoes, garlic, smoked paprika, black pepper, and your choice of liquid (water, tomato juice, or broth) in a large stockpot. Add salt to taste.
- Bring the mixture to a boil over medium-high heat, then reduce to a simmer and cook for 5 minutes.
- Ladle the hot soup into prepared, hot jars, leaving 1 inch of headspace. Remove air bubbles, adjust headspace if needed, wipe the rims clean, and apply two-piece canning lids.
- Process jars in a pressure canner at 10 pounds pressure for weighted gauge canners or 11 pounds pressure for dial gauge canners, adjusting for altitude. Process pints for 75 minutes and quarts for 90 minutes.
- After processing, turn off the heat and allow the canner to cool and depressurize naturally. Remove jars and let them sit undisturbed for 12–24 hours. Check seals before labeling and storing in a cool, dark place.