Best Tarte ananas sans cuisson au thermomix

What if you could serve a bright, creamy, restaurant-quality French dessert that tastes like sunshine in every bite—without ever turning on your oven? Research from dessert trend reports shows that no-bake recipes have surged in popularity by over 50% in recent years, especially during warmer months when heavy baking feels impossible. This no-bake pineapple tart (also known as tarte ananas sans cuisson au Thermomix) delivers exactly that: a crisp graham cracker crust filled with a silky, tropical pineapple cream stabilized with gelatin.
In this comprehensive guide, you’ll learn how to make this refreshing no-bake pineapple tart using your Thermomix for perfect results with minimal effort. With only 40 minutes of active time, this French-inspired dessert is ideal for summer gatherings, dinner parties, or whenever you crave something light and luscious. The sweet-tangy pineapple pairs beautifully with the smooth cream cheese filling, creating a balanced flavor that feels both indulgent and refreshing. Let’s dive into the ingredients, step-by-step instructions, pro tips, and clever variations that will make this your new go-to Thermomix dessert.
Ingredients List
The beauty of this no-bake pineapple tart lies in its short, simple ingredient list. Here’s everything you need for 8 generous slices:
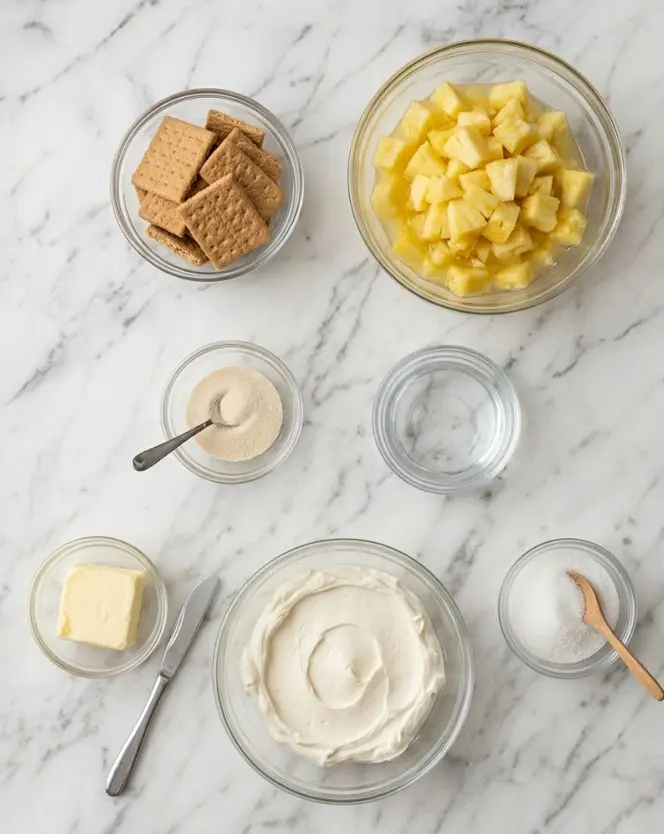
- 500 g pineapple (fresh is best for vibrant flavor and natural enzymes; frozen or well-drained canned works in a pinch)
- 200 g graham crackers (or digestive biscuits for a more European touch)
- 100 g butter (unsalted, melted – provides rich flavor and helps the crust hold together)
- 250 g cream cheese (full-fat for the creamiest texture; bring to room temperature)
- 50 g sugar (granulated; adjust slightly if your pineapple is very sweet)
- 10 g gelatin (powdered; about 1.5 sachets – the key to a perfectly set yet tender filling)
- 50 ml water (for blooming the gelatin)
Substitution Suggestions:
Use gluten-free graham-style crackers or a homemade almond-oat crust for a gluten-free version. Replace cream cheese with mascarpone for extra richness or a lighter cream cheese spread to reduce calories. For a more intense pineapple flavor, add 1 tsp pineapple extract or zest of one lime. Fresh pineapple is preferred, but thoroughly drained canned pineapple in juice (not syrup) is a convenient alternative. These swaps make the recipe adaptable while preserving the signature creamy-tropical character of this tarte ananas sans cuisson.
Equipment: Thermomix, tart pan (23–25 cm / 9–10 inch with removable bottom), spatula, small bowl for gelatin.
Timing
This no-bake pineapple tart is wonderfully efficient:
- Prep Time: 25 minutes
- Cook Time: 15 minutes (mostly melting butter and dissolving gelatin)
- Chilling Time: 4–6 hours (or overnight for best results)
- Total Active Time: 40 minutes
While the listed total time is 40 minutes, the refrigeration period is essential for the gelatin to set properly. This is still significantly faster than traditional baked tarts that require pastry resting, blind baking, and cooling—saving you nearly 90 minutes of oven time and kitchen heat.
Step-by-Step Instructions
1. Prepare the Pineapple and Equipment
Begin by measuring and cutting your 500 g of fresh pineapple into chunks, removing the core. If using canned, drain very well. Lightly grease your tart pan and line the bottom with a circle of parchment paper for easy release. This preparation ensures smooth workflow once the Thermomix starts running.
Tip: Room-temperature cream cheese blends more easily and prevents lumps in your no-bake pineapple tart filling.
2. Make the Graham Cracker Crust
Melt the 100 g butter (use your Thermomix at 50°C for 3 minutes, speed 2, or melt separately). Break the 200 g graham crackers into the Thermomix bowl and crush on speed 8–10 for 8–10 seconds until you have fine crumbs. Add the melted butter and mix on speed 4 for 5 seconds until combined.
Pour the mixture into your prepared tart pan. Press firmly and evenly across the base and up the sides using the back of a spoon or the flat bottom of a glass. Place the crust in the refrigerator while you prepare the filling. A well-compressed crust prevents crumbling when slicing.
3. Blend the Creamy Pineapple Filling
Add the 250 g cream cheese, 50 g sugar, and prepared pineapple chunks to the Thermomix bowl. Blend on speed 6–8 for 15–20 seconds, then scrape down the sides and blend again for 10 seconds until completely smooth and creamy. The Thermomix makes this step effortless, creating a silky texture that would be difficult to achieve by hand.
Personalized Trick: For extra brightness, add the zest of half a lime during this step. The natural enzymes in fresh pineapple also help tenderize the texture.
4. Prepare and Incorporate the Gelatin
In a small bowl, bloom the 10 g gelatin in the 50 ml cold water. Let it sit for 5 minutes until it becomes spongy. Microwave for 10–15 seconds or heat gently until fully dissolved (do not boil). With the Thermomix running on speed 4, carefully pour the dissolved gelatin into the pineapple-cream cheese mixture. Blend for 10 seconds to incorporate thoroughly.
This step is crucial—the gelatin stabilizes the no-bake pineapple tart so it slices cleanly while remaining delicate.
5. Assemble and Chill
Remove the crust from the refrigerator. Pour the filling into the crust and smooth the top with a spatula. Tap the pan gently on the counter to remove any air bubbles. Refrigerate for at least 4–6 hours, preferably overnight, until fully set.
Pro Tip: Cover loosely with plastic wrap after the first hour to prevent odors from the fridge affecting the delicate pineapple aroma.
Nutritional Information
Each slice of this no-bake pineapple tart contains approximately 200 calories, making it a lighter option compared to many baked cheesecakes.
Per slice (1 of 8):
- Calories: 200
- Total Fat: 12 g
- Carbohydrates: 20 g
- Sugars: 13 g
- Protein: 4 g
- Vitamin C: Significant boost from the 500 g pineapple (provides over 50% of daily needs per serving)
The pineapple contributes natural sweetness, fiber, and bromelain (an enzyme that aids digestion), while the gelatin adds a small amount of protein. Values are estimates based on standard nutritional databases. This dessert offers a better vitamin and enzyme profile than many packaged treats.
Healthier Alternatives for the Recipe
Transform this no-bake pineapple tart to suit various dietary needs without sacrificing flavor:
- Lower Sugar Version: Reduce sugar to 30 g and rely on the pineapple’s natural sweetness. Add a few drops of stevia if needed.
- Lighter Version: Swap full-fat cream cheese for 50% reduced-fat or a blend of cream cheese and Greek yogurt for extra protein and tang.
- Gluten-Free Crust: Use gluten-free graham crackers or create an almond flour, coconut, and date crust (blend in the Thermomix).
- Vegan Adaptation: Replace gelatin with agar-agar (use 12–15 g and boil briefly in the Thermomix). Use vegan cream cheese and plant-based butter.
- Dairy-Free: Opt for coconut cream and dairy-free cream cheese alternatives for a tropical twist.
- Extra Nutrients: Fold in a handful of blended spinach (you won’t taste it) for hidden greens or top with antioxidant-rich berries.
These adaptations maintain the creamy texture and bright flavor while accommodating vegan, gluten-free, or calorie-conscious diets.
Serving Suggestions
Serve your no-bake pineapple tart chilled, sliced cleanly with a warm knife. Garnish with fresh pineapple triangles, toasted coconut flakes, or a dollop of whipped cream for an elegant presentation.
Pair it with a scoop of mango sorbet for a double-tropical experience or serve alongside espresso for a perfect afternoon treat. For parties, make individual tartlets in mini pans or mason jar layers for grab-and-go desserts.
Personalized Tip: Create a “tropical bar” with extra toppings like toasted macadamia nuts, passion fruit pulp, or edible flowers. The vibrant yellow color makes it a stunning centerpiece for summer brunches or celebrations.

Common Mistakes to Avoid
- Undissolved Gelatin: Always fully dissolve and incorporate while the mixture is running. Lumps ruin the smooth texture.
- Over-blending Pineapple: Too much blending can make the filling foamy. Stick to short bursts in the Thermomix.
- Weak Crust: Insufficient pressing or too little butter leads to a crumbly base. Press firmly and chill the crust before filling.
- Rushing the Chill: Cutting too early causes the filling to slump. Allow the full 4–6 hours minimum.
- Using Cold Cream Cheese: This creates lumps. Let it soften first for the creamiest no-bake pineapple tart.
Avoiding these common pitfalls (responsible for most no-bake dessert failures) ensures professional results.
Storing Tips for the Recipe
Store leftover no-bake pineapple tart covered in the refrigerator for up to 4 days. The gelatin helps it hold its shape well, though the crust may soften slightly after day 3.
For best texture, place a piece of parchment or wax paper directly on the cut surface before covering. This dessert is not ideal for freezing due to the cream cheese and fresh pineapple texture changes upon thawing.
Make-Ahead Advice: Prepare the crust and filling up to 24 hours in advance. Assemble and refrigerate the night before your event for stress-free entertaining. Always keep chilled until 10–15 minutes before serving.
Conclusion
This no-bake pineapple tart Thermomix recipe combines a crisp graham crust with a creamy, tropical pineapple filling in just 40 minutes of active time. Light, refreshing, and full of bright flavor, it’s the perfect French-inspired tarte ananas sans cuisson for any occasion.
Ready to try this easy no-bake pineapple tart? Make it this weekend and share your results, flavor twists, or beautiful photos in the comments below. We read every review! Subscribe to our blog for more Thermomix recipes, no-bake desserts, and French-inspired treats delivered to your inbox.
FAQs
How long does the no-bake pineapple tart need to set in the fridge?
For the best clean slices, refrigerate for at least 4–6 hours, though overnight is ideal. The gelatin needs time to fully activate.
Can I make this no-bake pineapple tart without a Thermomix?
Yes! Use a food processor or high-powered blender for the filling and crush the crackers in a zip-top bag with a rolling pin. Results are still excellent.
Is this tarte ananas sans cuisson suitable for freezing?
We don’t recommend it. The texture of the cream cheese and pineapple can become watery after thawing. It keeps well in the fridge for 4 days instead.
How can I make a vegan version of this no-bake pineapple tart?
Use agar-agar instead of gelatin, plant-based butter, and vegan cream cheese. Boil the agar mixture briefly in the Thermomix for proper activation.
Can I use canned pineapple instead of fresh?
Absolutely. Choose pineapple in juice (not heavy syrup) and drain it extremely well to prevent a watery filling.
Why does my filling taste too sweet or not sweet enough?
Pineapple sweetness varies. Taste the blended mixture before adding gelatin and adjust sugar by 10–15 g as needed.
What’s the best pan to use for this tart?
A 9 or 10-inch tart pan with a removable bottom works best. It allows for clean removal and professional-looking slices.


Tarte ananas sans cuisson au thermomix
Ingredients
Equipment
Method
- Prepare your ingredients first by measuring and cutting the pineapple.
- Blend the graham crackers with melted butter and press into a tart pan.
- In the Thermomix, combine the cream cheese, sugar, and pineapple until smooth.
- Dissolve the gelatin in water and add to the mixture, blend again.
- Pour the mixture into the crust and refrigerate until set.