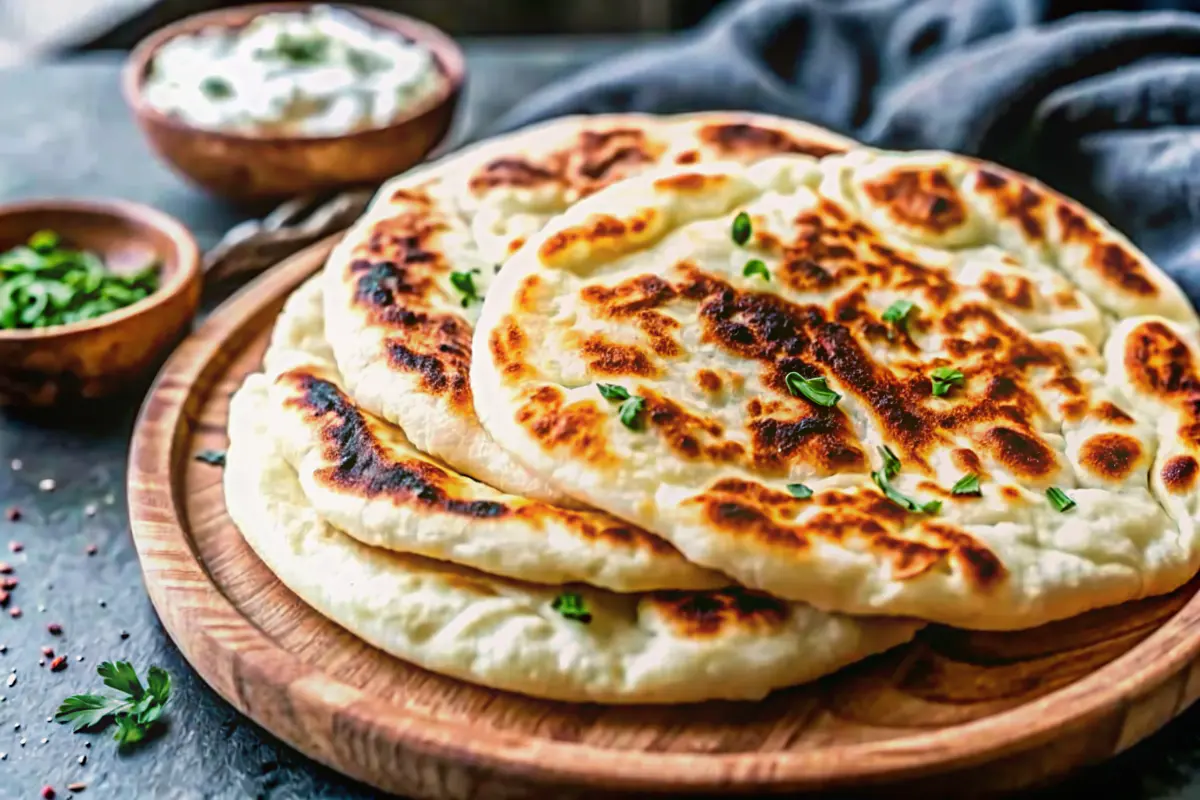
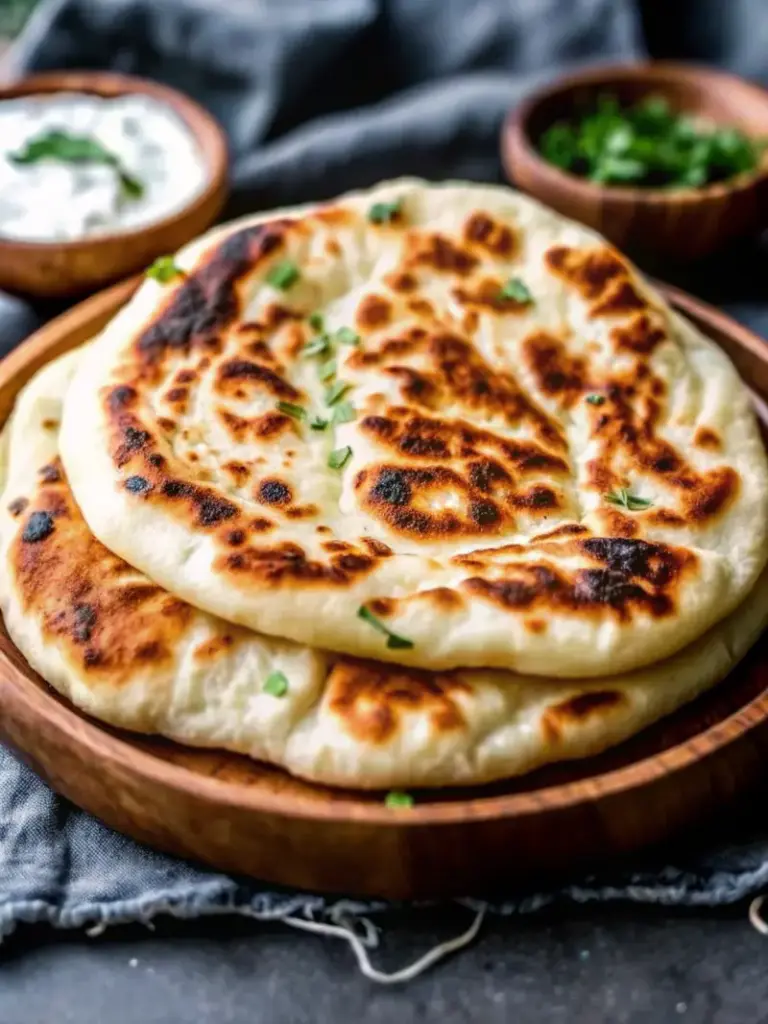
Have you ever wondered why restaurant-quality pita bread tastes infinitely better than store-bought alternatives? The secret isn’t complicated—it’s about understanding the science behind the dough and mastering a few essential techniques. In this comprehensive guide, we’ll walk you through everything you need to know to create authentic, fluffy pita bread recipe results that rival your favorite Mediterranean restaurant, all from the comfort of your own kitchen.
Pita bread recipe basics have been perfected over centuries in Mediterranean and Middle Eastern cuisines, but making homemade pita doesn’t require years of baking experience. With the right approach and our step-by-step instructions, you’ll be crafting soft, pillowy pita bread with perfectly formed pockets in no time. Whether you’re looking for a quick weeknight project or planning to impress guests at your next gathering, this definitive pita bread recipe guide covers everything from ingredient selection to storage tips.
Ingredients List
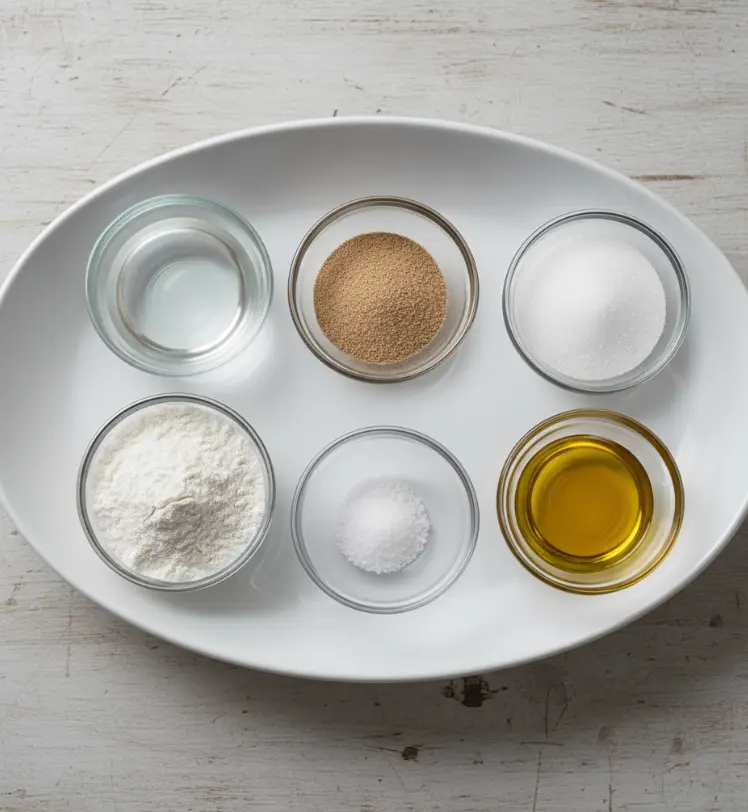
Creating the perfect pita bread recipe starts with quality ingredients. Here’s what you’ll need to gather for this authentic pita bread recipe:
- 1 cup warm water (approximately 110°F for optimal yeast activation—too hot and you’ll kill the yeast, too cool and activation will be sluggish)
- 2¼ teaspoons active dry yeast (fresh, not expired, as this directly impacts your rise)
- 1 teaspoon granulated sugar (feeds the yeast and accelerates fermentation)
- 2½ cups all-purpose flour (or a blend with bread flour for enhanced gluten development)
- 1 teaspoon kosher salt (enhances flavor and controls yeast activity)
- 1 tablespoon extra virgin olive oil (adds richness and improves texture)
Ingredient Substitutions & Options:
For a pita bread recipe with added nutrition, substitute half a cup of all-purpose flour with whole wheat flour. If you’re following a Mediterranean or Greek pita bread tradition, consider adding ½ teaspoon of dried oregano or fresh thyme leaves to your dough for authentic flavor notes. For those with dietary restrictions, this pita bread recipe can be adapted using bread machine yeast or even sourdough starter for a tangier profile.
Timing
Understanding the time investment in your pita bread recipe helps with meal planning. Here’s the breakdown:
- Preparation Time: 10 minutes
- Dough Rising Time: 1 to 1.5 hours
- Shaping & Resting: 10-15 minutes
- Cooking Time: 6-8 minutes (1-2 minutes per pita)
- Total Time: Approximately 1 hour 45 minutes to 2 hours
This timeline is notably efficient compared to many artisan bread recipes, making this pita bread recipe a practical option for weeknight dinners. The hands-on time totals only about 25-30 minutes, with the remaining time being passive rising and cooking—perfect for multitasking in the kitchen.
Step-by-Step Instructions
Step 1: Activate Your Yeast (The Foundation)
In a small bowl, combine your warm water, sugar, and yeast. This crucial step is where your pita bread recipe begins its transformation. Let this mixture sit undisturbed for 5-10 minutes. You should witness a visible foamy layer forming on top—this indicates your yeast is alive and ready to work its magic. If you don’t see this frothy activity, your yeast is likely expired, and you’ll need to start fresh with a new packet.
Pro Tip: Always check your yeast expiration date before starting. Temperature control is critical; use a kitchen thermometer to ensure your water hits the sweet spot of 110°F.
Step 2: Combine Dry Ingredients
In a large mixing bowl, whisk together your flour and salt. This combination creates the base structure for your pita bread recipe. Whisking them together ensures even salt distribution, which is essential for consistent flavor and proper gluten development throughout your dough.
Step 3: Bring It All Together
Create a well in the center of your flour mixture and pour in the activated yeast mixture along with the olive oil. Using a wooden spoon, begin stirring from the center outward, gradually incorporating flour until a shaggy dough forms. At this stage, your dough won’t look pretty—it should appear somewhat sticky and uneven. This is exactly what you want.
Step 4: Knead to Perfection (8-10 Minutes)
Transfer your dough to a clean work surface or continue in your mixing bowl. Knead by hand or using a stand mixer with a dough hook for 8-10 minutes. During this phase, you’re developing the gluten network that gives your pita bread recipe its characteristic chewy texture. The dough should transform from rough and sticky to smooth and elastic. You’ll know you’ve achieved proper kneading when the dough bounces back slightly when poked.
Insider Tip: If your dough feels too sticky while kneading, resist the urge to add excessive flour. Instead, slightly dampen your hands—this is more effective and maintains ideal moisture levels for that perfect pita texture.
Step 5: First Rise (The Patience Phase)
Place your kneaded dough in an oiled bowl, turning it to coat all sides with a thin layer of oil. Cover the bowl with a damp kitchen towel or plastic wrap and position it in a warm location—ideally around 75-80°F. Allow the dough to rise undisturbed for 1 to 1.5 hours until it has doubled in size. This fermentation period develops flavor and allows the yeast to produce carbon dioxide, creating those characteristic air pockets.
Step 6: Shape Your Pitas (The Creative Part)
Once risen, gently punch down the dough to release excess gas. Divide your dough into 6-8 equal portions—this pita bread recipe yields beautiful individual pitas perfect for serving. Roll each piece into a ball, then use a rolling pin to flatten each ball into a disc approximately ¼ inch thick. The thickness is crucial: too thin and your pitas won’t puff; too thick and they’ll remain dense.
Shaping Secret: Work gently with your dough. Rough handling can deflate the air bubbles you’ve worked so hard to develop. Let each shaped pita rest for 5 minutes before cooking.
Step 7: Cook to Golden Perfection (The Transformation)
Heat a skillet or griddle over medium-high heat. Once hot, place your first pita disc into the dry pan (no oil needed initially). Cook for 1-2 minutes on the first side until you see light golden spots appearing. Flip carefully and cook the other side for another 1-2 minutes until the pita puffs up and develops a light golden-brown color.
Game-Changing Tip: The puffing happens when steam trapped between the two sides of the dough creates pressure. For maximum puffing success, ensure your pan is properly heated and your dough disc is relatively thin and even.
Step 8: Keep Them Warm & Soft
Immediately upon removing each pita from the heat, wrap it in a clean kitchen towel. This crucial step traps steam, which keeps the pitas soft and pliable. Stack your cooked pitas in the towel as you finish cooking the remaining batch.
Nutritional Information
Here’s what one homemade pita (assuming 8 pitas per batch) typically contains:
- Calories: 160-180
- Protein: 5-6g
- Carbohydrates: 30-32g
- Fat: 2-3g (primarily from olive oil)
- Fiber: 1-1.5g
- Sodium: 290mg
Homemade pita bread recipe results offer superior nutritional profiles compared to commercial versions, which often contain preservatives and added sugars. By making your own, you control exactly what goes into each bite.
Healthier Alternatives for the Recipe
Transform this classic pita bread recipe into a more nutrient-dense option:
Whole Wheat Variation: Replace half of the all-purpose flour with whole wheat flour. This increases fiber content by approximately 40% and adds nutty flavor complexity.
Ancient Grains Version: Substitute ½ cup all-purpose flour with spelt or einkorn flour for enhanced mineral content and a distinct, slightly earthy taste profile.
Protein-Boosted Option: Add 2 tablespoons of ground flaxseed or chia seeds to your dry ingredients. This boosts omega-3 fatty acids and fiber without compromising the classic pita texture.
Lower-Sodium Alternative: Reduce salt to ½ teaspoon and add herbs like rosemary, thyme, or oregano for flavor depth without relying on sodium.
Serving Suggestions
Your freshly made pita bread recipe deserves equally delicious accompaniments:
- Mediterranean Style: Serve warm pitas with hummus, roasted vegetables, feta cheese, and olive tapenade
- Protein-Focused: Create pita sandwiches with grilled chicken, tzatziki, cucumber, and tomato
- Vegetarian: Fill with seasoned roasted chickpeas, Israeli salad (diced tomatoes, cucumbers, parsley), and tahini drizzle
- Breakfast Twist: Stuff with scrambled eggs, crumbled feta, and fresh herbs
- Dip Station: Serve alongside Greek yogurt-based dips, baba ganoush, or muhammara for entertaining
Common Mistakes to Avoid
Learning from others’ missteps accelerates your pita bread recipe mastery:
Mistake #1: Using Water That’s Too Hot or Too Cold
Hot water kills yeast; cold water doesn’t activate it. Solution: Always use a thermometer to verify 110°F water temperature.
Mistake #2: Insufficient Kneading
Under-kneaded dough lacks the gluten structure needed for proper puffing. Solution: Knead for the full 8-10 minutes until smooth and elastic.
Mistake #3: Skipping the Rest Period
Rushing shaped pitas into the pan prevents optimal puffing. Solution: Allow 5-10 minutes of rest after shaping.
Mistake #4: Pan Temperature Issues
Pans that aren’t hot enough won’t create the steam needed for puffing. Solution: Preheat your pan thoroughly and test with a drop of water—it should sizzle immediately.
Mistake #5: Opening the Towel Too Soon
Premature unwrapping allows steam to escape, causing pitas to deflate. Solution: Keep pitas wrapped for at least 10 minutes after cooking.
Storing Tips for the Recipe
Maximize your pita bread recipe results with proper storage:
Room Temperature Storage: Keep cooked pitas in an airtight container for up to 2 days. They’ll gradually firm up but remain suitable for toasting or reheating.
Refrigeration: Store in an airtight container for up to 5 days. Refrigeration slows staleness but may firm the texture slightly.
Freezer Magic: Wrap cooled pitas individually in plastic wrap, then place in a freezer bag for up to 3 months. Thaw at room temperature or toast directly from frozen.
Dough Preparation: Prepare dough through the first rise, portion into balls, and freeze on a baking sheet. Once solid, transfer to freezer bags. Thaw before cooking, or add 5-10 extra minutes to cooking time if cooking from frozen.
Reheating: Warm refrigerated or frozen pitas in a dry skillet for 30 seconds per side, or wrap in damp paper towels and microwave for 15-20 seconds for optimal texture restoration.
Conclusion
Mastering this pita bread recipe opens doors to countless Mediterranean and Middle Eastern dishes while proving that artisan-quality bread is entirely achievable at home. From yeast activation through perfect puffing, each step builds toward that satisfying moment when your pita emerges warm, soft, and ready to cradle your favorite fillings. The investment of 2 hours yields bread superior to store-bought alternatives while building confidence in your baking abilities.
Call to Action: Ready to transform your kitchen into a pita-making haven? Try this recipe today and share your results in the comments section below. Did your pitas puff perfectly? Encounter any challenges? We’d love to hear your experience and help troubleshoot any questions. Subscribe to our blog for more authentic Mediterranean recipes and expert baking tips delivered straight to your inbox!

FAQs
Q: Can I use instant yeast instead of active dry yeast in this pita bread recipe?
A: Absolutely! Use the same amount of instant yeast as active dry yeast. Instant yeast has smaller granules, so it activates slightly faster. You may reduce the activation time to 3-5 minutes.
Q: What’s the difference between this pita bread recipe and store-bought pita?
A: Homemade pita contains no preservatives, additives, or dough conditioners. The result is fresher, softer, and more flavorful bread that peaks in quality within hours of baking.
Q: Why didn’t my pitas puff up using this pita bread recipe?
A: Non-puffing typically results from: pan temperature that’s too low, dough that’s too thick, insufficient dough rest before cooking, or over-kneaded dough that’s too dense. Review each step and adjust accordingly.
Q: Can I make this pita bread recipe without a stand mixer?
A: Yes! Hand-kneading takes approximately 12-15 minutes instead of 8-10, but produces identical results. Kneading by hand also provides valuable tactile feedback about dough texture.
Q: How do I know when my dough has risen enough for this pita bread recipe?
A: The dough should approximately double in size. A simple test: gently poke the dough with a floured finger. If the indent springs back slowly and doesn’t completely disappear, it’s properly risen.
Q: Is this pita bread recipe suitable for meal prep?
A: Highly! Prepare dough through portioning, freeze the balls, and store for up to 3 months. This allows you to cook fresh pitas whenever needed—perfect for busy schedules.
Q: Can I add herbs to this pita bread recipe?
A: Certainly! Add 1-2 teaspoons of dried herbs (oregano, thyme, rosemary) or 1 tablespoon fresh herbs to your dry ingredients for Mediterranean variations.
How to Make Homemade Pita Bread: Easy Recipe with Perfect Pockets
- Total Time: 2 hours
- Yield: 6–8 pita breads 1x
- Diet: Vegetarian
Description
Learn how to make soft, fluffy homemade pita bread with perfect pockets every time. This authentic Mediterranean pita recipe walks you through yeast activation, kneading, shaping, and cooking like a pro.
Ingredients
- 1 cup warm water (110°F)
- 2¼ tsp active dry yeast
- 1 tsp granulated sugar
- 2½ cups all-purpose flour (or blend with bread flour)
- 1 tsp kosher salt
- 1 tbsp extra virgin olive oil
- Optional: substitute ½ cup flour with whole wheat, or add herbs like oregano or thyme
Instructions
- Combine warm water, sugar, and yeast. Let stand 5–10 minutes until foamy.
- Whisk flour and salt together in a large bowl.
- Add yeast mixture and olive oil to dry ingredients; mix until shaggy dough forms.
- Knead for 8–10 minutes until smooth and elastic.
- Place dough in oiled bowl, cover, and rise 1–1.5 hours until doubled in size.
- Punch down dough, divide into 6–8 balls, and roll each into ¼-inch thick discs.
- Let shaped pitas rest for 5 minutes.
- Cook each pita in a dry skillet over medium-high heat, 1–2 minutes per side, until puffed and golden.
- Wrap cooked pitas in a clean towel to keep soft and warm.
Notes
Store pitas in airtight containers at room temperature for 2 days or freeze up to 3 months. Use a properly heated skillet for best puffing results.
- Prep Time: 10 minutes
- Cook Time: 8 minutes
- Category: Bread
- Method: Stovetop
- Cuisine: Mediterranean
Nutrition
- Serving Size: 1 pita (1 of 8)
- Calories: 170
- Sugar: 1g
- Sodium: 290mg
- Fat: 3g
- Saturated Fat: 0.5g
- Unsaturated Fat: 2.5g
- Trans Fat: 0g
- Carbohydrates: 31g
- Fiber: 1.5g
- Protein: 6g
- Cholesterol: 0mg
Keywords: pita bread, homemade pita, Mediterranean bread, flatbread, yeast bread