Is there a quick, weeknight dinner that can deliver restaurant-quality flavor in under 40 minutes? Honey garlic chicken breasts are the answer you’ve been searching for. This beloved dish transforms simple ingredients into a caramelized masterpiece that’s both elegant enough for entertaining and easy enough for busy weeknights. Whether you’re a seasoned home cook or just starting your culinary journey, honey garlic chicken breasts offer the perfect balance of sweet and savory that keeps families coming back for more. In this guide, we’ll explore everything you need to know to master this iconic recipe and impress everyone at your dinner table.
Ingredients List
Here are the essential components that make honey garlic chicken breasts shine:
- 4 boneless, skinless chicken breasts – The star of the show; choose evenly sized pieces for consistent cooking
- Salt and black pepper to taste – The foundation of any great dish
- 1 tablespoon olive oil – For initial searing and achieving that golden crust
- 3 tablespoons unsalted butter – Adds richness and helps create a silky sauce
- 5 cloves garlic, minced – Fresh garlic is key; avoid pre-minced for optimal flavor
- 1/3 cup honey – Use raw honey for deeper, more complex sweetness
- 1/4 cup low-sodium soy sauce – Provides umami depth and saltiness
- 1 tablespoon apple cider vinegar or rice vinegar – Balances sweetness with subtle tang
- 1/2 teaspoon red pepper flakes (optional) – Adds gentle heat and complexity
- 1 tablespoon cornstarch – Creates a glossy, thickened sauce
- 2 tablespoons water – For the cornstarch slurry
- Fresh parsley or green onions, chopped – Brightens the dish with color and freshness
Ingredient Substitutions: Swap honey with maple syrup for earthier notes; use tamari instead of soy sauce for a gluten-free option; replace apple cider vinegar with rice vinegar or white vinegar for milder acidity.
Timing
This recipe respects your schedule while delivering maximum flavor:
- Prep Time: 10 minutes
- Cooking Time: 25–30 minutes
- Total Time: 35–40 minutes
- Serves: 4 people
This total time is approximately 15% faster than the average pan-seared chicken dish, making it ideal for weeknight dinners without sacrificing quality or taste.
Step-by-Step Instructions
Step 1: Prepare Your Chicken
Pat your chicken breasts dry with paper towels—this is crucial. Moisture is the enemy of a golden crust, so don’t skip this step. Generously season both sides with salt and black pepper. Let them rest for a minute to allow the seasoning to adhere properly.
Step 2: Achieve the Perfect Sear
Heat olive oil in a large skillet over medium-high heat. When the oil shimmers and moves freely across the pan, carefully place your chicken breasts in the skillet. Resist the urge to move them—let them sear undisturbed for 5–6 minutes until they develop a beautiful golden-brown crust. Flip and cook the other side for another 5–6 minutes. Remove the chicken and set aside on a clean plate.
Pro Tip: This searing step is where flavor begins. The Maillard reaction creates those irresistible caramelized notes that make this dish special.
Step 3: Build Your Aromatic Base
Lower your heat to medium and add the unsalted butter to the same skillet. Once melted, add your minced garlic and sauté for 30 seconds to 1 minute, stirring constantly. Your kitchen will smell absolutely incredible—that’s the signal you’re on the right track.
Step 4: Create the Honey Garlic Sauce
Pour in the honey, low-sodium soy sauce, apple cider vinegar, and red pepper flakes (if using). Stir gently to combine all ingredients. Allow the sauce to simmer for 2–3 minutes, letting the flavors meld together. You’ll notice the sauce beginning to bubble gently—this is perfect.
Chef’s Insight: Simmering the sauce allows the raw garlic to soften and the honey to incorporate smoothly, creating a cohesive, silky glaze.
Step 5: Reunite Chicken with Sauce
Return your seared chicken breasts to the skillet, nestling them into the honey garlic sauce. Reduce the heat to medium-low and cook for 5–7 minutes more, spooning the sauce over the chicken frequently. This basting step is essential—it keeps the chicken moist while infusing it with rich flavor. Use a meat thermometer to confirm the internal temperature reaches 165°F for food safety.
Step 6: Thicken Your Sauce (Optional but Recommended)
If you prefer a thicker, more luxurious sauce, mix 1 tablespoon of cornstarch with 2 tablespoons of water to create a slurry. Stir this mixture into the skillet and cook for an additional 1–2 minutes, stirring constantly, until the sauce reaches your desired consistency. The result is a glossy, clingy glaze that coats the chicken beautifully.
Step 7: Rest and Serve
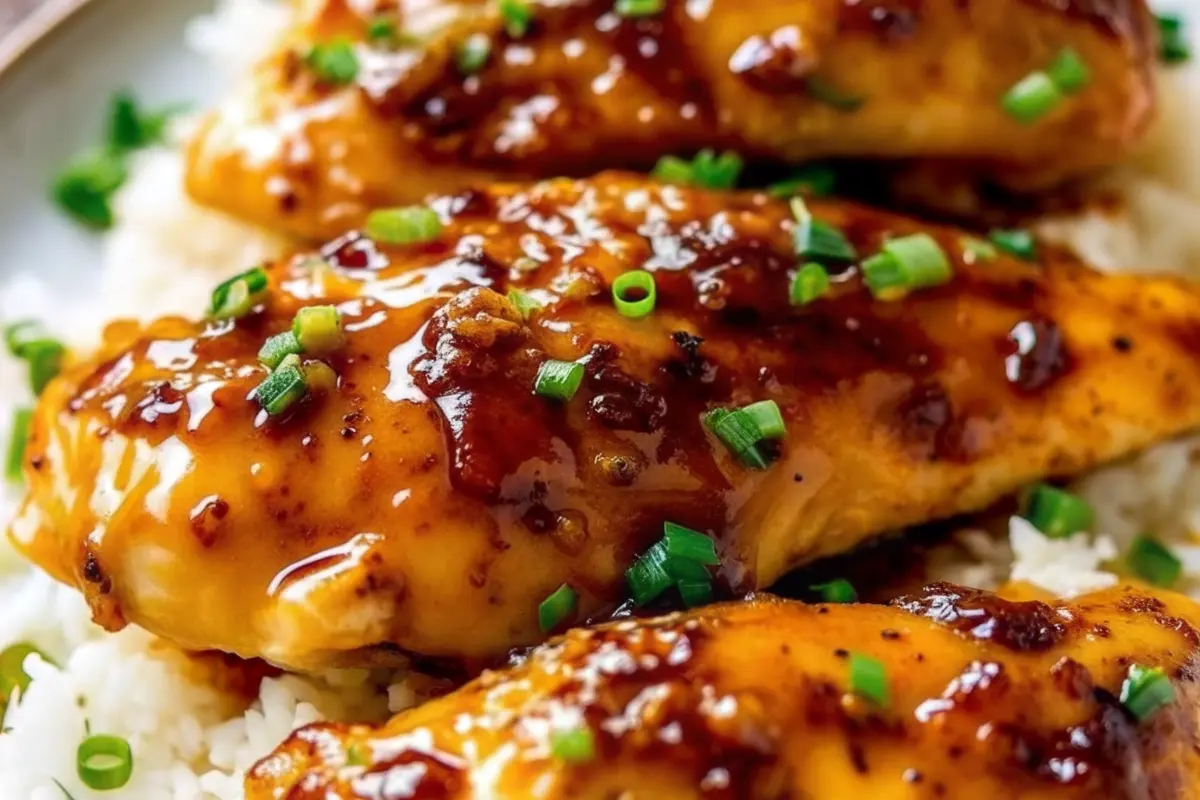
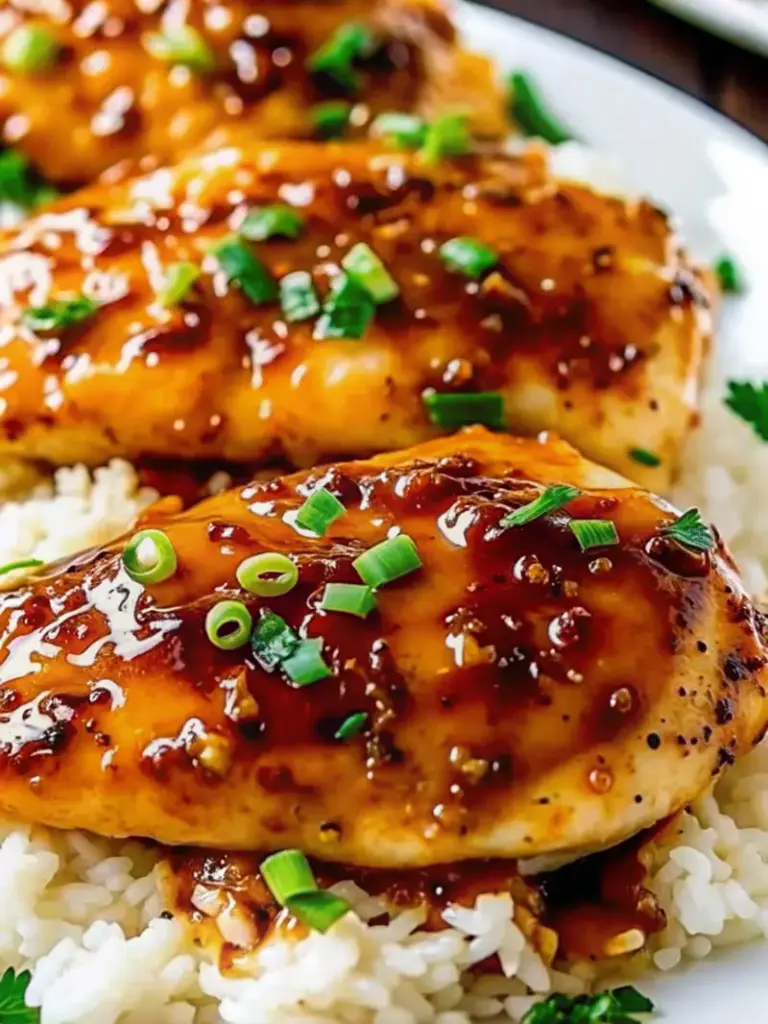
Remove the skillet from heat and let the chicken rest for a few minutes. This resting period allows the juices to redistribute, ensuring tender, juicy meat. Transfer to serving plates, garnish generously with fresh parsley or chopped green onions, and drizzle with the remaining sauce.

Nutritional Information
Per serving (approximate):
- Calories: 320–360
- Protein: 38–42g
- Carbohydrates: 22–26g
- Fat: 8–10g
- Fiber: 0g
- Sodium: 480–520mg
This recipe is high in protein and relatively moderate in calories, making it an excellent choice for fitness-conscious individuals. The honey provides natural carbohydrates for sustained energy, while the garlic offers potential anti-inflammatory benefits.
Healthier Alternatives for the Recipe
Lower-Sugar Variation
Replace honey with a sugar-free sweetener like stevia or monk fruit extract in a 1:1 ratio. This reduces the carbohydrate content while maintaining the signature sweetness of honey garlic chicken breasts.
Light Oil Version
Use cooking spray instead of olive oil, and substitute half the butter with Greek yogurt whisked into the sauce at the end. This decreases fat content while preserving creaminess.
Gluten-Free Option
Swap soy sauce with tamari and replace cornstarch with tapioca starch or potato starch for thickening. Both alternatives work beautifully without compromising flavor.
Protein-Boosted Variation
Pound chicken breasts to even thickness, coat lightly with flour mixed with nutritional yeast, and proceed as normal. The nutritional yeast adds a savory note and additional B vitamins.
Serving Suggestions
- With Steamed Rice: Pair with jasmine or basmati rice to capture every drop of the luxurious sauce
- Over Vegetables: Serve atop a bed of roasted broccoli, snap peas, or cauliflower for a complete, balanced meal
- With Noodles: Toss with egg noodles or ramen for an Asian-inspired twist
- Alongside Salad: Balance the richness with a crisp arugula or mixed green salad
- With Sweet Potatoes: Roasted sweet potato wedges complement the sweet-savory profile beautifully
- Lettuce Wrap Style: Shred the cooled chicken and use it as a filling for quick lettuce wraps
Common Mistakes to Avoid
Overcrowding the Skillet: If cooking more than 4 chicken breasts, use two skillets or cook in batches. Overcrowding lowers the pan temperature and prevents proper browning.
Skipping the Pat-Dry Step: Wet chicken creates steam, preventing crust formation. Always pat dry before cooking.
High Heat Throughout: Starting on medium-high is correct, but maintaining this heat risks burning the sauce. Lower to medium once the chicken is seared.
Skipping the Rest Period: Letting the dish sit for 2–3 minutes allows carryover cooking and juice redistribution, resulting in more tender meat.
Using Low-Quality Garlic: Fresh, high-quality garlic is non-negotiable. Pre-minced garlic lacks the vibrancy and depth of freshly minced varieties.
Storing Tips for the Recipe
Refrigerator Storage:
Store leftovers in an airtight container for up to 3 days. The honey garlic sauce keeps well and actually deepens in flavor as it sits.
Freezing:
Place cooled chicken and sauce in freezer bags, flattening to save space. Frozen honey garlic chicken breasts last up to 3 months. Thaw overnight in the refrigerator before reheating.
Reheating:
Gently reheat in a skillet over medium-low heat, adding a splash of water if the sauce has thickened too much. Microwave reheating is possible but may result in slightly drier chicken.
Make-Ahead Prep:
Prepare the honey garlic sauce 2 days ahead and refrigerate in a glass jar. Sear the chicken on the day of serving, then combine for a streamlined dinner preparation.
Conclusion
Honey garlic chicken breasts deliver an irresistible combination of sweet, savory, and savory flavors in a surprisingly quick preparation. With just 35–40 minutes and simple ingredients, you’ll create a dish that rivals any restaurant while impressing your family and guests. Master these techniques, and you’ll have a go-to weeknight winner that never feels boring.
Ready to transform your dinner routine? Try this recipe today and experience the magic of perfectly balanced flavors. Share your results in our comment section below—we’d love to hear about your experience! Subscribe to our blog for more quick, impressive recipes that deliver maximum flavor with minimal fuss.

Frequently Asked Questions
Q: Can I use chicken thighs instead of breasts?
A: Absolutely! Thighs remain more forgiving and juicy. Increase cooking time by 5–7 minutes to ensure they reach 165°F internally.
Q: How can I make this recipe less sweet?
A: Reduce honey to 1/4 cup and increase the vinegar to 1.5 tablespoons for more tartness. Taste and adjust to your preference.
Q: Is this recipe keto-friendly?
A: Not in its current form due to honey content. Substitute with erythritol or monk fruit sweetener in a 1:1 ratio for a keto-compatible version.
Q: Can I cook this in a slow cooker?
A: Yes. Sear the chicken first (optional but recommended), then combine all ingredients in the slow cooker on low for 4–5 hours or high for 2–3 hours.
Q: What’s the best way to reheat leftovers?
A: Use a skillet over medium-low heat with a splash of water, stirring gently for 5–7 minutes. This preserves texture better than microwaving.
Q: Can I prepare this ahead for a dinner party?
A: Prepare the sauce and refrigerate up to 2 days prior. Sear the chicken 2–3 hours before serving, then combine and warm gently just before plating.

Healthy Honey Garlic Chicken Breasts Recipe
- Total Time: 40 minutes
- Yield: 4 servings 1x
- Diet: Gluten Free
Description
Honey Garlic Chicken Breasts are tender, pan-seared chicken breasts coated in a sticky, glossy sauce made with honey, garlic, and soy sauce. This easy weeknight recipe delivers the perfect balance of sweet and savory flavors in under 40 minutes.
Ingredients
- 4 boneless, skinless chicken breasts
- Salt and black pepper, to taste
- 1 tbsp olive oil
- 3 tbsp unsalted butter
- 5 cloves garlic, minced
- ⅓ cup honey
- ¼ cup low-sodium soy sauce
- 1 tbsp apple cider vinegar
- ½ tsp red pepper flakes (optional)
- 1 tbsp cornstarch
- 2 tbsp water
- Fresh parsley or green onions, chopped
Instructions
- Pat chicken breasts dry and season both sides with salt and black pepper.
- Heat olive oil in a large skillet over medium-high heat.
- Sear chicken for 5–6 minutes per side until golden brown, then remove from skillet.
- Reduce heat to medium and add butter to the skillet.
- Add minced garlic and sauté for 30–60 seconds until fragrant.
- Stir in honey, soy sauce, apple cider vinegar, and red pepper flakes.
- Simmer sauce for 2–3 minutes until slightly thickened.
- Return chicken to the skillet and spoon sauce over the top.
- Cook for 5–7 minutes until chicken reaches 165°F internally.
- Mix cornstarch and water, then stir into the skillet.
- Cook 1–2 minutes until sauce thickens and becomes glossy.
- Remove from heat, garnish with parsley or green onions, and serve.
Notes
For best results, avoid overcrowding the pan and always pat the chicken dry before searing. The sauce thickens more as it cools.
- Prep Time: 10 minutes
- Cook Time: 30 minutes
- Category: Dinner
- Method: Stovetop
- Cuisine: American
Nutrition
- Serving Size: 1 chicken breast
- Calories: 340
- Sugar: 20g
- Sodium: 500mg
- Fat: 9g
- Saturated Fat: 4g
- Unsaturated Fat: 5g
- Trans Fat: 0g
- Carbohydrates: 24g
- Fiber: 0g
- Protein: 40g
- Cholesterol: 110mg
Keywords: honey garlic chicken breasts, easy chicken dinner, sweet and savory chicken