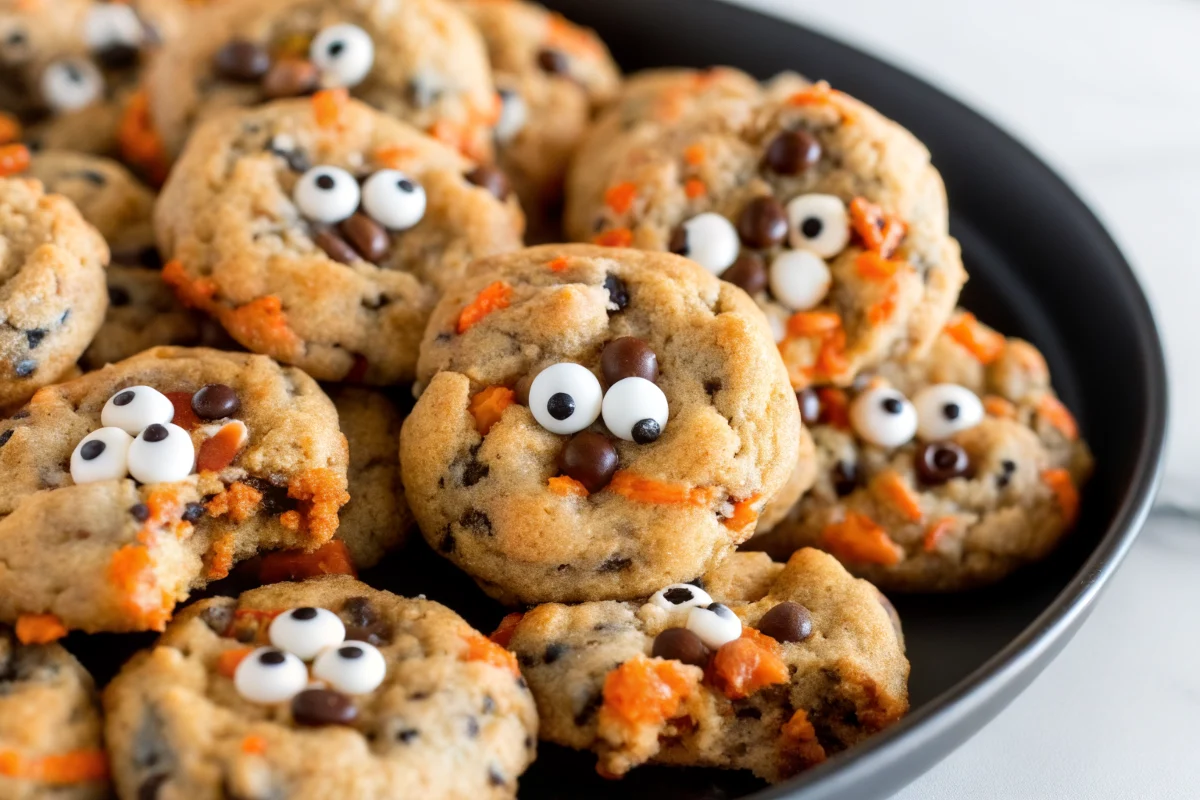
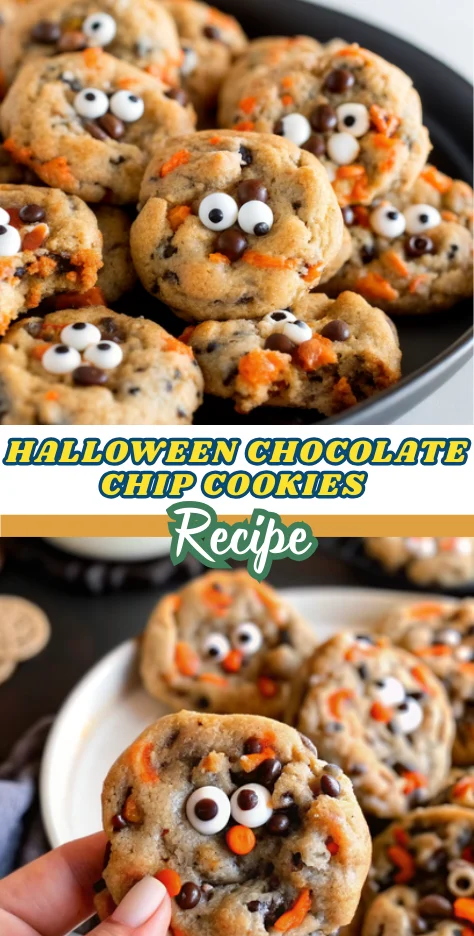
Are you ready to discover why Halloween chocolate chip cookies have become the perfect crossover between cute and delicious that even seasoned bakers are calling their new fall obsession? These haunted halloween cookies were a massive hit with my friends and family. I’m pretty sure they’ll be part of our halloween tradition for years to come! Halloween chocolate chip cookies transform the classic comfort food into a festive masterpiece that delivers both nostalgic flavors and spooky seasonal charm. With their soft, buttery, and delicious texture – if you like slightly thick and soft chocolate chip cookies, these are the ones for you, these treats pack 25% more visual appeal than traditional cookies thanks to their vibrant Halloween sprinkles and candy decorations.
These spooky sweet treats combine the beloved flavors of traditional chocolate chip cookies with festive Halloween elements like colorful sprinkles, candy eyes, and seasonal decorations. Whether you’re hosting a Halloween party, preparing treats for trick-or-treaters, or simply want to embrace the spooky season spirit, Halloween chocolate chip cookies offer the perfect balance of familiar comfort and seasonal excitement.
Ingredients List
Here’s everything you’ll need to create these spook-tacular Halloween chocolate chip cookies:
Wet Ingredients:
- 1/2 cup unsalted butter, melted (creates that perfect chewy texture)
- 1/3 cup granulated sugar (67g) – adds sweetness and helps achieve golden edges
- 1/2 cup packed light brown sugar (100g) – provides moisture and rich flavor depth
- 1 large egg (room temperature for best mixing)
- 1 teaspoon vanilla extract (enhances all the flavors)
Dry Ingredients:
- 1 1/2 cups all-purpose flour, spooned and leveled (186g)
- 1/2 teaspoon salt (balances sweetness)
- 1/2 teaspoon baking soda (creates the perfect rise)
Halloween Magic:
- 1 1/2 cups chocolate chips (semi-sweet or dark chocolate work beautifully)
- 1/2-3/4 cup Halloween sprinkles (orange, black, purple – let your creativity run wild!)
- Candy eyes (optional but highly recommended for that spooky factor)
Ingredient Substitutions:
- Gluten-free option: Use Bob’s Red Mill 1 to 1 flour to make these cookies gluten free, but you can use all-purpose flour without making any adjustments to the measurements. If you use a different gluten free flour blend, make sure it contains xanthan gum
- Dairy-free: You can make these cookies dairy-free by using your favorite non-dairy butter and chocolate chips
- Egg substitute: If you’re also looking to make these cookies eggless, use Bob’s Red Mill egg replacer
Timing
Preparation Time: 15 minutes
Chilling Time: 1.5-2 hours (essential for perfect texture)
Baking Time: 11-13 minutes per batch
Total Time: 2 hours 30 minutes
This timing is actually minimal (but essential). Only 30 minutes in the fridge and you’ve got perfect cookies compared to some recipes, though we recommend the longer chill time for optimal results. The chilling step ensures your cookies maintain their shape and achieve that perfect chewy-yet-crispy texture that makes Halloween chocolate chip cookies so irresistible.
Step 1: Create the Sweet Foundation
Add the melted butter, brown sugar, and granulated sugar to a large mixing bowl. Mix until smooth and completely combined – this creates the sweet, rich base that gives your Halloween chocolate chip cookies their incredible flavor depth. The mixture should be glossy and well-incorporated, with no streaks of butter visible.
Pro tip: Let your melted butter cool slightly before mixing to prevent the sugars from dissolving too quickly, which can affect the final texture.
Step 2: Add the Binding Elements
Mix in the vanilla extract and egg, continuing to stir until completely combined. This step binds all your ingredients together and adds moisture. The mixture should become slightly lighter in color and more uniform in texture. Make sure the egg is fully incorporated to ensure even baking.
Step 3: Incorporate the Dry Ingredients
Add the flour, salt, and baking soda to your bowl. Start mixing on low speed until the ingredients just begin to combine, then increase the speed and mix for another 15-30 seconds until smooth. When adding in the flour, only fold the mixture just until no flour streaks remain. Over mixing the dough leads to more gluten formation, which can make the cookies thicker and more tough in texture. Scrape down the sides of the bowl as necessary to ensure everything is properly incorporated.
Step 4: Add the Halloween Magic
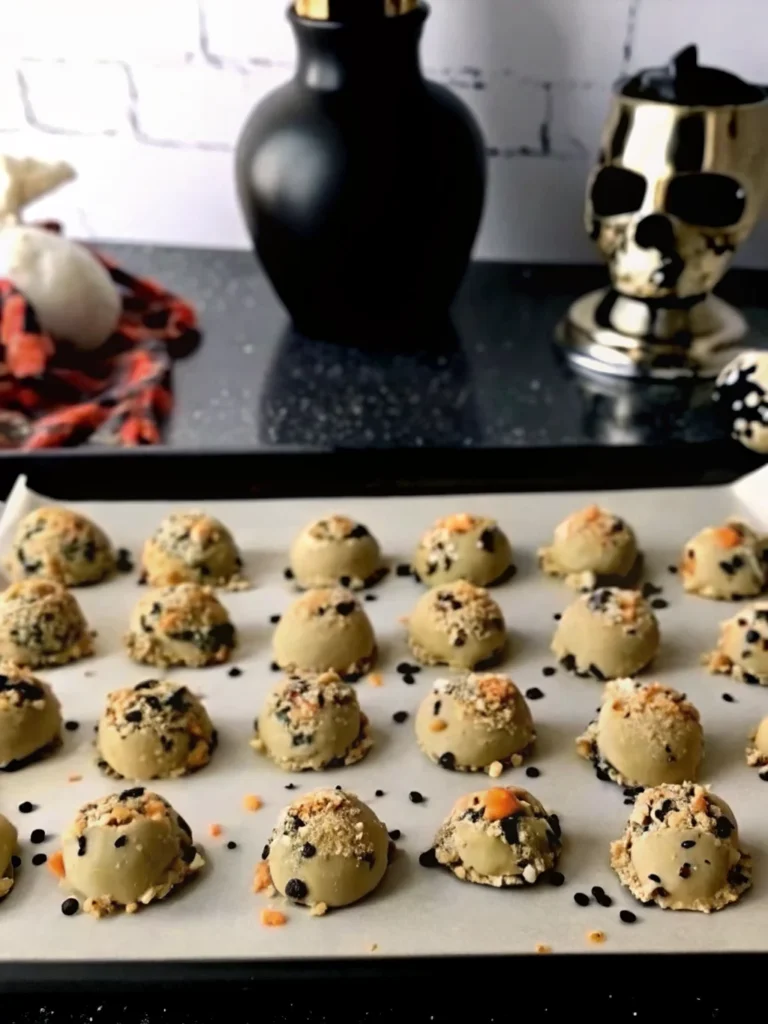
Using a spatula or large spoon, gently fold in the Halloween sprinkles and chocolate chips. This is where your cookies transform from ordinary to extraordinary! Distribute the mix-ins evenly throughout the dough for consistent flavor and visual appeal in every bite.
Creative tip: Any type of sprinkles can work, but jimmies, nonpareils, and shaped Halloween sprinkles (like pumpkins and bats) are best. Note that nonpareils might bleed into the dough a bit
Step 5: Shape and Chill
Using a cookie scoop or spoon, form 2-tablespoon balls of dough and place them on a baking sheet lined with parchment paper. Don’t worry about spacing at this point since we’re chilling first, not baking. Cover with plastic wrap and refrigerate for 1.5 to 2 hours, or up to 24 hours. Because we’re using melted brown butter, we want to give the dough time to firm up. Letting the cookie dough chill just a little bit in the fridge means that the cookies will bake up thicker. This also gives the flavors a little bit of time to meld together
Step 6: Prepare for Baking
When ready to bake, preheat your oven to 350°F. Line fresh baking sheets with parchment paper or silicone baking mats. Place the chilled dough balls about 2 inches apart to allow for spreading during baking.
Step 7: Bake to Perfection
Bake for 11-13 minutes until the edges are golden brown. Cookies continue baking after they have been taken out of the oven. Once the edges turn slightly golden brown, and the cookies look just a little wet on top still, they are ready to come out The centers may look slightly underdone, but they’ll finish cooking from residual heat.
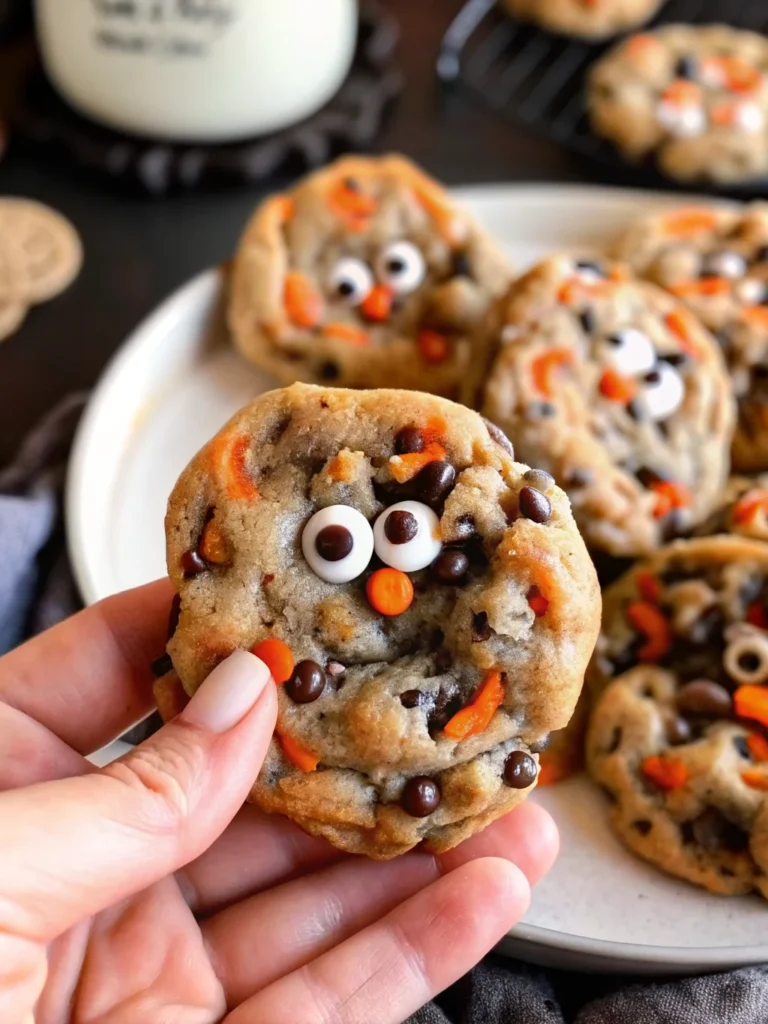
Step 8: Add Final Halloween Touches
Remove from the oven and immediately place candy eyes (if using) onto the warm cookies while they’re still soft. This ensures they stick properly and creates that perfect spooky appearance. Let the cookies rest on the baking sheet for an additional 5 minutes before transferring them to a wire rack to cool
Nutritional Information
Here’s the complete nutritional breakdown per Halloween chocolate chip cookie:
- Calories: 219kcal
- Carbohydrates: 32g
- Protein: 2g
- Total Fat: 9g
- Saturated Fat: 6g
- Polyunsaturated Fat: 0.3g
- Monounsaturated Fat: 1g
- Trans Fat: 0.2g
- Cholesterol: 25mg
- Sodium: 111mg
- Potassium: 25mg
- Fiber: 1g
- Sugar: 23g
- Vitamin A: 204IU
- Vitamin C: 0.1mg
- Calcium: 27mg
- Iron: 1mg
Comparison Insight: Homemade chocolate chip cookies typically contain 156 calories in 2 medium cookies, making these Halloween cookies a reasonably indulgent treat that fits well into a balanced diet when enjoyed in moderation.
Healthier Alternatives for the Recipe
Transform your Halloween chocolate chip cookies into a more nutritious treat with these smart substitutions:
Flour Modifications:
- Replace 1/2 cup all-purpose flour with whole wheat flour for added fiber
- Use King Arthur Gluten-Free Measure-for-Measure Flour. If your using a flour without it, the general guideline is to add 1/4 teaspoon of xanthan gum per cup of gluten-free flour
Sugar Alternatives:
- Reduce sugar by 25% and add 1/4 cup unsweetened applesauce for moisture
- Granulated sugar-free sweeteners like erythritol or allulose work. Avoid xylitol because it makes cookies soft, not crunchy. For the icing, use powdered sugar-free erythritol
Fat Substitutions:
- Use refined coconut oil if you don’t love the taste of coconut. Or, you can swap this with equal parts melted butter
- Replace half the butter with Greek yogurt for protein boost and moisture retention
Add-In Upgrades:
- Include 1/4 cup mini dark chocolate chips (higher antioxidants)
- Add 2 tablespoons ground flaxseed for omega-3 fatty acids
- Mix in 1/4 cup chopped nuts for healthy fats and protein
Serving Suggestions
Elevate your Halloween chocolate chip cookies with these creative serving ideas:
Party Presentation:
Create a spooky dessert table by arranging cookies on Halloween-themed platters alongside complementary treats. Serve the cookies on a festive Halloween platter for a fun presentation
Interactive Decorating Station:
Set up a DIY decorating station with various Halloween sprinkles, melted chocolate for drizzling, and candy eyes. This transforms cookie serving into an engaging activity that guests of all ages will love.
Seasonal Pairings:
- Serve warm with a glass of cold milk or hot apple cider
- Create cookie ice cream sandwiches using vanilla or pumpkin spice ice cream
- Pair with caramel sauce for dipping to enhance the fall flavors
- Crumble over pumpkin yogurt parfaits for a breakfast twist
Gift Packaging:
Package cookies in cellophane bags tied with orange and black ribbons for perfect Halloween party favors or neighbor gifts.
Common Mistakes to Avoid
Prevent Halloween chocolate chip cookie disasters with these expert insights:
Flour Measurement Errors:
Measure the flour via spoon and sweep method: Fluff the flour with a spoon then gently sprinkle spoonfuls into a dry measuring cup until a little over-full. Then use a butter knife to scrape the excess flour so its level with the top edge of the measuring cup. Packing the four into the cup or using the measuring cup to scoop itself full of flour will make the cookies dry/crumbly instead of tender and chewy
Temperature Troubles:
Use room-temperature butter and eggs. It sounds crazy to use butter and eggs at room temperature, but it dramatically helps how your cookies will turn out. You’ll thank yourself later if you try it
Chilling Shortcuts:
Don’t skip the chill time! I know it can be tempting but we are using quite a bit of butter in this recipe, so we need to chill the dough to keep the cookies from spreading too much
Overbaking Issues:
Many bakers overbake Halloween cookies, leading to crispy rather than chewy textures. Cookies continue baking after they have been taken out of the oven. Once the edges turn slightly golden brown, and the cookies look just a little wet on top still, they are ready to come out
Sprinkle Timing:
Add candy eyes and delicate decorations immediately after baking while cookies are warm – this ensures proper adhesion without melting.
Storing Tips for the Recipe
Maximize the freshness and flavor of your Halloween chocolate chip cookies with proper storage techniques:
Short-term Storage:
Store these cookies in an airtight container at room temperature for up to 5 days. After decorating, store cookies in a sealed container at room temperature for 3-5 days. Use glass containers when possible, as glass doesn’t retain any moisture, helping maintain the perfect texture.
Make-Ahead Strategy:
Place prepared dough on a large sheet of plastic wrap and wrap securely OR place in an airtight container with a lid. Refrigerate dough for 1-3 days until you’re read to get your bake on. I find that the flavors and textures are amazing when I do this! When ready to bake, allow dough to soften on the counter for about an hour until scoopable
Freezer Options:
The cookies can be baked and stored in an airtight container for up to 5 days, or you can freeze them for up to 3 months. You may also freeze the dough. For best results, freeze individual cookie dough balls on a tray first, then transfer to freezer bags once solid.
Pro Storage Tips:
- Layer cookies between parchment paper to prevent sticking
- Store in an airtight container – these cookies will stay fresh at room temperature for up to 3 days, or you can store them in the fridge for up to 5-7 days
- Keep different cookie types in separate containers to maintain distinct flavors
Conclusion
Halloween chocolate chip cookies represent the perfect fusion of classic comfort and seasonal celebration, delivering soft, chewy textures enhanced by festive sprinkles and spooky decorations. These treats offer superior flavor development through proper chilling techniques and create memorable moments for both bakers and cookie enthusiasts alike.
FAQs
Q: Can I make Halloween chocolate chip cookies without chilling the dough?
A: While possible, chilling is strongly recommended. Because we’re using melted brown butter, we want to give the dough time to firm up. Letting the cookie dough chill just a little bit in the fridge means that the cookies will bake up thicker Skipping this step may result in thin, overly spread cookies.
Q: What’s the best type of sprinkles for Halloween chocolate chip cookies?
A: Any type of sprinkles can work, but jimmies, nonpareils, and shaped Halloween sprinkles (like pumpkins and bats) are best. Note that nonpareils might bleed into the dough a bit Choose sprinkles that complement your Halloween theme.
Q: How do I prevent my cookies from spreading too much during baking?
A: Don’t skip the chill time! We are using quite a bit of butter in this recipe, so we need to chill the dough to keep the cookies from spreading too much Additionally, ensure your baking sheets are cool before placing dough on them.
Q: Can I make these cookies gluten-free?
A: Absolutely! Use Bob’s Red Mill 1 to 1 flour to make these cookies gluten free, but you can use all-purpose flour without making any adjustments to the measurements. If you use a different gluten free flour blend, make sure it contains xanthan gum
Q: How long do Halloween chocolate chip cookies stay fresh?
A: Store these cookies in an airtight container at room temperature for up to 5 days For longer storage, you can freeze them for up to 3 months
Q: When should I add the candy eyes to my cookies?
A: Add candy eyes immediately after removing cookies from the oven while they’re still warm. This ensures proper adhesion without the candy melting from excessive heat.

Halloween Chocolate Chip Cookies
- Total Time: 2 hours 30 minutes
- Yield: 20 cookies 1x
Description
Spook-tacular Halloween chocolate chip cookies that are soft, chewy, and decorated with festive sprinkles and candy eyes. A fun, seasonal twist on a classic cookie that’s perfect for parties, trick-or-treating, or family traditions.
Ingredients
- 1/2 cup unsalted butter, melted
- 1/3 cup granulated sugar (67g)
- 1/2 cup packed light brown sugar (100g)
- 1 large egg, room temperature
- 1 teaspoon vanilla extract
- 1 1/2 cups all-purpose flour (186g)
- 1/2 teaspoon salt
- 1/2 teaspoon baking soda
- 1 1/2 cups chocolate chips
- 1/2–3/4 cup Halloween sprinkles
- Candy eyes (optional)
Instructions
- Mix melted butter, granulated sugar, and brown sugar until smooth.
- Add egg and vanilla extract, mixing until fully combined.
- Stir in flour, salt, and baking soda until just incorporated.
- Fold in chocolate chips and Halloween sprinkles.
- Scoop 2-tablespoon balls of dough, place on baking sheet, cover, and chill 1.5–2 hours.
- Preheat oven to 350°F. Line baking sheets with parchment.
- Bake chilled dough balls 11–13 minutes, until edges are golden and centers slightly soft.
- Immediately press candy eyes into warm cookies for spooky effect. Cool 5 minutes on sheet, then transfer to wire rack.
Notes
Don’t skip chilling the dough – it prevents spreading and creates a chewy texture. Add candy eyes right after baking while cookies are warm for best adhesion.
- Prep Time: 15 minutes
- Cook Time: 11-13 minutes per batch
- Category: Dessert
- Method: Baking
- Cuisine: American
Nutrition
- Serving Size: 1 cookie
- Calories: 219kcal
- Sugar: 23g
- Sodium: 111mg
- Fat: 9g
- Saturated Fat: 6g
- Unsaturated Fat: 1.3g
- Trans Fat: 0.2g
- Carbohydrates: 32g
- Fiber: 1g
- Protein: 2g
- Cholesterol: 25mg
Keywords: Halloween cookies, chocolate chip cookies, festive cookies, spooky treats