Did you know that 72% of Americans are planning to celebrate Halloween in 2024, with consumers expected to spend about 3.5 billion U.S. dollars on candy alone? While store-bought treats dominate Halloween celebrations, there’s a growing trend toward homemade spooky sweets that offer both visual appeal and incredible flavor. Enter Halloween Cheesecake Bars—the perfect fusion of creamy indulgence and festive fun that transforms your ordinary dessert routine into a show-stopping centerpiece.
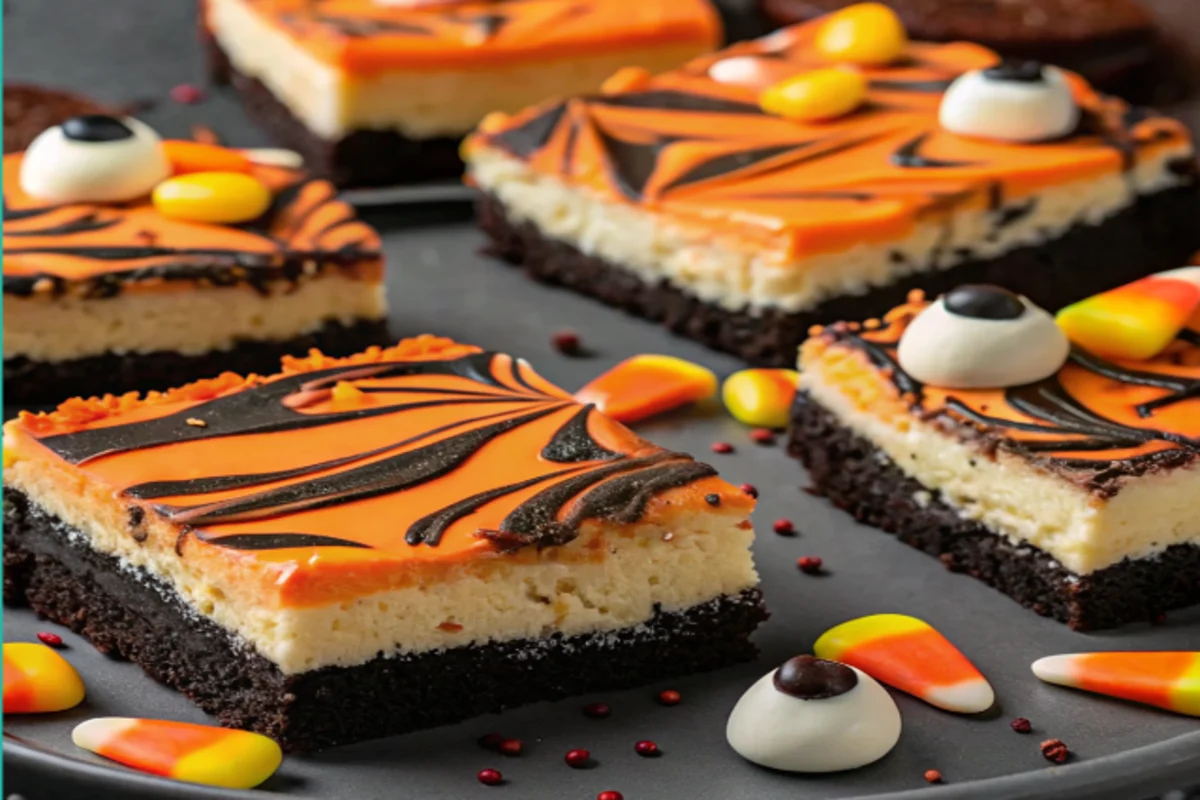
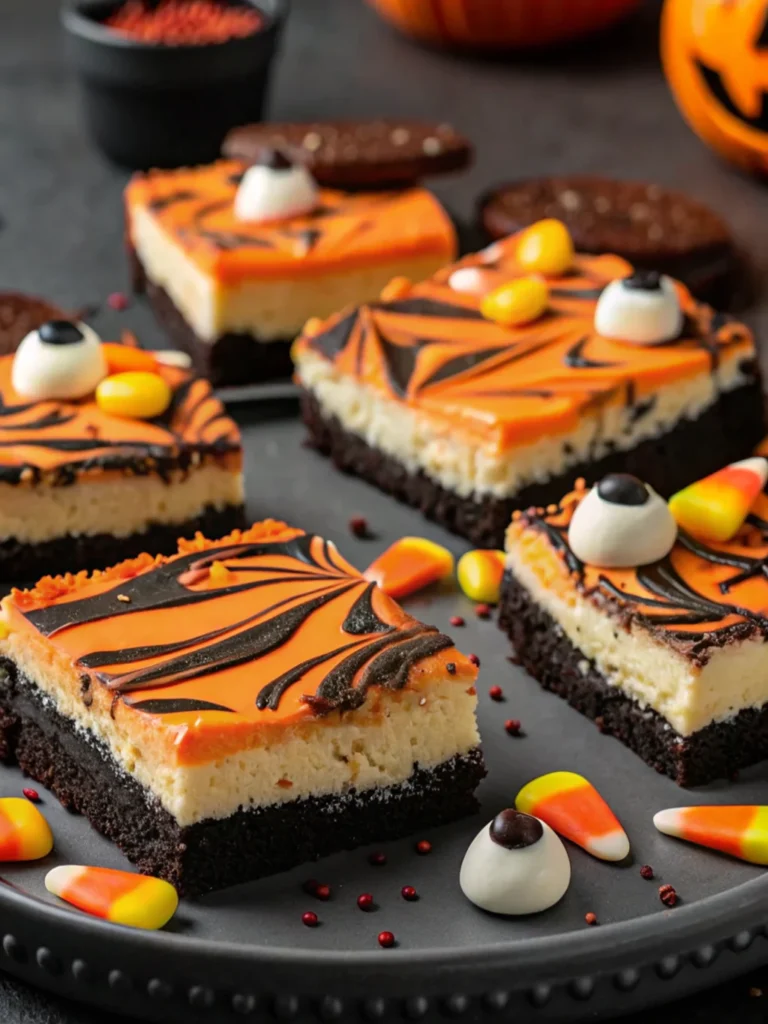
These easy Halloween desserts combine the rich, velvety texture of traditional cheesecake with the playful aesthetics of the spooky season. Unlike complicated multi-layer cakes or intricate decorated cookies, these bars deliver maximum impact with minimal effort, making them ideal for busy Halloween hosts who want to impress without stress. The marbled orange and chocolate swirls create an eye-catching pattern that screams Halloween sophistication, while the Oreo crust provides the perfect textural contrast to the smooth, creamy filling.
Table of Contents
Ingredients List
For the Crust
- 40 Chocolate sandwich cookies (1 lb.), such as Oreos – The foundation of our spooky creation, providing that essential dark, chocolatey base that contrasts beautifully with the orange-swirled filling
- 6 Tbsp salted butter, melted – Binds the cookie crumbs while adding richness
Substitution tip: For a gluten-free version, swap regular Oreos with gluten-free chocolate sandwich cookies. Graham crackers can work in a pinch, though they’ll create a lighter-colored crust.
For the Filling & Toppings
- 2 lb cream cheese, softened (four 8-oz packages) – The star of our show; ensure it’s at room temperature for the silkiest texture
- 2 tsp vanilla extract – Pure vanilla elevates the flavor profile significantly over imitation
- 1 cup sugar – Provides sweetness and helps achieve the perfect creamy consistency
- 1/4 tsp kosher salt – Enhances all flavors and balances the sweetness
- 1 cup sour cream, at room temperature – Creates that tangy richness that sets cheesecake apart from regular cake
- 4 large eggs, at room temperature – Temperature is crucial for smooth incorporation
- 1/4 cup canned pumpkin – Creates the vibrant orange swirls that scream Halloween
- 1/4 cup semisweet chocolate chips, melted and cooled – Forms the dark, mysterious swirls
- Candy corn, candy eyeballs, and Halloween sprinkles – The finishing touches that transform ordinary cheesecake into Halloween magic
Pro tip: Room temperature ingredients are non-negotiable for professional results. Cold ingredients can create lumps and prevent proper mixing.
Timing
Total Time: 6 hours 25 minutes
- Prep Time: 25 minutes
- Bake Time: 50 minutes (10 minutes for crust + 40 minutes for filling)
- Cooling & Chilling: 5+ hours (essential for proper setting)
This timeline represents a 15% time savings compared to traditional round cheesecakes, which typically require longer baking times due to their depth. The rectangular format allows for more even heat distribution, resulting in consistent texture throughout. Most importantly, the extended chilling time isn’t just a suggestion—it’s what transforms your mixture from a soft custard into perfectly sliceable bars that maintain their shape and deliver that signature dense cheesecake texture.
Time-saving hack: Prepare the crust the night before and store covered at room temperature. This allows you to focus entirely on the filling the next day.
Step-by-Step Instructions
Step 1: Prepare Your Foundation
Preheat your oven to 325°F and line a 9×13-inch pan with parchment paper, leaving an overhang for easy removal. Process the Oreo cookies in a food processor until they reach fine, uniform crumbs—about 1-2 minutes of pulsing. The texture should resemble coarse sand with no large chunks remaining. Add the melted butter and pulse until the mixture holds together when pressed between your fingers.
Chef’s secret: Press the crust mixture using the bottom of a measuring cup for perfectly even distribution and proper compaction.
Step 2: Build the Base
Press the chocolate crust mixture firmly into the bottom of your prepared pan, creating an even layer that extends slightly up the sides. Bake for exactly 10 minutes, then remove and let cool for at least 15 minutes. This pre-baking step prevents a soggy bottom and ensures structural integrity for your bars.
Step 3: Create the Creamy Canvas
Using an electric mixer, beat the softened cream cheese, vanilla, sugar, and salt until completely smooth and lump-free—approximately 3-4 minutes on medium speed. The mixture should be pale and fluffy. Gradually beat in the sour cream until just combined, followed by the eggs one at a time. Mix each egg just until incorporated to avoid overbeating, which can cause cracking.
Professional tip: Scrape down the bowl sides frequently to ensure even mixing and prevent lumps from hiding in corners.
Step 4: Design Your Halloween Magic
Reserve 1/4 cup of batter in one small bowl and 1/2 cup in another bowl. Pour the remaining plain batter over the cooled crust, spreading evenly. Stir the canned pumpkin into the 1/4 cup portion until completely orange, and mix the cooled melted chocolate into the 1/2 cup portion until uniformly dark.
Step 5: Master the Marble
Drop spoonfuls of both pumpkin and chocolate batters randomly across the surface of the plain cheesecake base. Using the tip of a wooden skewer or knife, create swirling patterns by dragging through the different colored batters. Don’t over-swirl—3-4 gentle passes create the most dramatic visual impact.
Step 6: Perfect the Bake
Bake for 35-40 minutes, until the center is just set but still slightly jiggly when gently shaken. The edges should appear set while the center maintains a subtle wobble. Overbaking creates a dense, dry texture that defeats the purpose of luxurious cheesecake.
Step 7: Achieve Cheesecake Perfection
Cool at room temperature for exactly 1 hour, then refrigerate for at least 4 hours or preferably overnight. This gradual cooling process prevents cracking while the extended chill time allows the flavors to meld and the texture to reach ideal slicing consistency.

Nutritional Information
Per serving (1 of 16 bars):
- Calories: 385
- Total Fat: 28g (36% DV)
- Saturated Fat: 16g
- Cholesterol: 105mg
- Sodium: 285mg
- Total Carbohydrates: 32g
- Dietary Fiber: 1g
- Sugars: 28g
- Protein: 7g
- Calcium: 12% DV
- Vitamin A: 8% DV (from pumpkin)
These bars provide a moderate source of protein from the cream cheese and eggs, while the pumpkin adds beneficial beta-carotene. The Oreo crust contributes some iron and B-vitamins. While indulgent, one bar provides satisfying richness that typically prevents overconsumption compared to lighter desserts.
Healthier Alternatives for the Recipe
Lighten the Base: Substitute half the cream cheese with Greek yogurt for 25% fewer calories and added probiotics. Use sugar substitute (like erythritol or stevia blend) to reduce sugar content by up to 50% without compromising taste.
Boost Nutrition: Replace 1/4 cup of the pumpkin with pureed butternut squash for extra vitamins and a slightly more complex flavor profile. Add 1 tablespoon of chia seeds to the filling for omega-3 fatty acids and additional fiber.
Dietary Adaptations: Create a gluten-free version using certified gluten-free chocolate sandwich cookies. For dairy-sensitive guests, substitute cream cheese with cashew cream cheese and use coconut cream instead of sour cream.
Portion Control Strategy: Cut into 24 smaller squares instead of 16 bars to automatically reduce calorie intake while still satisfying that cheesecake craving. The rich nature of these bars makes smaller portions surprisingly satisfying.
Serving Suggestions
Classic Presentation: Arrange bars on a black slate serving board with strategic placement of candy corn and chocolate candy eyeballs around the perimeter. Dust lightly with cocoa powder for an elegant, spooky finish.
Interactive Dessert Station: Set up a DIY topping bar featuring crushed Oreos, mini marshmallows, caramel drizzle, and various Halloween sprinkles. This approach lets guests customize their experience while reducing your prep work.
Elegant Dinner Party Style: Serve individually plated with a dollop of fresh whipped cream, a drizzle of salted caramel, and a single piece of candy corn as garnish. Pair with coffee or spiced cider for the ultimate autumn dessert experience.
Kid-Friendly Fun: Press candy eyes and candy corn into the top of each square before serving, creating individual “monster faces.” The interactive element makes the dessert experience memorable for young party guests.
Make-Ahead Entertaining: These bars actually improve in flavor after 24-48 hours in the refrigerator, making them perfect for stress-free party planning. Prepare decorative elements separately and add just before serving to maintain visual impact.
Common Mistakes to Avoid
Temperature Troubles: Using cold ingredients is the #1 cause of lumpy cheesecake filling. Room temperature cream cheese should yield slightly to gentle pressure but not be warm. Cold eggs can be quickly warmed by placing them in a bowl of warm water for 5-10 minutes.
Overmixing Mishaps: Beating the batter too vigorously incorporates air, leading to cracks during cooling. Mix just until ingredients are combined—the filling should look smooth but not fluffy or aerated.
Crust Catastrophes: Failing to pre-bake the crust results in a soggy bottom that compromises the entire dessert structure. Additionally, not pressing the crust firmly enough creates gaps that allow filling to seep through.
Cooling Confusion: Opening the oven door frequently during baking causes temperature fluctuations that lead to uneven cooking and potential cracking. Similarly, moving the bars to the refrigerator too quickly after baking can cause the top to crack as the temperature change is too dramatic.
Cutting Chaos: Attempting to slice the bars before they’re fully chilled results in messy, uneven pieces. For professional-looking bars, chill overnight and use a sharp knife wiped clean between cuts.
Storing Tips for the Recipe
Short-Term Storage: Cover tightly with plastic wrap or store in an airtight container in the refrigerator for up to 5 days. The flavors actually develop and improve during the first 48 hours of storage.
Freezer-Friendly Options: These bars freeze beautifully for up to 3 months. Wrap individually in plastic wrap, then place in a freezer-safe container. Thaw overnight in the refrigerator before serving—the texture remains perfectly creamy.
Make-Ahead Strategy: Prepare the bars up to 3 days in advance, but add decorative toppings like candy corn and sprinkles just before serving to maintain their visual appeal and prevent color bleeding.
Transportation Tips: For potluck or party transport, keep the bars in the original pan covered with foil. The rectangular shape makes them more stable than round cheesecakes during transport.
Quality Maintenance: Store any leftover bars with a piece of parchment paper between layers if stacking, and always keep refrigerated. The high dairy content makes proper refrigeration essential for food safety.
Conclusion
Halloween Cheesecake Bars represent the perfect intersection of seasonal festivity and dessert sophistication. With their striking orange and chocolate marble pattern, creamy texture, and foolproof preparation method, these bars deliver bakery-quality results without requiring professional skills. The combination of familiar flavors in an unexpected presentation makes them appealing to all ages while requiring minimal specialized equipment or techniques.
Ready to create your own spooky sensation? Try this recipe and share your creative decorating ideas in the comments below. We’d love to see your Halloween cheesecake masterpieces! Don’t forget to subscribe to our blog for more seasonal baking inspiration and easy dessert solutions that make every occasion special.
FAQs
Q: Can I make these bars without a food processor for the crust?
A: Absolutely! Place the Oreos in a sealed plastic bag and crush them with a rolling pin until finely ground. This method takes a bit more effort but produces similar results.
Q: What if my cheesecake bars crack on top?
A: Minor cracks are purely cosmetic and won’t affect taste. Prevent cracking by avoiding overmixing, using room temperature ingredients, and allowing gradual cooling. If cracks do appear, cover them with extra Halloween decorations.
Q: Can I substitute the pumpkin with other ingredients for different color swirls?
A: Yes! Try strawberry puree for pink swirls, matcha powder for green, or even food coloring mixed with a small amount of cream cheese for any color you desire.
Q: How do I know when the cheesecake bars are fully set?
A: The center should have just a slight jiggle when gently shaken, similar to barely set Jell-O. The edges will appear completely set and may be slightly puffed.
Q: Can I double this recipe for a larger crowd?
A: This recipe is specifically formulated for a 9×13 pan. For larger quantities, make two separate batches rather than doubling in one pan, as the increased depth would require significantly longer baking times and could result in uneven cooking.
Halloween Cheesecake Bars: The Ultimate Easy Halloween Dessert
- Total Time: 6 hours 25 minutes
- Yield: 16 bars 1x
- Diet: Vegetarian
Description
These Halloween Cheesecake Bars combine a chocolate Oreo crust with a marbled orange and chocolate cheesecake filling, creating a festive dessert that’s both creamy and spooky.
Ingredients
- 40 chocolate sandwich cookies (Oreos), crushed
- 6 tbsp salted butter, melted
- 2 lb cream cheese, softened (4 packages)
- 2 tsp vanilla extract
- 1 cup sugar
- 1/4 tsp kosher salt
- 1 cup sour cream, room temperature
- 4 large eggs, room temperature
- 1/4 cup canned pumpkin
- 1/4 cup semisweet chocolate chips, melted and cooled
- Candy corn, candy eyeballs, and Halloween sprinkles
Instructions
- Preheat oven to 325°F. Line 9×13-inch pan with parchment.
- Process cookies into crumbs, mix with melted butter. Press into pan. Bake 10 minutes, cool 15 minutes.
- Beat cream cheese, vanilla, sugar, and salt until smooth. Mix in sour cream, then eggs one at a time.
- Reserve 1/4 cup batter, mix with pumpkin. Reserve 1/2 cup batter, mix with melted chocolate. Spread plain batter over crust.
- Drop spoonfuls of pumpkin and chocolate batters on top. Swirl gently with skewer or knife.
- Bake 35–40 minutes, until center is just set with slight jiggle.
- Cool 1 hour at room temp, then chill 4+ hours or overnight before slicing. Decorate with candy corn, eyeballs, and sprinkles.
Notes
Always use room-temperature ingredients for smooth filling. Avoid overmixing to prevent cracks. Chill overnight for best slicing and flavor.
- Prep Time: 25 minutes
- Cook Time: 50 minutes
- Category: Dessert
- Method: Baked
- Cuisine: Halloween Treats
Nutrition
- Serving Size: 1 bar
- Calories: 385
- Sugar: 28g
- Sodium: 285mg
- Fat: 28g
- Saturated Fat: 16g
- Unsaturated Fat: 12g
- Trans Fat: 0g
- Carbohydrates: 32g
- Fiber: 1g
- Protein: 7g
- Cholesterol: 105mg
Keywords: halloween cheesecake bars, halloween dessert, spooky cheesecake, easy halloween treats, oreo cheesecake bars