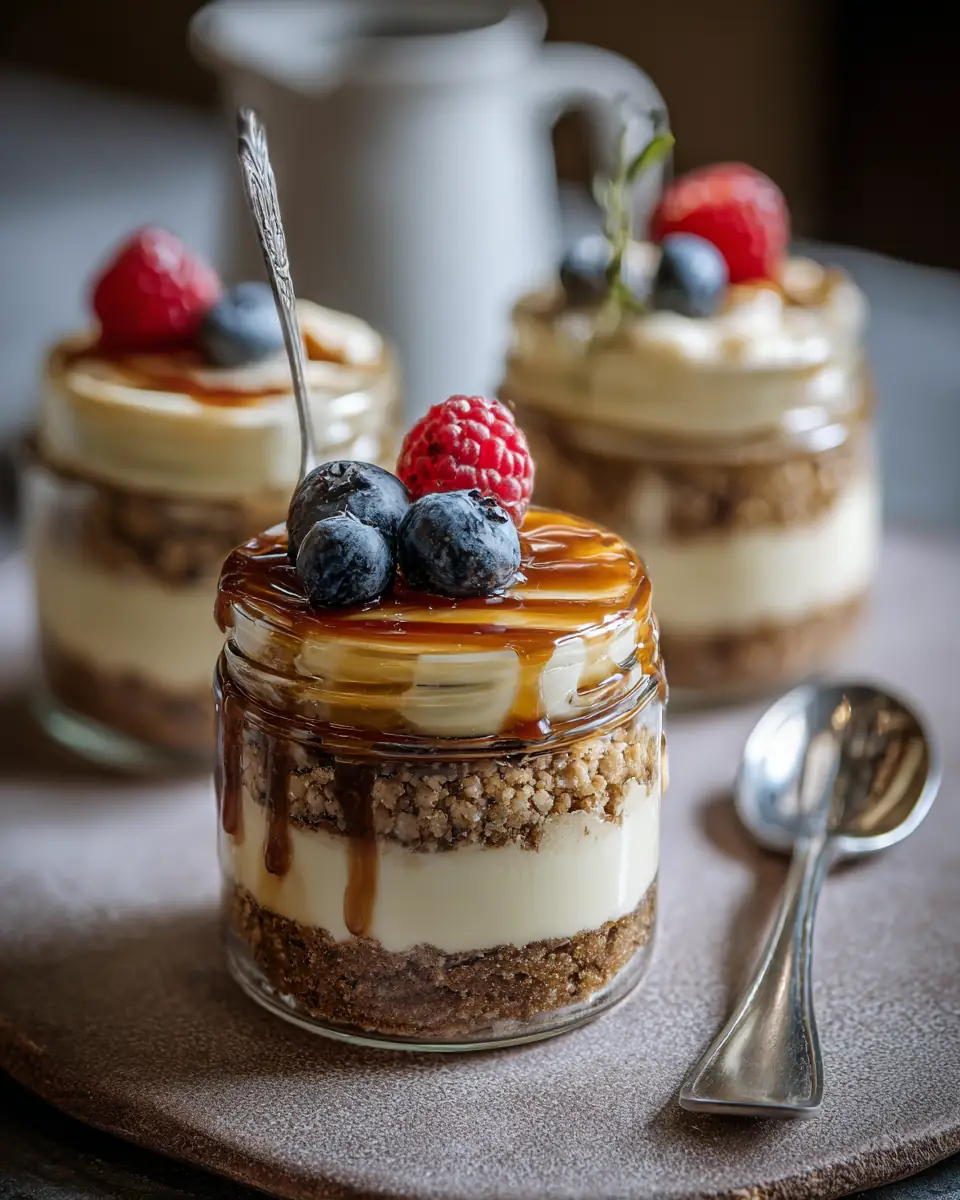
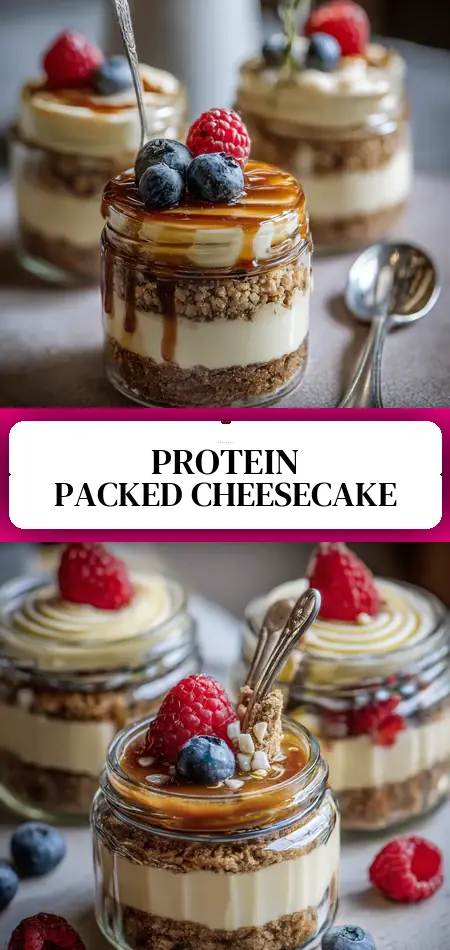
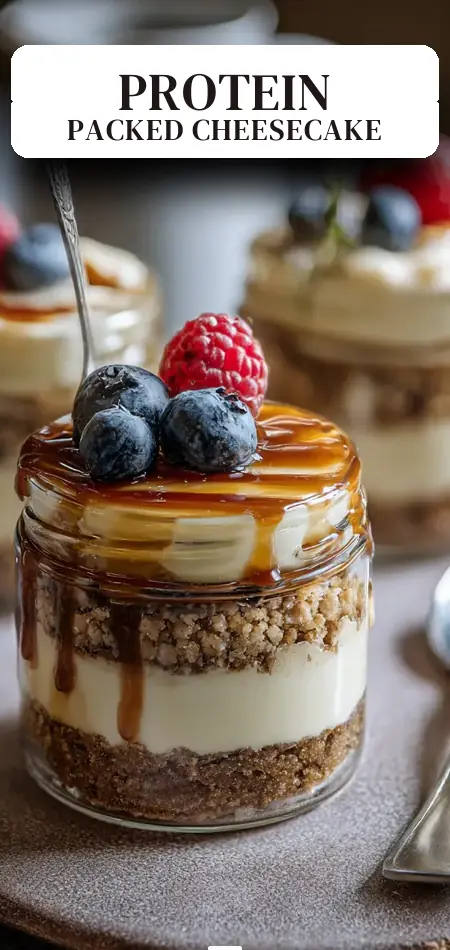
Easy High Protein Cheesecake Jars
What if you could enjoy the rich, velvety texture of classic New York-style cheesecake while hitting your protein goals and staying under 250 calories per serving?
Most people believe decadent cheesecake is off-limits on a fitness or healthy eating plan. These high protein cheesecake jars prove that belief wrong.
This easy, no-bake (or optionally baked crust) recipe delivers everything you love about cheesecake — tangy, creamy, slightly sweet — in perfectly portioned jars. Each serving contains approximately 220 calories and 20–24 grams of protein, thanks to the smart combination of Greek yogurt, low-fat cream cheese, and vanilla protein powder.
Perfect for meal prep, these high protein cheesecake jars have become a staple for busy professionals, fitness enthusiasts, and families who want a nutritious dessert that actually tastes indulgent. Ready in just 15 minutes of active time, they set beautifully in the fridge while you go about your day.
In this complete guide, you’ll get the exact recipe, expert tips for flawless texture, nutritional transparency, healthier variations, and storage strategies that make these jars ideal for weekly meal prep. Whether you need a post-workout treat, a satisfying afternoon snack, or a guilt-free dessert, these portable protein cheesecake jars deliver restaurant-quality results at home.
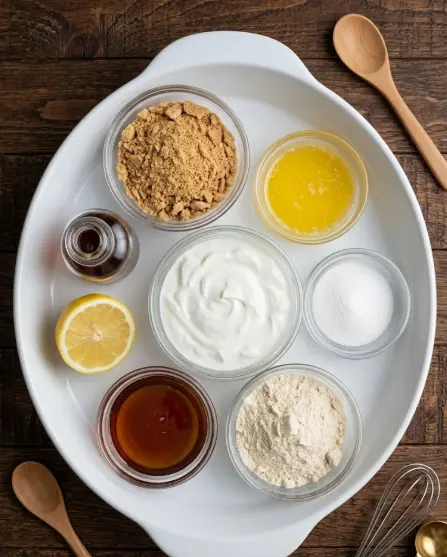
Ingredients List
The beauty of these high protein cheesecake jars lies in their simple, wholesome ingredients that work together to create authentic cheesecake flavor and creamy texture.
For the Crust (makes 4 jars):
- 120 g almond flour (or crushed graham crackers for a more traditional taste)
- 30 ml melted coconut oil or butter (coconut oil keeps it dairy-free)
- 15 g sweetener of choice (erythritol, monk fruit, or regular sugar all work)
For the Cheesecake Filling:
- 227 g low-fat cream cheese, softened to room temperature
- 240 g 2% or non-fat Greek yogurt (provides extra protein and tang)
- 30 g vanilla protein powder (whey or plant-based — choose one that tastes good on its own)
- 30 g sweetener (maple syrup, honey, or sugar-free alternative)
- 5 ml vanilla extract
- 15 ml lemon juice (optional but highly recommended for that signature cheesecake brightness)
Optional Toppings:
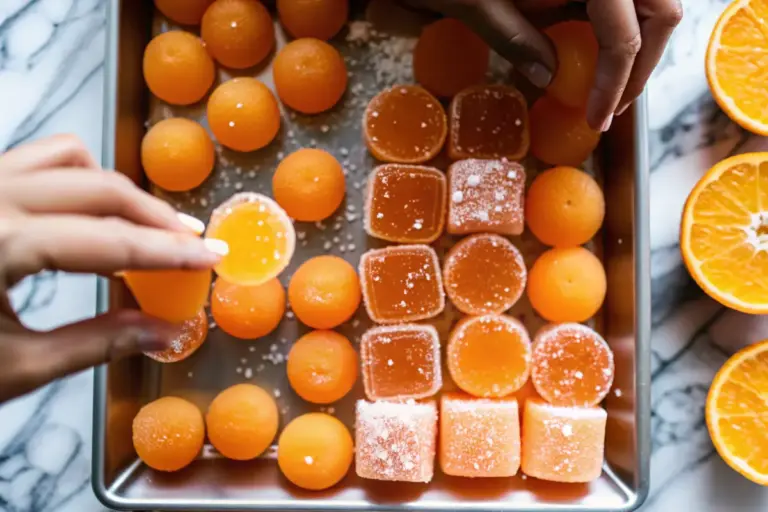
Fresh berries, chopped nuts, sugar-free caramel drizzle, dark chocolate shavings, or a sprinkle of cinnamon.
Smart Substitutions:
- Gluten-free: Use almond flour or certified gluten-free graham crackers.
- Lower fat: Swap to fat-free cream cheese and non-fat Greek yogurt.
- Dairy-free: Use vegan cream cheese, coconut yogurt, and a plant-based protein powder.
- Higher protein: Add an extra 15 g protein powder or replace some yogurt with low-fat cottage cheese blended smooth.
- Nut-free crust: Use crushed oats or oat flour mixed with a bit more oil.
These ingredients create a balanced macro profile while delivering the tangy, sweet, and creamy sensory experience of traditional cheesecake without the heavy calorie load.
Timing
Prep Time: 15 minutes
Cook Time: 0–10 minutes (only if baking the crust)
Chilling Time: 2 hours minimum (overnight preferred)
Total Time: 2 hours 15 minutes
While the total time includes chilling, the actual hands-on work is only 15 minutes. This makes these high protein cheesecake jars roughly 70% faster than baking a full-sized cheesecake, which typically requires 60–90 minutes in the oven plus 4+ hours of cooling. The mostly hands-off process is what makes this recipe genuinely easy for weekly meal prep.
Step-by-Step Instructions
1. Prepare the Crust Base
In a small bowl, mix 120 g almond flour (or crushed graham crackers), 30 ml melted coconut oil or butter, and 15 g sweetener until the texture resembles damp sand. It should hold together when pressed but not be overly wet.
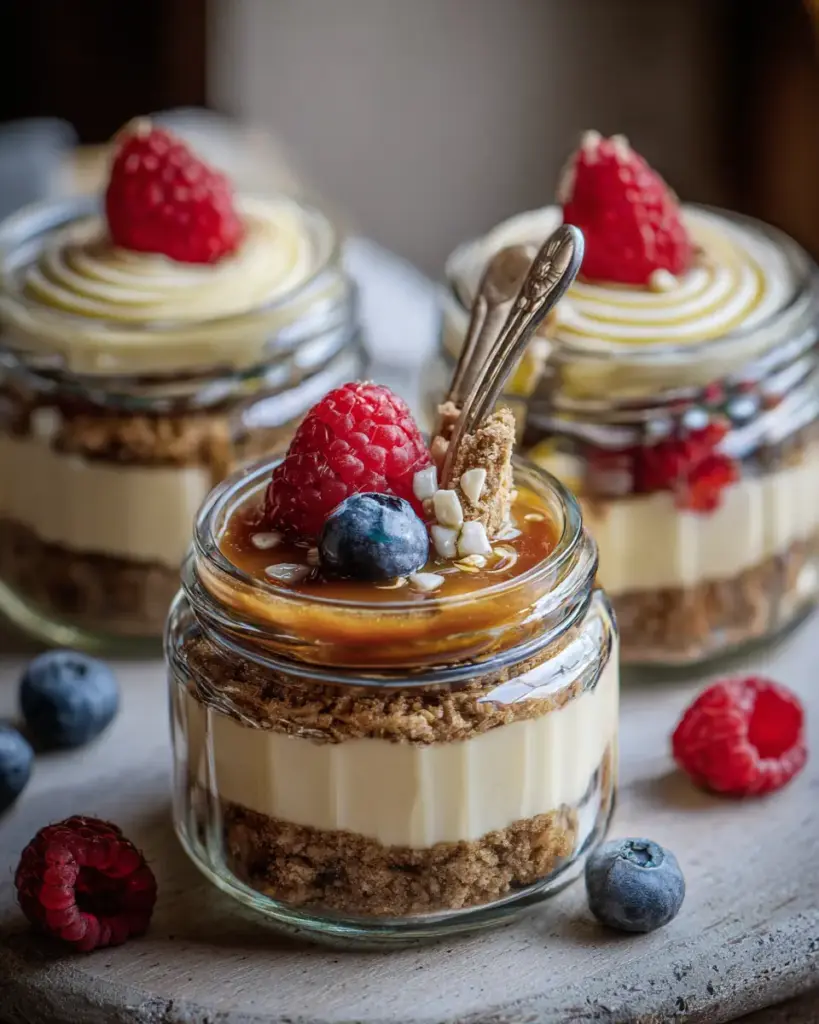
Divide the mixture evenly between 4 small jars (4–6 oz size works best). Use the back of a spoon or a small tamper to press the crust firmly into the bottom of each jar. This creates a stable, flavorful base that contrasts beautifully with the creamy filling.
Pro Tip: For extra flavor and crunch, bake the crusts at 350°F (175°C) for 8–10 minutes until lightly golden. If you’re short on time or prefer fully no-bake, simply chill the crusts in the fridge for 10–15 minutes while you prepare the filling.
2. Create the Silky Cheesecake Filling
Make sure your 227 g low-fat cream cheese is fully softened to room temperature. This is the most important step for preventing lumps. Beat the cream cheese in a medium bowl using a hand mixer or whisk until completely smooth.
Add 240 g Greek yogurt and continue mixing until perfectly blended and creamy. Next, add 30 g vanilla protein powder one tablespoon at a time, mixing thoroughly after each addition. This gradual approach prevents clumping — a common issue in protein cheesecake recipes.
Finally, mix in 30 g sweetener, 5 ml vanilla extract, and 15 ml lemon juice (if using). The lemon juice brightens the flavor and gives it that authentic cheesecake tang. Taste and adjust sweetness if needed. The mixture should be thick but pourable.
Actionable Tip: If your protein powder is gritty, use a blender or food processor for the entire filling. This creates an ultra-smooth, luxurious texture.
3. Assemble the Jars
Remove the jars with chilled crusts from the refrigerator. Spoon or pipe approximately ¼ cup of the cheesecake filling over each crust layer. Leave a little space at the top for toppings and to prevent overflow when adding lids.
Add your favorite toppings now or wait until serving. Fresh berries add natural sweetness and antioxidants, while a sprinkle of nuts provides healthy fats and crunch.
4. Chill for Perfect Texture
Place the assembled high protein cheesecake jars in the refrigerator for at least 2 hours. Overnight chilling (8+ hours) delivers the absolute best, firm-yet-creamy texture that most closely mimics baked cheesecake.
The patience required here is worth it — the flavors meld and the protein powder fully hydrates, eliminating any aftertaste while creating that signature cheesecake density.
Nutritional Information
Per Jar (1 of 4 servings):
- Calories: 220
- Protein: 20–24 g (depending on exact brands used)
- Carbohydrates: 8–12 g
- Fat: 14–16 g
- Sugar: 5–8 g (significantly lower when using sugar-free sweeteners)
This high protein cheesecake jars recipe offers nearly 25% of many adults’ daily protein needs in a single dessert. Compared to traditional cheesecake (often 400–500 calories and only 5–8 g protein per slice), this version delivers 50% fewer calories with 3–4 times more protein.
The Greek yogurt and protein powder combination not only boosts protein but also provides probiotics and supports muscle recovery. Using low-fat cream cheese keeps saturated fat in check while maintaining rich mouthfeel. When made with sugar-free options and almond flour crust, each jar can fit comfortably into keto, low-carb, or macro-tracking lifestyles.
Healthier Alternatives for the Recipe
These high protein cheesecake jars are already a smart choice, but they adapt beautifully to different needs:
- Higher Protein Version: Blend in ½ cup low-fat cottage cheese with the Greek yogurt for an extra 10–12 g protein per batch with minimal flavor impact.
- Keto-Friendly: Use almond flour crust, sugar-free sweetener, and full-fat dairy or coconut alternatives. Net carbs can drop below 6 g per jar.
- Lower Calorie: Switch to fat-free cream cheese and non-fat Greek yogurt. Add extra lemon zest to maintain flavor.
- Vegan Adaptation: Vegan cream cheese, coconut or almond yogurt, and a high-quality plant protein work surprisingly well.
- Anti-Inflammatory Twist: Add ½ teaspoon turmeric to the filling and top with antioxidant-rich berries and walnuts.
These modifications let you enjoy protein cheesecake jars regardless of dietary restrictions while preserving the luxurious taste.
Serving Suggestions
The jar format makes these incredibly versatile. Here are creative ways to serve your high protein cheesecake jars:
- Classic: Top with fresh strawberries or blueberries right before serving for a beautiful, colorful presentation.
- Indulgent: Drizzle with sugar-free caramel or melted dark chocolate for a cheesecake sundae experience.
- Breakfast Style: Enjoy one as a high-protein start to your day topped with granola and banana slices.
- Party Presentation: Make mini versions in shot glasses for elegant dessert tables at gatherings.
- Layered Parfait: Alternate filling with crushed berries in taller jars for stunning visual appeal.
They travel beautifully, making them ideal for office lunches, picnics, or post-gym snacks. The individual portions help with mindful eating while feeling completely satisfying.
Common Mistakes to Avoid
- Cold Cream Cheese: This is the top reason for lumpy filling. Always soften completely or bring to room temperature for 45–60 minutes before mixing.
- Adding Protein Powder All at Once: This almost always causes clumps. Add gradually and mix thoroughly between additions.
- Using Jars That Are Too Big: Stick to 4–6 oz jars so the crust-to-filling ratio stays balanced and you don’t overeat.
- Skipping the Chill Time: Cutting the 2-hour minimum short results in runny texture. Plan ahead — overnight is even better.
- Over-Sweetening: Protein powder and Greek yogurt both have their own flavors. Taste as you go and remember flavors intensify as it chills.
Avoiding these pitfalls will ensure your high protein cheesecake jars turn out perfectly every time.
Storing Tips for the Recipe
These jars are specifically designed for meal prep success.
Store prepared high protein cheesecake jars (with lids) in the refrigerator for up to 5–7 days. The individual portions maintain freshness and texture beautifully throughout the week.
Meal Prep Strategy: Make a batch on Sunday afternoon. By Monday evening they’ll have the ideal firm texture. Keep toppings separate if using fresh fruit or items that might release moisture, and add them just before eating.
Do not freeze these jars. The dairy-based filling can become grainy and separate upon thawing. Instead, focus on the 5–7 day refrigerator window, which is more than enough for most meal prep schedules.
Always use clean jars and airtight lids to maintain optimal flavor and food safety.
Conclusion
These high protein cheesecake jars combine the creamy decadence of classic cheesecake with 20+ grams of protein and only 220 calories per serving. Easy to make, perfect for meal prep, and endlessly customizable, they prove healthy desserts can be truly satisfying.
Ready to transform your dessert routine? Try this high protein cheesecake jars recipe this week and share your favorite toppings or variations in the comments below. We love hearing how you make it your own! Subscribe to the blog for more high-protein recipes, meal prep ideas, and healthier dessert makeovers delivered to your inbox.
FAQs
How much protein is actually in each cheesecake jar?
Each jar typically contains 20–24 grams of protein, depending on the specific brands of Greek yogurt and protein powder used. This makes them one of the most satisfying sweet treats available.
What’s the best protein powder to use?
Vanilla whey protein or a whey-casein blend works best for flavor and texture. Choose a high-quality brand that you enjoy in smoothies, as the taste carries through to the final dessert.
Can I make these fully no-bake?
Absolutely. The crust sets beautifully in the fridge without baking. The no-bake version is actually preferred by many for its softer, more authentic cheesecake-like texture.
Are these high protein cheesecake jars suitable for diabetics?
When made with sugar-free sweeteners, they can be a good option. The high protein content also helps stabilize blood sugar compared to traditional desserts. Always check with your healthcare provider.
How long do the jars last in the fridge?
They stay fresh for 5–7 days when stored with airtight lids, making them excellent for weekly meal prep.
Can I use cottage cheese instead of cream cheese?
Yes! Blending low-fat cottage cheese creates an even higher-protein version with a very similar final texture. Many readers prefer this “secret ingredient” swap.
Do I need special jars for this recipe?
Any small glass jars (4–6 oz / 120–180 ml) with lids work well. Mason jars or reusable dessert jars are perfect and create an attractive presentation.
Are these cheesecake jars kid-friendly?
Very much so. The individual portions and familiar cheesecake flavor make them a hit with children while secretly providing them with extra protein and probiotics from the Greek yogurt.
This high protein cheesecake jars recipe continues to be one of our most popular healthy dessert options for good reason — it’s simple, delicious, and genuinely nutritious.
Easy High Protein Cheesecake Jars
Ingredients
Method
- Make the Crust: Mix almond flour, oil, and sweetener until it feels like damp sand. Press 2–3 tbsp into small jars (4–6 oz). Chill 10–15 mins or bake at 350°F for 8–10 mins until golden.
- Mix the Filling: Beat cream cheese until smooth. Add Greek yogurt and blend. Mix in protein powder one scoop at a time, then sweetener and vanilla. Adjust flavor with lemon juice if desired.
- Assemble: Layer about ¼ cup filling over crust in each jar. Add toppings like berries, nuts, or a drizzle of caramel.
- Chill: Refrigerate at least 2 hours—overnight is even better for perfect texture.