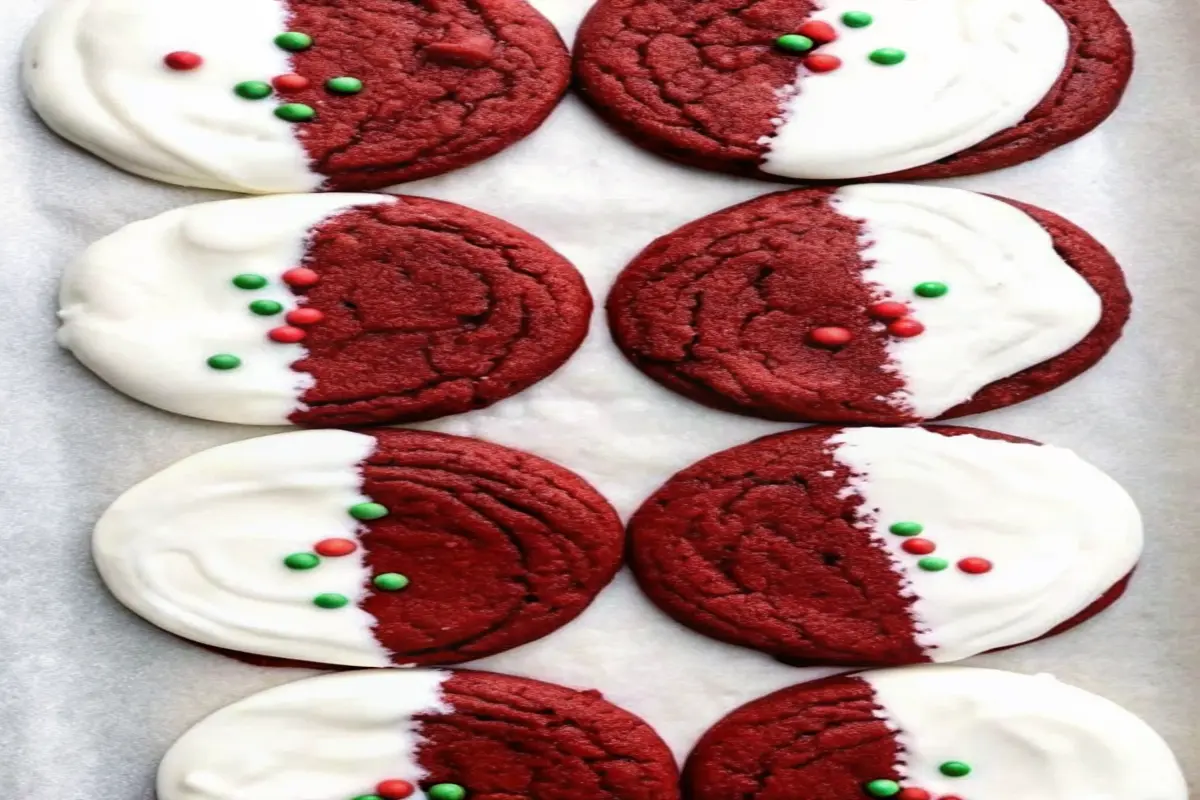
Easy Red Velvet Christmas Cookies Recipe
Have you ever wondered what makes bakery-style cookies so impossibly soft and chewy compared to homemade versions? The secret might just be in the pan-banging technique—a simple yet transformative method that creates those signature ridged edges and fudgy centers. Red velvet pan-banging cookies combine this professional technique with the elegant flavor profile of red velvet, resulting in show-stopping treats that look and taste like they came from a high-end patisserie. This comprehensive guide will walk you through creating these stunning desserts from scratch, whether you’re baking for the holidays or simply craving something special.
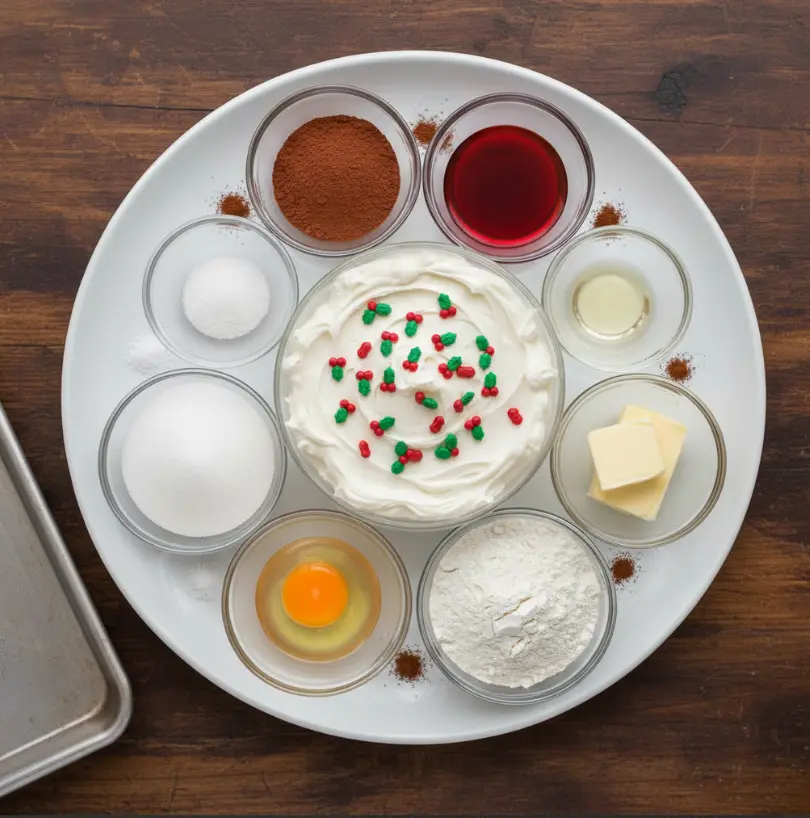
Ingredients List
Creating the perfect red velvet cookie recipe starts with quality ingredients. Here’s everything you’ll need:
For the Cookie Dough:
- 2 cups [284 g] all-purpose flour
- 1 teaspoon baking soda
- 3/4 teaspoon fine salt
- 1/2 teaspoon cream of tartar
- 1 cup [2 sticks or 227 g] unsalted butter, at room temperature
- 1 1/2 cups [300 g] granulated sugar
- 1 large egg
- 2 tablespoons Dutch-process cocoa powder (this provides the subtle chocolate undertone that defines red velvet)
- 1 tablespoon red food coloring (gel-based preferred for deeper color)
- 1 tablespoon pure vanilla extract
For the Cream Cheese Icing:
- 3 oz [85 g] cream cheese, softened
- 1 tablespoon unsalted butter, melted
- 2 to 4 tablespoons water
- 1/2 teaspoon pure vanilla extract
- Pinch of salt
- 1 to 1 1/2 cups [120 to 180 g] confectioners’ sugar
- Holly sprinkles or festive decorations
Pro Ingredient Tips:
Consider using gel-based food coloring instead of liquid versions for a more vibrant, merlot-like hue. Dutch-process cocoa powder creates that signature red velvet depth, differentiating these from regular chocolate cookies. This combination is what transforms simple chocolate cookies into red velvet desserts worthy of celebration.
Timing
Understanding the timeline helps you plan your baking schedule effectively:
- Prep Time: 15 minutes (mixing and forming dough balls)
- Baking Time: 13-16 minutes per batch
- Cooling Time: 10 minutes on pan, then 30 minutes on wire rack
- Total Time: Approximately 90 minutes (significantly faster than many homemade cookie recipes, which average 120 minutes)
The efficient timeline means you can go from measuring ingredients to serving beautifully iced cookies in under two hours—perfect for last-minute holiday entertaining or spontaneous dessert cravings.
Step-by-Step Instructions
Step 1: Prepare Your Workspace
Adjust your oven rack to the middle position and preheat to 350°F [180°C]. Line three half sheet pans with aluminum foil or parchment paper. Having everything ready prevents scrambling mid-bake and ensures even cooking across batches.
Step 2: Combine Your Dry Ingredients
In a small bowl, whisk together flour, baking soda, fine salt, and cream of tartar. Whisk thoroughly for about 30 seconds to incorporate air and distribute the leavening agents evenly. This step prevents lumps and ensures consistent texture throughout your bakery style cookies.
Step 3: Cream the Butter and Sugar
Using a stand mixer fitted with a paddle attachment, beat room-temperature butter on medium speed for about 1 minute until creamy. This incorporates air for a lighter texture. Add granulated sugar and continue beating on medium speed for 2-3 minutes until the mixture is light, fluffy, and pale—this is crucial for achieving those characteristic ridges.
Step 4: Incorporate the Wet Ingredients
Add your egg to the butter-sugar mixture and beat on low speed just until combined. This prevents overworking the dough. Then add the Dutch-process cocoa powder, red food coloring, and vanilla. Mix on low until combined, using a spatula to scrape down the bowl sides and ensure the red coloring is completely incorporated for uniform color distribution.
Step 5: Combine Wet and Dry Ingredients
Pour the flour mixture into your wet ingredients and mix on low speed until just combined. The dough will be slightly thick. This step determines your final texture—overmixing develops gluten, leading to tough cookies, while proper mixing creates tenderness.
Step 6: Form Cookie Balls
Form the dough into 3 oz [85 g] balls (about 1/4 cup each). For consistency, use a large cookie scoop or weigh portions. Uniform sizing ensures even baking across all cookies. Place 4 cookies on each prepared sheet pan, spacing them equally apart to allow for spreading.
Step 7: Execute the Pan-Banging Technique
This signature technique creates the distinctive look of red velvet pan-banging cookies:
Bake the first batch for 8 minutes until dough balls spread but remain puffed. Remove from oven and lift one side of the sheet pan about 4 inches. Gently and firmly drop the pan against the oven rack—this causes edges to set while centers collapse slightly. After 2 minutes, repeat this banging motion 2-3 additional times. This creates the characteristic ridged edges while maintaining that coveted underbaked center.
Step 8: Complete Baking
Continue baking for 13-16 minutes total. The cookies should have spread completely with set, golden edges, but centers should remain visibly soft and underbaked. The cookies will continue cooking on the hot pan after removal.
Step 9: Cool Properly
Transfer the pan to a wire rack and let cookies cool for exactly 10 minutes on the pan. This allows the structure to set without overbaking. Transfer to a wire rack to cool completely (about 30 minutes) before icing—this prevents melting.
Step 10: Prepare the Icing
Melt butter in a medium bowl. Add softened cream cheese, 2 tablespoons water, vanilla, and a pinch of salt. Whisk until smooth. Gradually add confectioners’ sugar, adjusting consistency with additional water as needed. The icing should be thick enough to cling when dipping but thin enough to coat smoothly.
Step 11: Assemble and Decorate
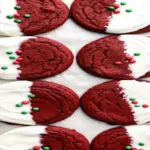
Dip half of each cooled cookie into icing and decorate with holly sprinkles or festive toppings. Let icing set before serving.
Nutritional Information
Per cookie (with icing), approximately:
- Calories: 280-320
- Total Fat: 14-16g
- Saturated Fat: 8-9g
- Cholesterol: 35-40mg
- Sodium: 210-240mg
- Total Carbohydrates: 38-42g
- Dietary Fiber: 0.5g
- Sugars: 28-32g
- Protein: 2-3g
These values vary based on exact icing thickness and decoration additions.
Healthier Alternatives for the Recipe
Reduce Sugar Version: Replace half the granulated sugar with coconut sugar, reducing overall sweetness while adding subtle caramel notes.
Whole Grain Option: Substitute up to 1/2 cup all-purpose flour with whole wheat pastry flour for added fiber without compromising texture.
Lower-Fat Icing: Use Greek yogurt-based cream cheese frosting (mix cream cheese with Greek yogurt for tanginess and reduced fat).
Natural Coloring: Replace gel food coloring with a combination of beet juice and cocoa for natural red velvet coloring.
These modifications maintain the essential character of red velvet cookies from scratch while accommodating various dietary preferences.
Serving Suggestions
Holiday Entertaining: Arrange on tiered cake stands with winter greenery for an elegant dessert display. The striking red color complements holiday décor beautifully.
Coffee Shop Pairing: Serve with specialty coffee or hot chocolate for café-style enjoyment.
Gift Giving: Package in tissue-lined boxes with gold ribbon for impressive homemade gifts (store in airtight containers for up to 3 days).
Dessert Boards: Combine with red velvet desserts like macarons, brownies, or fudge for charcuterie-style presentations.
School Functions: These make impressive contributions to bake sales, holiday parties, and classroom celebrations.

Common Mistakes to Avoid
Mistake 1: Overbaking the Centers
Many bakers fear underbaked cookies, leading to overdone centers. Remember—cookies continue cooking on the hot pan. Underbaking is actually the goal for that signature fudgy texture.
Mistake 2: Skipping the Pan-Banging
This technique specifically creates the ridged edges and soft centers that define the recipe. Skipping it results in ordinary cookies lacking visual interest.
Mistake 3: Using Liquid Food Coloring
Liquid coloring produces duller colors and affects dough consistency. Gel-based options provide vibrant color without excess moisture.
Mistake 4: Room Temperature Errors
Butter must be genuinely room temperature for proper creaming. Cold butter won’t incorporate air; overly warm butter produces greasy cookies.
Mistake 5: Inconsistent Cookie Sizing
Uniform portions ensure even baking. Varied sizes lead to some cookies underbaked and others overdone.
Mistake 6: Icing Application Too Soon
Applying icing to warm cookies causes it to melt off. Always cool completely first.
Storing Tips for the Recipe
Short-Term Storage: Keep cooled cookies in airtight containers at room temperature for up to 3 days. Separating layers with parchment paper prevents sticking.
Freezing Dough Balls: Form dough into balls and freeze on baking sheets for 2 hours, then transfer to freezer bags for up to 3 months. Bake directly from frozen, adding 1-2 minutes to baking time.
Freezing Baked Cookies: Freeze cooled, uniced cookies in airtight containers for up to 2 months. Ice and decorate after thawing.
Icing Storage: Store icing in the refrigerator for up to 5 days. Allow it to reach spreadable consistency at room temperature before using.
Prevent Staleness: Store in containers with a piece of bread (replacing daily) to absorb excess moisture and maintain freshness.
Conclusion
Red velvet pan-banging cookies represent the perfect intersection of technique and flavor—delivering professional-quality results achievable in a home kitchen. By mastering the distinctive pan-banging method, using quality Dutch-process cocoa powder and gel-based food coloring, and respecting proper cooling times, you’ll create cookies that impress every guest. These elegant treats elevate any occasion, from casual coffee time to formal holiday presentations. Try this recipe today and discover why this technique has become a baking favorite. Share your results in our comments section, and subscribe to our blog for more professional baking techniques and holiday recipes delivered straight to your inbox.

FAQs
Q: Can I make these cookies without a stand mixer?
A: Yes. Cream butter and sugar with an electric hand mixer for 3-5 minutes, then proceed with hand mixing for remaining ingredients. The technique works; it just requires more manual effort.
Q: What’s the difference between red velvet cookies and chocolate cookies?
A: Red velvet uses less cocoa powder (creating subtle chocolate flavor), incorporates red food coloring, and traditionally includes cream cheese icing. The combination produces the signature elegant appearance and distinctive taste.
Q: Can I substitute the Dutch-process cocoa powder?
A: Yes, but results differ. Natural cocoa powder creates more acidic flavor. Use Dutch-process for the traditional merlot-esque color that defines red velvet.
Q: How important is the pan-banging technique?
A: It’s essential for achieving the signature ridged edges and fudgy centers. Without it, you have nice cookies but lose the distinctive bakery-style appearance.
Q: Can I use liquid red food coloring instead of gel?
A: You can, but gel produces more vibrant color with less impact on dough consistency. Liquid coloring requires adjusting flour quantities to compensate for added moisture.
Q: How do I know when the cookies are perfectly underbaked?
A: Centers should appear visibly soft and glossy, not set. They’ll look slightly raw but feel structured when touched gently. They firm up as they cool.
Easy Red Velvet Christmas Cookies Recipe
- Total Time: 1 hour 30 minutes
- Yield: 12 large cookies 1x
- Diet: Vegetarian
Description
These red velvet pan-banging cookies are bakery-style perfection with crisp, rippled edges, soft fudgy centers, and a classic red velvet flavor finished with cream cheese icing. A stunning cookie for holidays and special occasions.
Ingredients
For the Cookies
- 2 cups all-purpose flour
- 1 teaspoon baking soda
- 3/4 teaspoon fine salt
- 1/2 teaspoon cream of tartar
- 1 cup unsalted butter, room temperature
- 1 1/2 cups granulated sugar
- 1 large egg
- 2 tablespoons Dutch-process cocoa powder
- 1 tablespoon red gel food coloring
- 1 tablespoon vanilla extract
For the Cream Cheese Icing
- 3 oz cream cheese, softened
- 1 tablespoon unsalted butter, melted
- 2–4 tablespoons water
- 1/2 teaspoon vanilla extract
- Pinch of salt
- 1–1 1/2 cups powdered sugar
- Festive sprinkles (optional)
Instructions
- Preheat oven to 350°F (180°C) and line baking sheets with parchment paper.
- Whisk flour, baking soda, salt, and cream of tartar in a bowl.
- Cream butter on medium speed until smooth, then beat in sugar until light and fluffy.
- Add egg and mix just until combined.
- Mix in cocoa powder, red food coloring, and vanilla until evenly colored.
- Add dry ingredients and mix on low speed until just combined.
- Form dough into 3 oz balls and place 4 per baking sheet.
- Bake 8 minutes, remove pan, lift and bang gently on oven rack.
- Return to oven and repeat pan-banging every 2 minutes, 2–3 times.
- Total bake time should be 13–16 minutes with soft centers.
- Cool cookies on pan for 10 minutes, then transfer to rack to cool completely.
- Whisk icing ingredients until smooth.
- Dip half of each cookie into icing and decorate as desired.
Notes
Pan-banging creates rippled edges and soft centers. Cookies should look slightly underbaked in the center when removed from the oven.
- Prep Time: 15 minutes
- Cook Time: 16 minutes
- Category: Dessert
- Method: Baking
- Cuisine: American
Nutrition
- Serving Size: 1 cookie
- Calories: 300
- Sugar: 30g
- Sodium: 230mg
- Fat: 15g
- Saturated Fat: 9g
- Unsaturated Fat: 6g
- Trans Fat: 0g
- Carbohydrates: 40g
- Fiber: 1g
- Protein: 3g
- Cholesterol: 40mg
Keywords: red velvet cookies, pan banging cookies, bakery style cookies, red velvet dessert