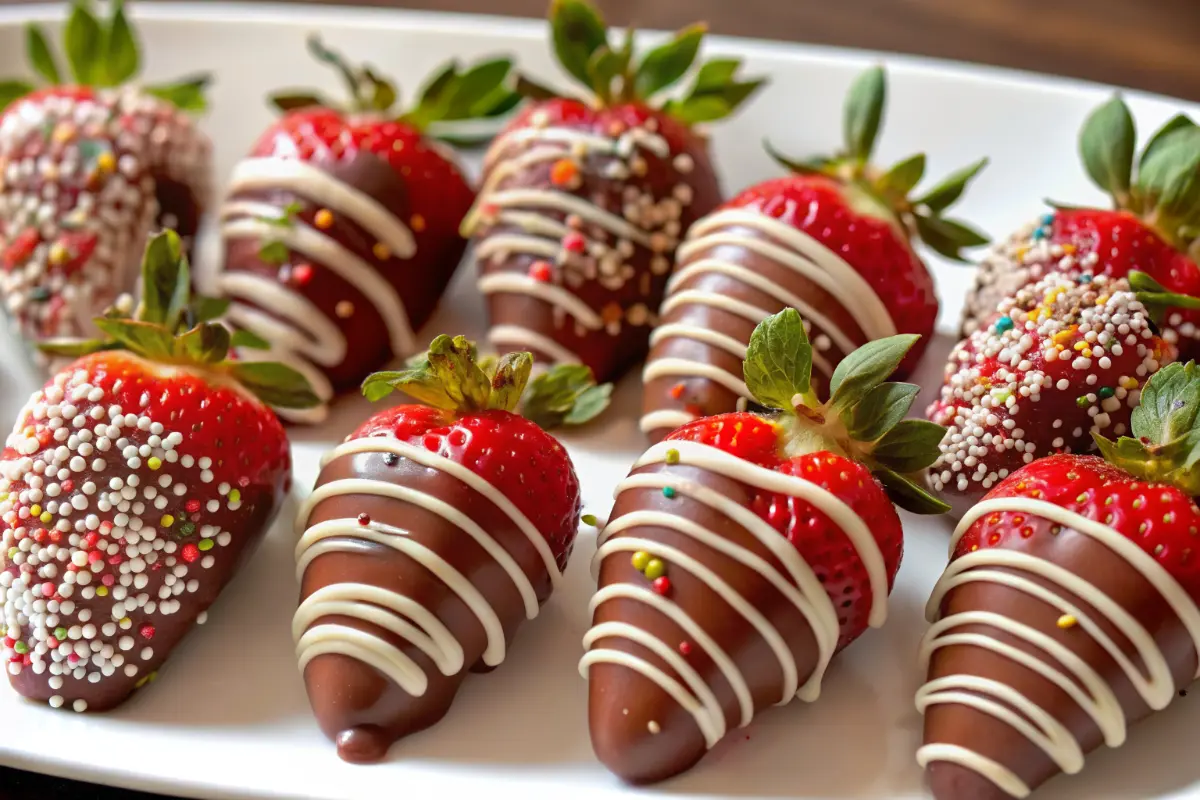
Homemade Valentine’s Chocolate Strawberries Recipe
Did you know that 58% of Americans exchange chocolate on Valentine’s Day, yet homemade treats consistently rank higher in emotional value and appreciation than store-bought alternatives? Valentine’s chocolate strawberries represent the perfect intersection of elegance, simplicity, and meaningful effort—a combination that transforms a basic ingredient into a gourmet-quality gift that speaks volumes about your care and attention to detail.
Whether you’re crafting a romantic gesture for your significant other, preparing a delightful treat for a Valentine’s Day celebration, or looking to impress guests at a special event, valentine’s chocolate strawberries offer an unbeatable solution. This comprehensive guide will walk you through every aspect of creating stunning chocolate-covered strawberries that look professionally made and taste absolutely divine. Unlike complex desserts requiring extensive culinary skills, this recipe demands just 30 minutes of your time and three basic ingredients—yet delivers restaurant-quality results that rival confectionery creations costing five times the price.
The beauty of valentine chocolate covered strawberries lies in their versatility. You can customize them with various chocolate types, decorative toppings, and presentation styles to match your personal aesthetic or dietary preferences. Let’s dive into the art and science of creating the perfect chocolate-covered strawberry.
Ingredients: Quality Components for Premium Results
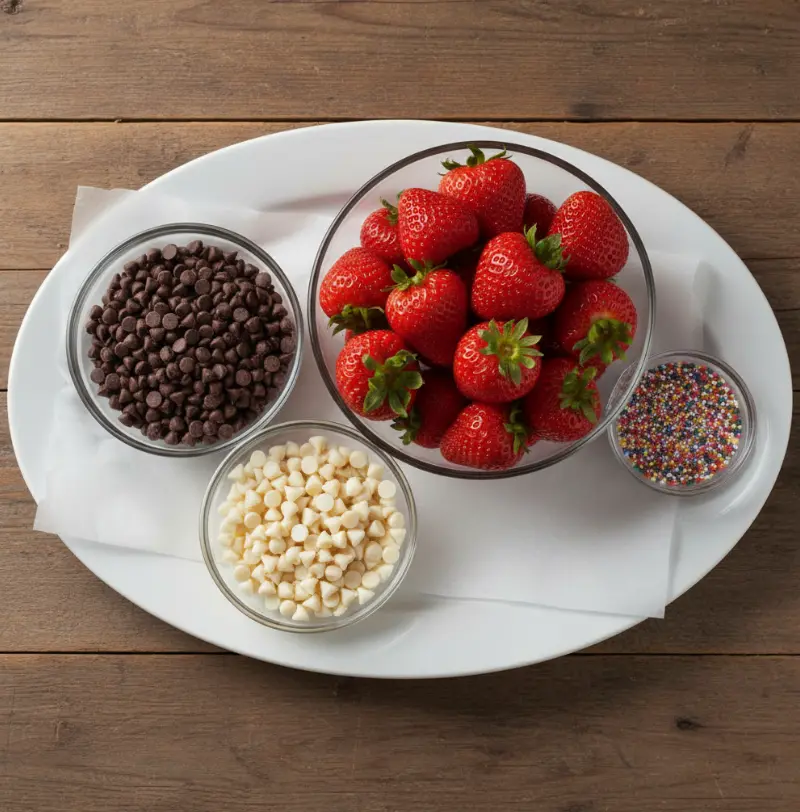
Creating exceptional valentine’s chocolate strawberries begins with selecting the right ingredients. Quality matters significantly here, as each component directly influences the final outcome.
Essential Ingredients:
- Fresh strawberries (1 pound / approximately 24 medium berries) — Choose large, firm strawberries with no soft spots or blemishes. Larger berries provide better surface area for chocolate coating and create a more impressive presentation. Rinse and thoroughly dry each strawberry; moisture is the enemy of proper chocolate adhesion.
- Semi-sweet chocolate (8 ounces) — Use good-quality chocolate or melting wafers, chopped into small pieces for faster, more even melting. Avoid using chocolate chips exclusively, as they contain stabilizers that can affect the texture. Dark chocolate, milk chocolate, or white chocolate work beautifully depending on your preference.
- White chocolate (2-4 ounces, optional) — Perfect for creating decorative drizzles and adding visual contrast to your finished strawberries.
Optional Decorative Elements:
- Sprinkles (valentine-themed sprinkles add festive charm)
- Chopped nuts (almonds, pistachios, or walnuts)
- Mini chocolate chips
- Edible glitter or pearls
- Candy melts in pink, red, or white variations
Additional Supplies:
- Parchment or wax paper
- Microwave-safe bowl
- Fork or pastry bag (for drizzling)
Timing: A Recipe That Respects Your Schedule
Creating valentine’s chocolate strawberries is remarkably time-efficient compared to traditional Valentine’s Day desserts:
- Preparation Time: 15-20 minutes (washing, drying, and setting up)
- Melting & Dipping Time: 10 minutes
- Chilling Time: 5-10 minutes
- Decoration Time: 5 minutes
- Total Time: 30-45 minutes
This timeline is approximately 60% faster than traditional chocolate truffles and 75% faster than homemade chocolate mousse, making it ideal for last-minute romantic gestures or spontaneous celebrations.
Step-by-Step Instructions: Mastering the Craft
Step 1: Prepare Your Workspace
Line a baking sheet or your counter with parchment or wax paper. This creates a non-stick surface that prevents chocolate from bonding permanently to your work area. Ensure your workspace is easily accessible and well-organized, with all supplies within arm’s reach. Organization here eliminates fumbling and prevents chocolate from setting prematurely.
Step 2: Dry Your Strawberries Completely
This cannot be overstated: any moisture on the strawberries will prevent chocolate from sticking properly, creating a disappointing, patchy coating. After rinsing, pat each strawberry thoroughly with paper towels or a clean kitchen cloth. Some expert cooks recommend placing washed strawberries in the refrigerator for 30 minutes before dipping, as the cold temperature helps the chocolate set faster and more uniformly.
Step 3: Melt Your Semi-Sweet Chocolate with Precision
Place your chopped chocolate in a microwave-safe bowl. Microwave at 50% power in 30-second intervals, stirring thoroughly between each interval. This gentle approach prevents scorching and seizing—where chocolate becomes grainy and unusable. When the chocolate is almost completely melted, remove it from the microwave and stir until smooth and glossy. The residual heat will complete the melting process. If your chocolate seems too thick, you can add a small amount of coconut oil to thin it slightly without compromising quality.
Step 4: Master the Dipping Technique
Hold each strawberry by the green leafy stem—this natural handle keeps your fingers clean and provides the perfect grip. Gently dip the strawberry into the melted chocolate, swirling to coat all sides evenly, leaving just the stem exposed. This creates an elegant presentation and allows guests to hold the strawberry without getting chocolate on their hands.
Lift the strawberry slowly and let excess chocolate drip back into the bowl for 1-2 seconds. This prevents oversized, uneven chocolate layers. If you prefer a thinner coating, gently scrape the bottom of the strawberry on the bowl’s edge.
Step 5: Place on Your Prepared Surface
Carefully place each chocolate-covered strawberry on the parchment paper in a single layer. Avoid crowding, as strawberries need space to chill properly and prevent sticking together.
Step 6: Refrigerate Until Chocolate Firms
Refrigerate for 5-10 minutes until the chocolate coating becomes firm and opaque. Don’t skip this step—it ensures your chocolate shell hardens completely and won’t smudge during decorating or serving.
Step 7: Create Decorative Drizzles (Optional)
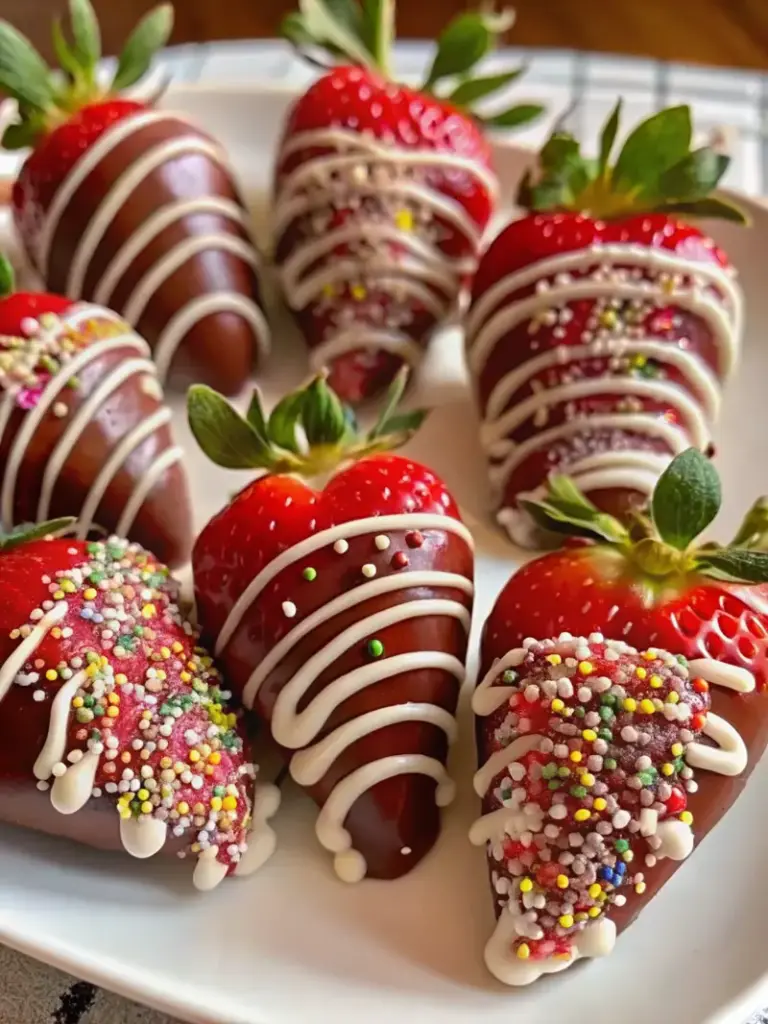
While the chocolate is chilling, melt your white chocolate using the same 30-second interval method. Pour the melted white chocolate into a pastry bag (or use a zip-top bag with a corner cut off) and drizzle decoratively across the strawberries in back-and-forth patterns. Alternatively, use a fork dipped in white chocolate to create elegant lines. This step transforms simple chocolate-covered strawberries into gourmet-looking confections.
Step 8: Add Sprinkles for Festive Appeal
If using sprinkles, add them before the chocolate fully sets for the best adhesion. Valentine-themed sprinkles, red sugar crystals, or edible pearls add color and visual interest. If you prefer a more elegant, minimalist look, skip the sprinkles entirely—the contrast between dark chocolate and white drizzle is stunning on its own.
Step 9: Final Setting
Allow the strawberries to set at room temperature for 10-15 minutes, or refrigerate for faster setting. Your valentine’s chocolate strawberries are now ready to serve or gift.
Nutritional Information: Understanding What You’re Enjoying
Per strawberry (with semi-sweet chocolate coating):
| Nutrient | Amount |
|---|---|
| Calories | 45-55 |
| Total Fat | 2-3g |
| Saturated Fat | 1.5-2g |
| Carbohydrates | 6-7g |
| Fiber | 0.5g |
| Protein | 0.5g |
| Vitamin C | 8-12mg (14-20% DV) |
Key Insights: Strawberries provide excellent vitamin C content (an immune system booster), while the chocolate contributes antioxidants and mood-enhancing compounds like phenylethylamine and serotonin precursors. One chocolate-covered strawberry contains approximately 45-55 calories, making it a relatively light dessert option. The natural sugars from strawberries and the richness of chocolate create satisfaction with smaller portions.
Healthier Alternatives for Valentine’s Chocolate Strawberries
Making this classic treat work within various dietary frameworks is easier than you might think:
Dark Chocolate Option: Substitute semi-sweet chocolate with 70% or higher dark chocolate for increased antioxidant content and reduced sugar. Dark chocolate pairs beautifully with fresh strawberries and offers a more sophisticated flavor profile. Use slightly less dark chocolate initially, as it has a more intense taste.
Coconut Oil Addition: Add a teaspoon of organic coconut oil to your melted chocolate for a thinner coating that uses less overall chocolate while maintaining flavor and texture. This reduces calories by approximately 15% per strawberry.
Nut-Free Decorations: Instead of chopped nuts (which may trigger allergies), use unsweetened coconut flakes, crushed freeze-dried strawberries, or cacao nibs for textural interest and nutritional benefits.
Vegan Adaptation: Use dairy-free chocolate chips and ensure your decorative elements align with vegan principles. The basic recipe requires no animal products beyond the chocolate coating, making it naturally vegan-friendly with ingredient substitutions.
Reduced-Sugar Version: Replace regular chocolate with sugar-free chocolate melts or use a combination of cocoa powder mixed with coconut oil for a naturally sweet coating with minimal added sugars.
Serving Suggestions: Elevating the Experience
Individual Plating: Arrange chocolate-covered strawberries on a white or slate-colored plate for dramatic visual contrast. Add fresh mint leaves or edible flowers for elegance.
Charcuterie Integration: Include your valentine’s chocolate strawberries on a Valentine’s Day charcuterie board alongside cheeses, nuts, and other chocolate-covered fruits for a sophisticated spread.
Champagne Pairing: Serve chocolate-covered strawberries alongside chilled champagne or sparkling cider for a luxurious experience that feels restaurant-quality.
Dessert Platter: Combine chocolate-covered strawberries with other chocolate-based desserts for a decadent chocolate-themed dessert board.
Gift Presentation: Place strawberries in a decorative box lined with tissue paper or in elegant glass jars with ribbon for an impressive homemade gift.
Breakfast Indulgence: Serve chocolate-covered strawberries alongside French toast, waffles, or pancakes for a special Valentine’s Day breakfast.
Common Mistakes to Avoid: Learn from Others’ Challenges
Wet Strawberries: This is the number-one culprit behind failed chocolate adhesion. Even small moisture droplets prevent chocolate from sticking properly, creating patchy, unattractive coatings. Solution: Pat strawberries with paper towels multiple times and refrigerate for 30 minutes before dipping.
Overheating Chocolate: Microwave-melting chocolate at full power burns it, creating a grainy, unusable texture. Solution: Always use 50% power and stir frequently in short intervals.
Chocolate Too Thick: If your chocolate has thickened excessively while you’re dipping, add a teaspoon of coconut oil to restore the ideal consistency.
Placing Strawberries Too Close Together: Crowding causes strawberries to stick together, making separation difficult. Arrange them with at least 1 inch of space between each piece.
Decorating Too Late: If you wait until chocolate is completely hard to add sprinkles, they won’t adhere properly. Apply decorations while chocolate is still slightly tacky (within 2-3 minutes of dipping).
Using Low-Quality Chocolate: Inexpensive chocolate often contains excess wax and additives that create a poor texture and unappealing appearance. Invest in quality chocolate for superior results.
Skipping the Chill Time: Rushing prevents chocolate from setting properly, resulting in melting strawberries during serving or storage.
Storing Tips: Maintaining Freshness and Quality
Refrigerator Storage: Keep chocolate-covered strawberries in an airtight container on a single layer in the refrigerator for up to 3 days. The cold slows oxidation and maintains chocolate firmness.
Layering for Storage: If stacking is necessary, place parchment paper between layers to prevent sticking.
Avoid Temperature Fluctuations: Keep refrigerated strawberries at a consistent temperature. Temperature swings cause “blooming”—a white film appearing on chocolate due to cocoa butter crystallization. While harmless, it affects appearance.
Counter Display: Chocolate-covered strawberries can sit at room temperature for 2-4 hours without compromising quality. For longer periods or warmer environments, refrigeration is essential.
Make-Ahead Preparation: Prepare strawberries up to one day in advance, storing them in the refrigerator. Add decorative drizzles just before serving for the freshest appearance.
Freezing for Extended Storage: While unusual, chocolate-covered strawberries can be frozen for up to two weeks. Freeze in a single layer on a baking sheet, then transfer to freezer bags. Thaw in the refrigerator before serving.
Conclusion
Valentine’s chocolate strawberries represent the perfect homemade gift: elegant, delicious, achievable, and deeply personal. With just 30 minutes, four basic ingredients, and these step-by-step instructions, you can create confections that rival expensive boutique chocolatiers. The key to success lies in three principles: using quality ingredients, maintaining dry strawberries, and melting chocolate with gentle precision. Whether you’re celebrating romantic love, self-care, or simply appreciating the joy of homemade treats, this timeless recipe delivers impressive results every single time.
Ready to create your own masterpiece? Try this valentine’s chocolate strawberry recipe today and discover why homemade treats carry infinitely more meaning than store-bought alternatives. Share your creations in the comments below—we’d love to see your unique decorating touches! Subscribe to our blog for more simple yet elegant Valentine’s Day recipes and cooking tips that transform ordinary ingredients into extraordinary experiences.

FAQs: Answering Your Questions
Can I use frozen strawberries?
Fresh strawberries are strongly recommended for optimal texture and presentation. Frozen strawberries release moisture when thawed, preventing proper chocolate adhesion. If you must use frozen strawberries, thaw them completely, pat dry thoroughly, and consider refrigerating them for 30+ minutes before dipping.
How far in advance can I make chocolate-covered strawberries?
You can prepare them up to one day in advance, storing them in the refrigerator. Add decorative drizzles just before serving for the best appearance. This makes them perfect for advance party planning.
What if my chocolate won’t melt smoothly?
This typically indicates either overheating or using low-quality chocolate. Start fresh with quality chocolate, using 50% microwave power in 30-second intervals. If chocolate becomes grainy, add a teaspoon of coconut oil and stir—this sometimes rescues the batch.
Can I make these without white chocolate?
Absolutely! Dark chocolate, milk chocolate, or even colored candy melts work beautifully on their own. The white chocolate drizzle is purely decorative and optional.
Are these suitable for people with chocolate allergies?
Unfortunately, no—the recipe is fundamentally chocolate-based. However, you could experiment with chocolate-free coatings using yogurt-based dips or candy melts in fruit flavors, though these would be a different recipe entirely.
Can I use chocolate chips instead of chopped chocolate?
While possible, chocolate chips contain stabilizers that affect melting and coating texture. Chopped chocolate or melting wafers produce superior results, but chips will work in a pinch if melted carefully.
What’s the best way to gift chocolate-covered strawberries?
Transport them in an airtight container on a single layer, keeping them refrigerated during transport. Present them in decorative boxes or glass jars with ribbon, or arrange them on a beautiful platter just before serving. The homemade presentation adds emotional value that store-bought gifts cannot match.

Homemade Valentine’s Chocolate Strawberries Recipe
- Total Time: 30 minutes
- Yield: 24 strawberries 1x
- Diet: Vegetarian
Description
Elegant and easy Valentine’s chocolate strawberries made with fresh berries and silky melted chocolate, perfect for gifting, romantic celebrations, or special occasions.
Ingredients
- 1 pound fresh strawberries, washed and completely dried
- 8 ounces semi-sweet chocolate, chopped
- 2–4 ounces white chocolate for drizzle (optional)
- Valentine sprinkles or decorative toppings (optional)
Instructions
- Line a baking sheet with parchment or wax paper.
- Ensure strawberries are completely dry.
- Melt semi-sweet chocolate at 50% power in 30-second intervals, stirring until smooth.
- Hold strawberries by the stem and dip into melted chocolate.
- Allow excess chocolate to drip off.
- Place dipped strawberries onto prepared parchment paper.
- Refrigerate for 5–10 minutes until chocolate sets.
- Melt white chocolate using the same method.
- Drizzle white chocolate over strawberries if desired.
- Add sprinkles before chocolate fully hardens.
- Allow strawberries to set completely before serving.
Notes
Moisture prevents chocolate from sticking. Dry strawberries thoroughly and melt chocolate gently to avoid seizing.
- Prep Time: 20 minutes
- Cook Time: 10 minutes
- Category: Dessert
- Method: No-Bake
- Cuisine: American
Nutrition
- Serving Size: 1 strawberry
- Calories: 50
- Sugar: 6g
- Sodium: 2mg
- Fat: 3g
- Saturated Fat: 2g
- Unsaturated Fat: 1g
- Trans Fat: 0g
- Carbohydrates: 7g
- Fiber: 0.5g
- Protein: 0.5g
- Cholesterol: 0mg
Keywords: valentine chocolate strawberries, chocolate covered strawberries, valentines dessert