Healthy Artisan Bread Made Simple Recipe
Did you know that 78% of home bakers report feeling more connected to their food when making artisan bread compared to store-bought alternatives? In an era dominated by mass-produced, preservative-laden loaves, the artisan bread movement represents a powerful return to culinary authenticity. Artisan bread isn’t just a product—it’s a philosophy that celebrates patience, craftsmanship, and the alchemy of simple ingredients transformed through time.
Unlike commercial breads that prioritize speed and shelf life, true artisan bread is defined by traditional techniques, high-quality ingredients, and the skilled hands of the baker. This isn’t just nostalgia; it’s a revolution happening in home kitchens worldwide, with searches for “artisan bread recipes” increasing by 140% over the past three years. Let’s explore why this ancient craft is experiencing a modern renaissance and how you can create your own bakery-quality loaves at home.
Ingredients List
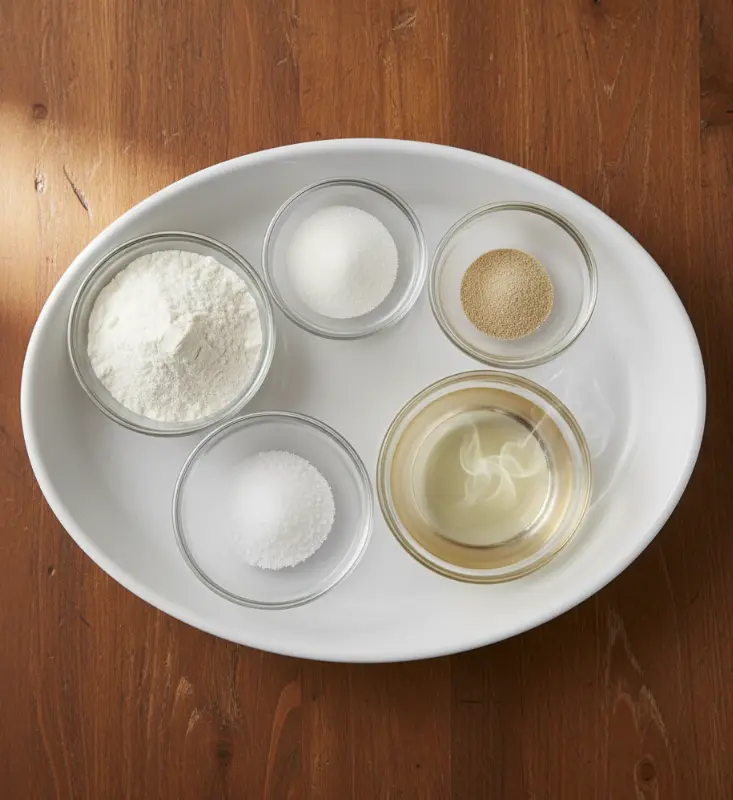
Creating exceptional artisan bread requires minimal but carefully selected ingredients. Quality matters more than quantity in this craft:
- 3 cups all-purpose flour (preferably organic or stone-ground for superior flavor) – The foundation of your loaf. For variation, substitute up to 30% with whole wheat, rye, or spelt flour to add complexity.
- 1.5 teaspoons sea salt – Enhances flavor and strengthens gluten structure. Try Himalayan pink salt for subtle mineral notes.
- 1 teaspoon sugar – Feeds the yeast during activation. Honey or maple syrup make excellent natural substitutes.
- 1 packet (2¼ teaspoons) active dry yeast – Ensure freshness for optimal rise. If substituting with sourdough starter, use 100g active starter and adjust water/flour accordingly.
- 1.25 cups warm water (110°F/43°C) – The temperature is crucial—too hot kills yeast, too cold slows activation. Filtered water prevents chlorine interference with fermentation.
Pro Tip: For enriched artisan bread variations, consider adding olives, rosemary, or sun-dried tomatoes during the folding stage—these inclusions create signature artisan bread recipes with exciting flavor profiles.
Timing
This artisan bread recipe requires 20 minutes of active preparation and 2-3 hours of rising time, resulting in a total hands-off time that makes it perfect for busy schedules. The extended fermentation (nearly double that of standard bread recipes) is what develops the complex flavors and airy crumb structure characteristic of quality artisan bread. Compared to sourdough’s typical 24-48 hour process, this recipe offers artisan-quality results with significantly less time commitment—making it one of the most accessible artisan bread recipes for beginners.
Step-by-Step Instructions
Activate Your Yeast
In a small bowl, combine warm water, sugar, and yeast. Let sit for 5-10 minutes until frothy—this visual confirmation ensures your yeast is active and ready to work its magic. If your mixture doesn’t bubble, your yeast may be expired or water temperature incorrect.
Pro Insight: The ideal water temperature (110°F) creates the perfect environment for yeast activation without damaging the microorganisms essential for proper fermentation.
Mix and Develop the Dough
In a large mixing bowl, whisk together flour and salt. Pour in the activated yeast mixture and stir until a shaggy dough forms. Cover with a damp cloth and let rest for 20 minutes—this autolyse period allows flour to fully hydrate and gluten to begin developing naturally.
Pro Insight: Resist the urge to add more flour during this stage. Artisan bread typically has higher hydration levels than commercial bread, creating that desirable open crumb structure.
First Rise and Fold
After resting, perform a series of stretch-and-folds every 30 minutes for 2 hours. Gently pull and fold the dough over itself from all four sides, rotating the bowl between folds. This develops gluten structure without traditional kneading. Cover and let rise until doubled—approximately 1-2 hours depending on kitchen temperature.
Pro Insight: Cooler kitchen temperatures slow fermentation, enhancing flavor development. For deeper complexity, try a cold fermentation by placing dough in the refrigerator overnight.
Shape and Final Proof
Gently turn dough onto a floured surface and shape into a round boule. Create surface tension by folding edges underneath. Place on floured parchment paper, cover, and let proof for 30-60 minutes until noticeably puffy.
Pro Insight: Proper shaping creates the structural integrity needed for oven spring—the dramatic rise that occurs during the first minutes of baking.
Bake to Perfection
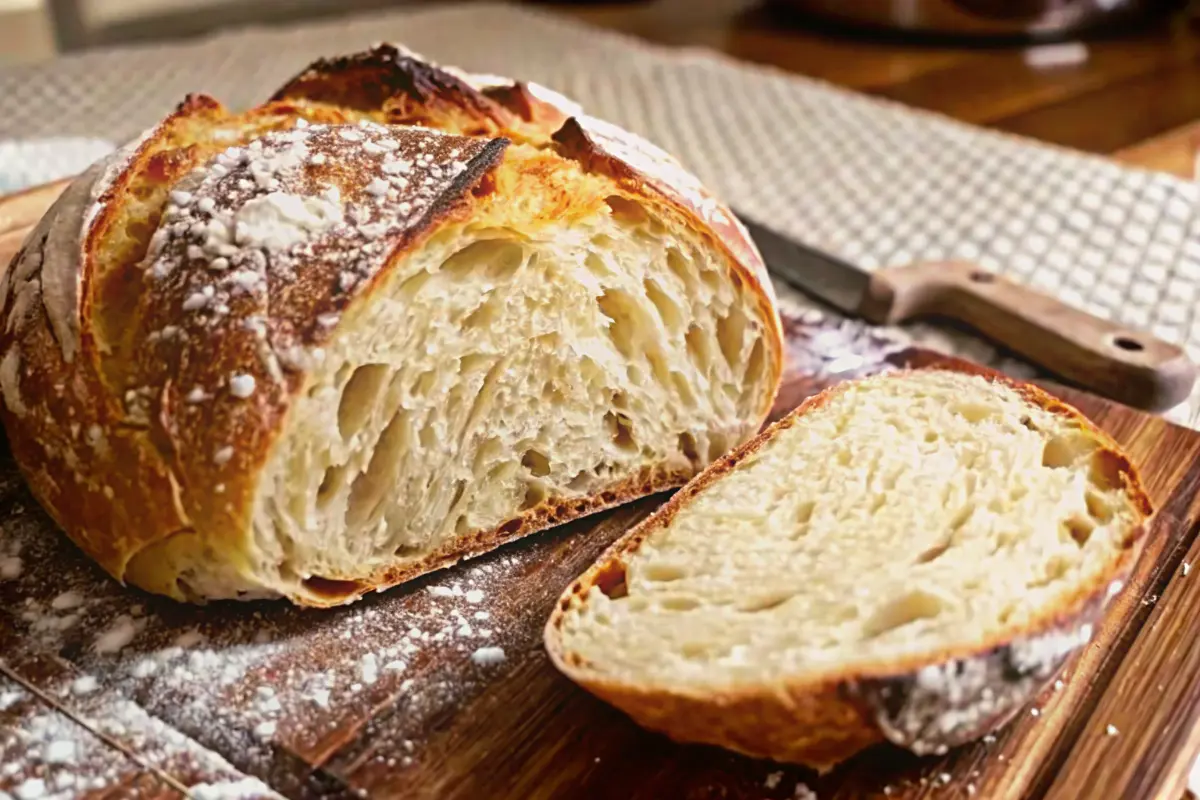
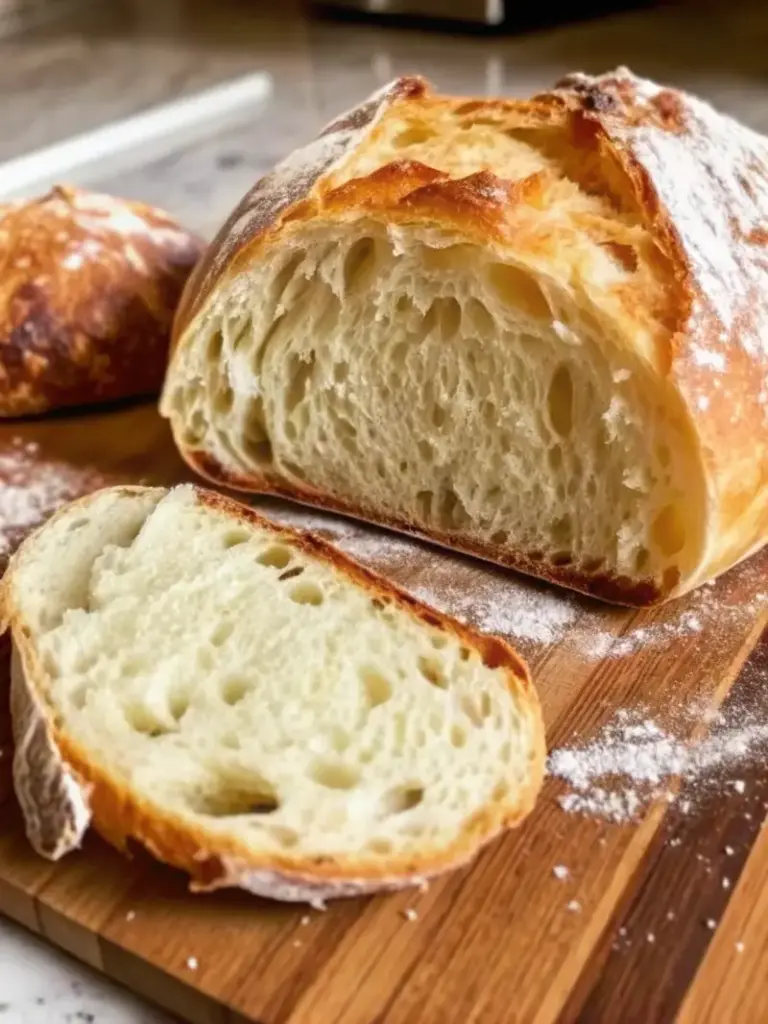
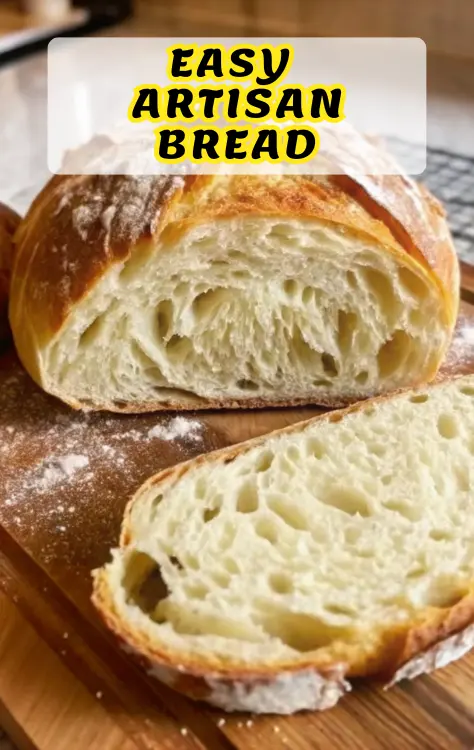
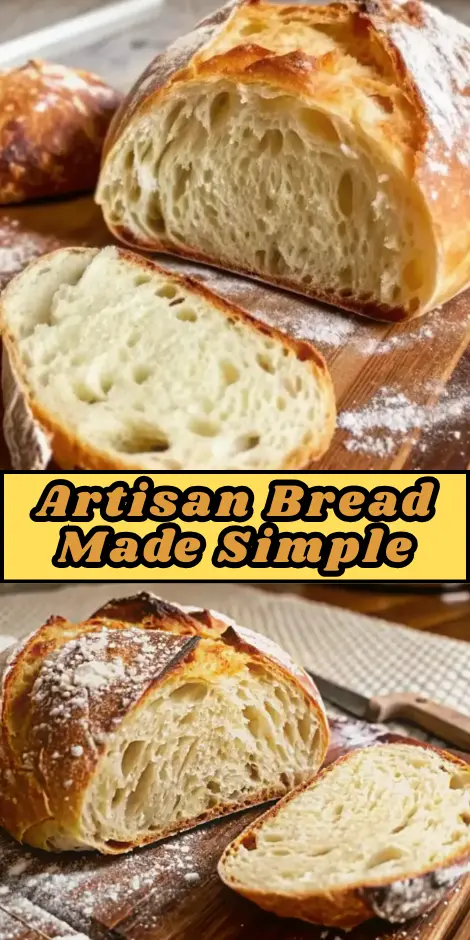
Preheat oven to 450°F (230°C) with Dutch oven inside. Carefully transfer dough (on parchment) into the hot Dutch oven, cover, and bake for 30 minutes. Remove lid and bake 15-20 minutes more until deep golden brown. The hollow sound when tapped indicates perfect doneness.
Pro Insight: The Dutch oven creates a steamy environment mimicking professional bread ovens, crucial for developing that signature artisan bread crust.
Nutritional Information
Per serving (1 slice, approximately 1/12 of loaf):
- Calories: 160
- Total Fat: 0.5g
- Sodium: 280mg
- Total Carbohydrates: 33g
- Dietary Fiber: 1g
- Sugars: 1g
- Protein: 5g
Unlike mass-produced breads loaded with preservatives and dough conditioners, this artisan bread recipe delivers clean nutrition through its simple ingredient profile. The longer fermentation process also enhances digestibility by breaking down complex carbohydrates and phytic acid, making nutrients more bioavailable.
Healthier Alternatives for the Recipe
- Whole Grain Boost: Substitute 1 cup all-purpose flour with whole wheat flour for added fiber and nutrients while maintaining structure
- Reduced Sodium: Decrease salt to 1 teaspoon for lower sodium content without compromising too much on flavor development
- Gluten-Friendly: For those with mild sensitivities, try a 50/50 blend of all-purpose and spelt flour, which has a different gluten structure
- Sugar-Free Option: Omit sugar entirely—the yeast will still activate, though slightly slower, creating a more neutral flavor profile
- Seeded Power: Add 2 tablespoons each of flax, chia, and sunflower seeds during mixing for omega-3s and crunch
Serving Suggestions
Artisan bread shines when paired thoughtfully. Try these combinations:
- Slice thickly and toast for avocado toast topped with microgreens and a drizzle of aged balsamic
- Transform into gourmet croutons by cubing day-old bread, tossing with olive oil and herbs, then baking until crisp
- Serve alongside a charcuterie board featuring aged cheeses, cured meats, and honey for dipping
- Create an open-faced sandwich with roasted vegetables and goat cheese for a sophisticated lunch option
Pro Tip: For the ultimate sensory experience, serve your artisan bread warm with high-quality olive oil and flaky sea salt—let the bread’s natural flavors take center stage.
Common Mistakes to Avoid
- Rushing the rise: Artisan bread requires time—skipping proper fermentation results in dense, flavorless loaves
- Over-flouring during shaping: Excess flour creates dry, crumbly texture; use bench scraper instead of additional flour when handling
- Cutting too soon: Wait at least 1 hour before slicing to allow crumb structure to set—premature cutting causes gummy texture
- Incorrect water temperature: Water above 130°F kills yeast; below 95°F slows activation significantly
- Skipping the Dutch oven: Baking directly on a sheet pan produces inferior crust development compared to the steam-retaining Dutch oven method
Storing Tips for the Recipe
Artisan bread’s lack of preservatives means proper storage is crucial. For optimal freshness:
- Store cooled bread cut-side down on a wooden board, covered with a clean kitchen towel—never in plastic which traps moisture and softens crust
- For longer storage, slice completely cooled bread and freeze in airtight bags for up to 3 months
- Revive day-old bread by spritzing with water and reheating in a 350°F oven for 5-10 minutes
- Avoid refrigeration, which accelerates staling through starch retrogradation
Conclusion
Artisan bread represents the beautiful marriage of simple ingredients, time-honored techniques, and patient craftsmanship. This accessible recipe delivers bakery-quality results with minimal ingredients and maximum flavor. Try this recipe today, share your baking journey in the comments, and subscribe for more artisan bread recipes that transform your kitchen into a professional bakery.
FAQs
Q: Can I make artisan bread without a Dutch oven?
A: Absolutely! Bake on a preheated baking stone or steel with a pan of boiling water on the oven floor to create steam. While results may vary slightly, you’ll still achieve excellent crust development.
Q: Why is my artisan bread dense?
A: Density typically results from under-proofing, insufficient gluten development, or cutting too soon. Ensure proper fermentation time and allow bread to cool completely before slicing.
Q: How can I tell when my bread is fully baked?
A: Look for deep golden brown color, hear a hollow sound when tapped on the bottom, and check internal temperature (190-210°F).
Q: Can I use sourdough starter instead of commercial yeast?
A: Yes, but adjust hydration and fermentation times. Substitute 100g active starter for the yeast/water/sugar mixture and expect longer rise times—this creates authentic sourdough artisan bread.
Q: Why does artisan bread have a shorter shelf life?
A: Without preservatives, artisan bread stales faster but remains delicious for 2-3 days. The natural acidity from longer fermentation actually extends shelf life compared to commercial breads with similar ingredients.
Healthy Artisan Bread Made Simple Recipe
- Total Time: 3 hours
- Yield: 1 artisan loaf 1x
Description
Artisan bread is a return to authentic craftsmanship, celebrating simple ingredients, slow fermentation, and bakery-quality texture achievable right at home.
Ingredients
- 3 cups all-purpose flour
- 1.5 teaspoons sea salt
- 1 teaspoon sugar
- 1 packet (2¼ teaspoons) active dry yeast
- 1.25 cups warm water (110°F)
Instructions
- Combine warm water, sugar, and yeast; let sit 5–10 minutes until frothy.
- Whisk flour and salt, then add yeast mixture to form a shaggy dough; rest 20 minutes.
- Perform stretch-and-folds every 30 minutes for 2 hours, then let rise until doubled.
- Shape dough into a boule and proof 30–60 minutes.
- Preheat Dutch oven to 450°F, bake covered 30 minutes, uncovered 15–20 more until golden.
Notes
For deeper flavor, cold-ferment the dough overnight. Ensure proper proofing to achieve an airy, open crumb.
- Prep Time: 20 minutes
- Cook Time: 45 minutes
- Category: Bread
- Method: Baking
- Cuisine: Artisan
Nutrition
- Serving Size: 1 slice
- Calories: 160
- Sugar: 1g
- Sodium: 280mg
- Fat: 0.5g
- Saturated Fat: 0g
- Unsaturated Fat: 0.5g
- Trans Fat: 0g
- Carbohydrates: 33g
- Fiber: 1g
- Protein: 5g
- Cholesterol: 0mg
Keywords: artisan bread, homemade bread, Dutch oven bread, bakery style bread